Page 215 of 687

Downloaded from www.Manualslib.com manuals search engine 3D-42 FRONT SUSPENSION
9) Install right and left axle shafts to axle housing (for 4WD).
Install knuckle to axle housing (for 2WD).
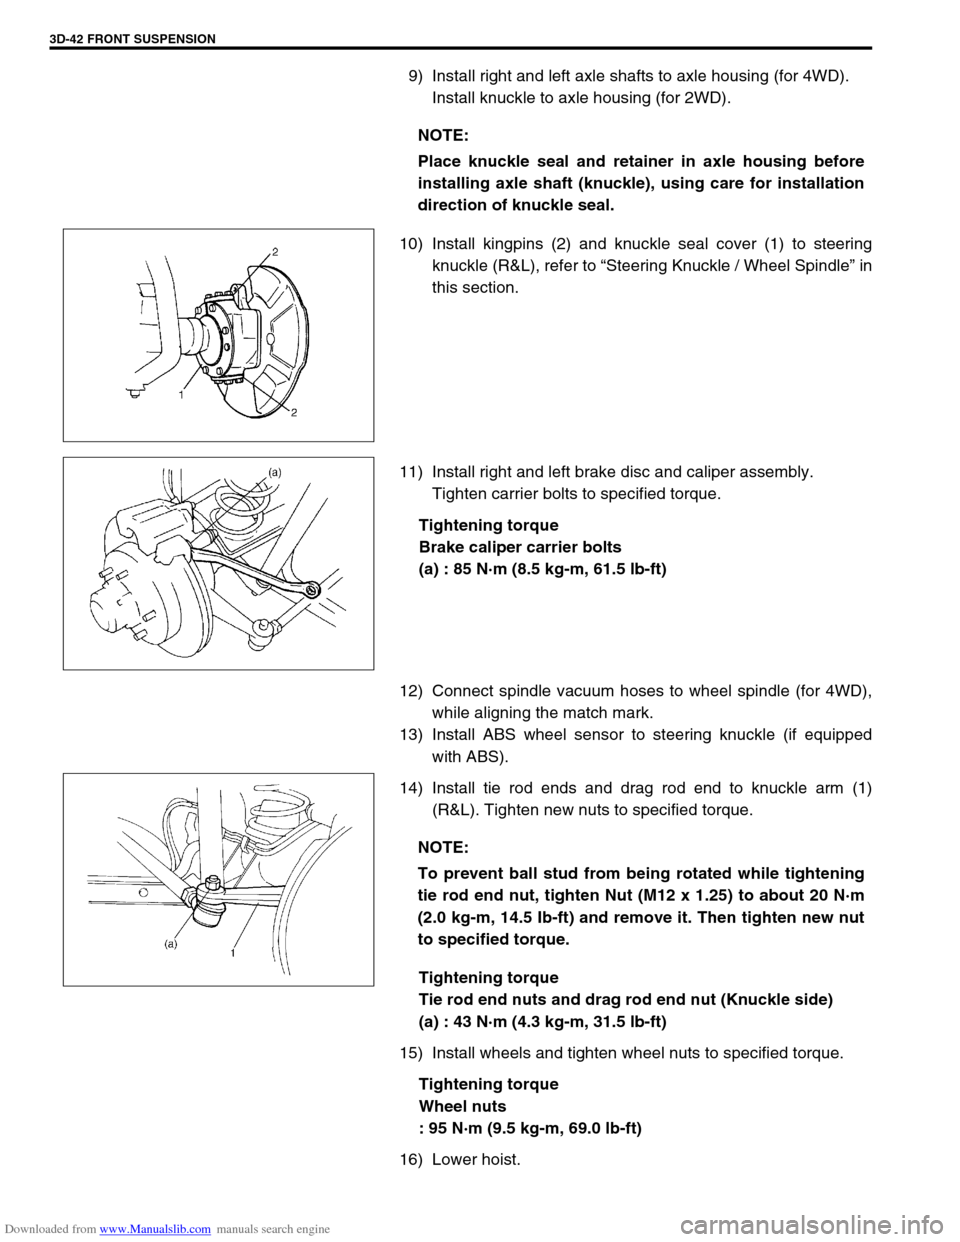
10) Install kingpins (2) and knuckle seal cover (1) to steering
knuckle (R&L), refer to “Steering Knuckle / Wheel Spindle” in
this section.
11) Install right and left brake disc and caliper assembly.
Tighten carrier bolts to specified torque.
Tightening torque
Brake caliper carrier bolts
(a) : 85 N·m (8.5 kg-m, 61.5 lb-ft)
12) Connect spindle vacuum hoses to wheel spindle (for 4WD),
while aligning the match mark.
13) Install ABS wheel sensor to steering knuckle (if equipped
with ABS).
14) Install tie rod ends and drag rod end to knuckle arm (1)
(R&L). Tighten new nuts to specified torque.
Tightening torque
Tie rod end nuts and drag rod end nut (Knuckle side)
(a) : 43 N·m (4.3 kg-m, 31.5 lb-ft)
15) Install wheels and tighten wheel nuts to specified torque.
Tightening torque
Wheel nuts
: 95 N·m (9.5 kg-m, 69.0 lb-ft)
16) Lower hoist.NOTE:
Place knuckle seal and retainer in axle housing before
installing axle shaft (knuckle), using care for installation
direction of knuckle seal.
NOTE:
To prevent ball stud from being rotated while tightening
tie rod end nut, tighten Nut (M12 x 1.25) to about 20 N·m
(2.0 kg-m, 14.5 Ib-ft) and remove it. Then tighten new nut
to specified torque.
Page 216 of 687
Downloaded from www.Manualslib.com manuals search engine FRONT SUSPENSION 3D-43
17) Tighten lateral rod (1) mounting bolt and nut to specified
torque.
Tightening torque
Lateral rod bolt and nut
(a) : 90 N·m (9.0 kg-m, 65.0 lb-ft)
18) Tighten right and left shock absorber lower mounting nuts
and leading arm mounting nuts to specified torque.
Tightening torque
Shock absorber lower nuts and leading arm nuts
(a) : 90 N·m (9.0 kg-m, 65.0 lb-ft)
19) Refill front axle (differential) housing with new specified gear
oil. Refer to “Maintenance Service” in Section 7E for refill.
20) Confirm front end (wheel) alignment referring to “Preliminary
Checks Prior to Adjusting Front Alignment” in Section 3A. NOTE:
When tightening bolt and nut, be sure that vehicle is off
hoist and in non loaded condition.
NOTE:
When tightening these nuts, be sure that vehicle is off
hoist and in non loaded condition.
1. Shock absorber
2. Leading arm
Page 220 of 687

Downloaded from www.Manualslib.com manuals search engine REAR SUSPENSION 3E-1
6F1
6F2
6G
1A
6K
7A
7A1
7B1
3E
8A
8B
8A
8B
8C
8D
8E
9
10
10A
10B
SECTION 3E
REAR SUSPENSION
CONTENTS
General Description ....................................... 3E-2
Diagnosis ........................................................ 3E-3
Diagnosis Table ........................................... 3E-3
Rear Shock Absorber Check ........................ 3E-3
Trailing Arm, Lateral Rod, Axle Housing
and Coil Spring Check ................................. 3E-3
Trailing Arm and Lateral Rod Bush Check ... 3E-3
Rear Suspension Fasteners ......................... 3E-4
Bearing Retainer and Axle Shaft Oil Seal
Check ........................................................... 3E-4
Bump Stopper and Spring Rubber Seat
Check ........................................................... 3E-4
Wheel Disc, Nut and Bearing Check ............ 3E-4On-Vehicle Service ........................................ 3E-5
Rear Shock Absorber................................... 3E-5
Coil Spring ................................................... 3E-6
Bump Stopper .............................................. 3E-9
Lateral Rod .................................................. 3E-9
Trailing Arm / Bushing................................ 3E-10
Rear Axle Shaft and Wheel Bearing .......... 3E-12
Rear Axle Shaft Inner Oil Seal ................... 3E-17
Rear Axle Housing ..................................... 3E-18
Tightening Torque Specifications .............. 3E-22
Required Service Materials ......................... 3E-22
Special Tools ................................................ 3E-23
WARNING:
When hoisting vehicle, be sure to select the lifting point suitable for the service work referring to Sec-
tion 0A.
NOTE:
All suspension fasteners are an important attaching part in that it could affect the performance of
vital parts and systems, and/or could result in major repair expense. They must be replaced with
one of the same part number or with an equivalent part if replacement becomes necessary. Do not
use a replacement part of lesser quality or substitute design. Torque values must be used as speci-
fied during reassembly to assure proper retention of this part.
Never attempt to heat, quench or straighten any suspension part. Replace it with a new part, or
damage to the part may result.
Page 221 of 687
Downloaded from www.Manualslib.com manuals search engine 3E-2 REAR SUSPENSION
General Description
1. Rear axle housing 4. Bearing oil seal 7. Brake drum 10. Bump stopper
2. Rear wheel bearing 5. Oil seal protector 8. Rear axle shaft 11. Coil spring
3. Bearing retainer ring 6. Lateral rod 9. Shock absorber 12. Trailing arm
Page 222 of 687

Downloaded from www.Manualslib.com manuals search engine REAR SUSPENSION 3E-3
Diagnosis
Diagnosis Table
Refer to “Diagnosis Table” in Section 3.
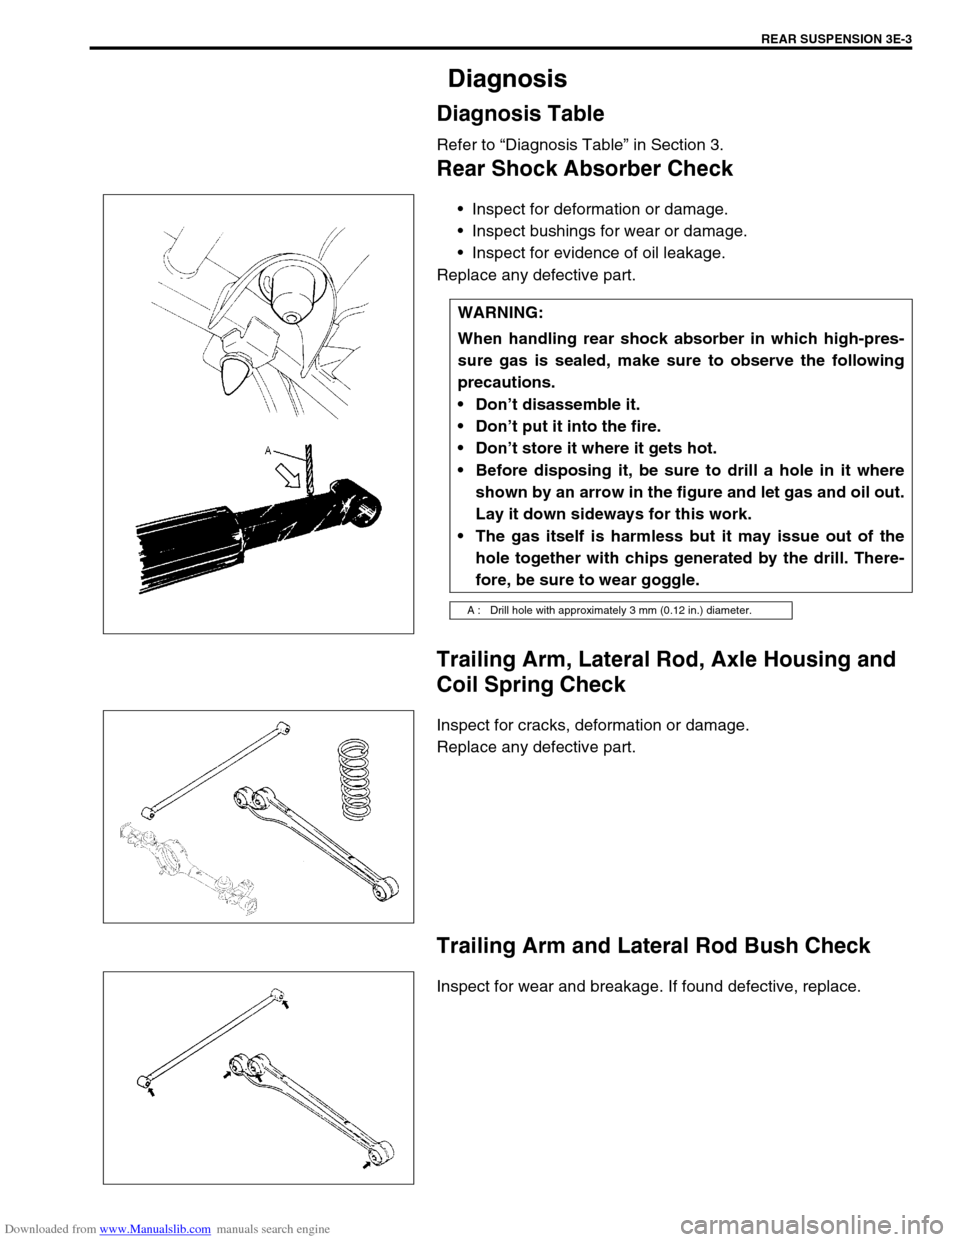
Rear Shock Absorber Check
Inspect for deformation or damage.
Inspect bushings for wear or damage.
Inspect for evidence of oil leakage.
Replace any defective part.
Trailing Arm, Lateral Rod, Axle Housing and
Coil Spring Check
Inspect for cracks, deformation or damage.
Replace any defective part.
Trailing Arm and Lateral Rod Bush Check
Inspect for wear and breakage. If found defective, replace.WARNING:
When handling rear shock absorber in which high-pres-
sure gas is sealed, make sure to observe the following
precautions.
Don’t disassemble it.
Don’t put it into the fire.
Don’t store it where it gets hot.
Before disposing it, be sure to drill a hole in it where
shown by an arrow in the figure and let gas and oil out.
Lay it down sideways for this work.
The gas itself is harmless but it may issue out of the
hole together with chips generated by the drill. There-
fore, be sure to wear goggle.
A : Drill hole with approximately 3 mm (0.12 in.) diameter.
Page 223 of 687

Downloaded from www.Manualslib.com manuals search engine 3E-4 REAR SUSPENSION
Rear Suspension Fasteners
Check each bolt and nut fastening suspension parts for tightness.
Tighten loose one, if any, to specified torque, referring to “Tighten-
ing Torque Specifications” of this section.
Bearing Retainer and Axle Shaft Oil Seal
Check
When brake drum has been removed, check inside of brake
drum for gear oil leakage.
Also, check backside of brake back plate for oil leakage.If oil
leakage is found, replace defective oil seal.
Whenever it is possible to check oil seal during disassembly,
check its lip for wear.
If oil leakage or worn lip is found, replace defective oil seal.
Bump Stopper and Spring Rubber Seat Check
Inspect for wear and breakage. If found defective, replace.
Wheel Disc, Nut and Bearing Check
Inspect each wheel disc for dents, distortion and cracks. A
disc in badly damaged condition must be replaced.
Check wheel hub nuts for tightness and, as necessary,
retighten to specification.
Tightening torque
Wheel nuts
(a) : 95 N·m (9.5 kg-m, 69.0 lb-ft)
Page 224 of 687
Downloaded from www.Manualslib.com manuals search engine REAR SUSPENSION 3E-5
Check wheel bearings for wear. When measuring thrust
play, apply a dial gauge to axle shaft center after removing
wheel center cap from wheel disc.
When measurement exceeds limit, replace bearing.
Rear wheel bearing thrust play limit
: 0.8 mm (0.03 in.)
By rotating wheel actually, check wheel bearing for noise and
smooth rotation. If it is defective, replace bearing.
On-Vehicle Service
Rear Shock Absorber
The shock absorber is non-adjustable, non-refillable, and cannot be disassembled. The only service the shock
absorber requires is replacement when it has lost its resistance, is damaged, or leaking fluid.
REMOVAL
1) Hoist vehicle.
2) Support rear axle housing (1) by using floor jack (2) to pre-
vent it from lowering.
WARNING:
When discarding shock absorber, be sure to refer to instructions in “Rear Shock Absorber Check” in
this section for proper procedure as it is gas sealed type.
Page 225 of 687
Downloaded from www.Manualslib.com manuals search engine 3E-6 REAR SUSPENSION
3) Remove upper mounting bolt (2).
4) Remove lower mounting bolt (3).
5) Remove shock absorber (1).
INSTALLATION
1) Install shock absorber (1), refer to figure for proper installing
direction of bush and washer (2).
Tighten bolts (3) temporarily by hand.
2) Remove floor jack.
3) Lower hoist.
4) Tighten shock absorber bolts (3) to specified torque.
Tightening torque
Shock absorber upper and lower bolts
(a) : 85 N·m (8.5 kg-m, 61.5 lb-ft)
Coil Spring
REMOVAL
1) Hoist vehicle and remove wheel.
2) Support rear axle housing (1) by using floor jack (2).
3) Remove brake flexible hose E-ring (2).
NOTE:
Tighten lower bolt with vehicle off hoist and in non-
loaded condition.
1. Brake flexible hose