2005 SUBARU LEGACY stop start
[x] Cancel search: stop startPage 304 of 627

5-49
Audio
– CONTINUED –
"Fast-reversing
Press the “ ” side of the TUNE/TRACK button con-
tinuously for more than 0.5 second to fast-reverse the disc/folder.
Release the button to stop fast-reversing.
NOTE
If you fast-reverse to the beginning of the first
track/file (track), fast-reversing will stop and the
player will start playback. !
Repeating
" To repeat the currently playing track/file (track)
To repeat a track/file (track), briefly press the “RPT”
button while the track/file (track) is playing. The dis-
play will show “RPT”, and the track/file (track) will be
repeated.
To cancel the track/file (track) repeat-play mode, brief-
ly press the “RPT” button twice. The “RPT” indication
will go off, and the normal playback mode will be re- sumed.
NOTE " Each time you briefly press the button, the mode
will change to the next one in the sequence shown
TUNE
TRACK
UB5211CA
RPT
RDM
UB5217BA
Page 356 of 627

7-1
7
Starting and operating
Fuel ................................................................ 7-2 Fuel requirements ............................................. 7-2
Fuel filler lid and cap ........................................ 7-4
State emission testing (U.S. only) ............... 7-8
Preparing to drive ......................................... 7-10
Starting the engine ....................................... 7-10 Manual transmission vehicle ........................... 7-10
Automatic transmission vehicle ...................... 7-11
Stopping the engine ..................................... 7-12
Manual transmission .................................... 7-13 Shifting speeds ................................................. 7-14
Driving tips ........................................................ 7-15
Automatic transmission – 4 speed ............. 7-16 Selector lever .................................................... 7-17
Selector lever reverse inhibiting function ...... 7-19
Selection of manual mode ............................... 7-20
Maximum speeds .............................................. 7-21
Driving tips ........................................................ 7-23
SPORT mode ..................................................... 7-23
Shift lock release .............................................. 7-24
Automatic transmission – 5 speed ............. 7-25 Selector lever .................................................... 7-26
Selector lever reverse inhibiting function ...... 7-28
Selection of manual mode ............................... 7-30
Maximum speeds .............................................. 7-32
Driving tips ........................................................ 7-33
SPORT mode ..................................................... 7-34
Shift lock release .............................................. 7-35
Rear viscous limited slip differential (LSD) (if equipped) .............................................. 7-36 Power steering .............................................. 7-36
Braking ........................................................... 7-37
Braking tips ....................................................... 7-37
Brake system .................................................... 7-37
Disc brake pad wear warning indicators ........ 7-38
ABS (Anti-lock Brake System) ..................... 7-38 ABS system self-check .................................... 7-39
ABS warning light ............................................. 7-39
Electronic Brake Force Distribution (EBD) system ........................................................ 7-41Steps to take if EBD system fails .................... 7-41
Vehicle Dynamics Control system (if equipped) ............................................... 7-43Vehicle Dynamics Control system monitor .... 7-45
Vehicle Dynamics Control OFF switch ........... 7-48
Tire pressure monitoring system (TPMS) (if equipped) ............................................... 7-49
Parking your vehicle ..................................... 7-51
Cruise control ................................................ 7-53 To set cruise control ........................................ 7-53
To temporarily cancel the cruise control ....... 7-55
To turn off the cruise control ........................... 7-56
To change the cruising speed ......................... 7-56
Cruise control indicator light ........................... 7-57
Cruise control set indicator light .................... 7-58
Page 361 of 627

7-6
Starting and operating
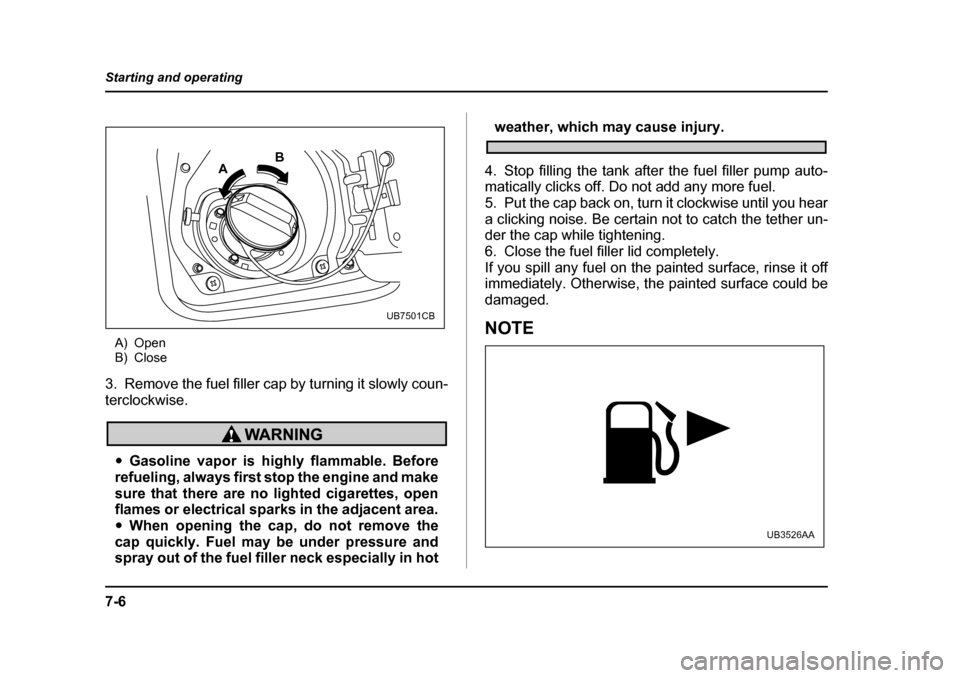
A) Open
B) Close
3. Remove the fuel filler cap by turning it slowly coun-
terclockwise.
" Gasoline vapor is highly flammable. Before
refueling, always first stop the engine and make
sure that there are no lighted cigarettes, open
flames or electrical sparks in the adjacent area. " When opening the cap, do not remove the
cap quickly. Fuel may be under pressure and
spray out of the fuel filler neck especially in hot
weather, which may cause injury.
4. Stop filling the tank after the fuel filler pump auto-
matically clicks off. Do not add any more fuel.
5. Put the cap back on, turn it clockwise until you hear
a clicking noise. Be certain not to catch the tether un-
der the cap while tightening.
6. Close the fuel filler lid completely.
If you spill any fuel on the painted surface, rinse it off
immediately. Otherwise, the painted surface could be
damaged.
NOTE
A B
UB7501CB
UB3526AA
Page 365 of 627

7-10
Starting and operating
Preparing to drive
You should perform the following checks and adjust-
ments every day before you start driving.
1. Check that all windows, mirrors, and lights are
clean and unobstructed.
2. Check the appearance and condition of the tires.
Also check tires for proper inflation.
3. Look under the vehicle for any sign of leaks.
4. Check that the hood, trunk and rear gate are fullyclosed.
5. Check the adjustment of the seat.
6. Check the adjustment of the inside and outside mir-rors.
7. Fasten your seatbelt. Check that your passengers
have fastened their seatbelts.
8. Check the operation of the warning and indicator
lights when the ignition switch is turned to the “ON” po- sition.
9. Check the gauges, indicator and warning lights af-
ter starting the engine.
NOTE
Engine oil, engine coolant, brake fluid, washer flu-
id and other fluid levels should be checked daily,
weekly or at fuel stops.
Starting the engine
Do not operate the starter motor continuously
for more than ten seconds. If the engine fails to
start after operating the starter for five to ten
seconds, wait for ten seconds or more before
trying again.
! Manual transmission vehicle
1. Apply the parking brake.
2. Turn off unnecessary lights and accessories.
3. Press the clutch pedal to the floor and shift the shift
lever into neutral.
Hold the clutch pedal to the floor while starting the en-
gine. The starter motor will only operate when the
clutch pedal is pressed fully to the floor.
4. Turn the ignition switch to the “ON” position and
check the operation of the warning and indicator lights.
Refer to the “Warning and indicator lights” section
(chapter 3).
5. Turn the ignition switch to the “START” position
without depressing the accelerator pedal. Release
the key immediately after the engine has started.
Page 367 of 627

7-12
Starting and operating
Release the accelerator pedal as soon as the en-
gine starts.
2) If this fails to start the engine, turn the ignition
switch back to the “OFF” position and wait for at
least 10 seconds. Then fully depress the accelerator
pedal and turn the ignition switch to the “START”
position. If the engine starts, quickly release the ac-
celerator pedal.
3) If this fails to start the engine, turn the ignition
switch again to the “OFF” position. After waiting for
10 seconds or longer, turn the ignition switch to the
“START” position without depressing the accelera-
tor pedal.
4) If the engine still refuses to start, contact your
nearest SUBARU dealer for assistance.
6. Confirm that all warning and indicator lights have
gone out after the engine has started. The fuel injec-
tion system automatically lowers the idle speed as the
engine warms up.
While the engine is warming up, make sure that the
selector lever is at the “P” or “N” position and that the
parking brake is applied.Stopping the engine
Do not stop the engine when the vehicle is mov-
ing. This will cause loss of power to the power
steering and the brake booster, making steer-
ing and braking more difficult. It could also re-
sult in accidental activation of the “LOCK” po-
sition on the ignition switch, causing the steer-
ing wheel to lock.
The ignition switch should be turned off only when the
engine is idling.
Page 368 of 627

7-13
Starting and operating
– CONTINUED –
Manual transmission
Do not drive the vehicle with the clutch disen-
gaged (i.e., when the clutch pedal is depressed)
or with the shift lever in the neutral position.
Engine braking has no effect in either of these
conditions and the risk of an accident is conse-
quently increased.
Shift into reverse ONLY when the vehicle has
completely stopped. It may cause damage to
the transmission to try shifting into reverse
when the vehicle is moving.
The manual transmission is a fully synchromeshed, 5-
forward-speed and 1-reverse-speed transmission. The shift pattern is shown on the shift lever knob.
When shifting from 5th gear to reverse gear, first re-
turn the shift lever to the neutral position then shift intoreverse gear.
To change gears, fully depress the clutch pedal, move
the shift lever, and gradually let up on the clutch pedal.
If it is difficult to shift into gear, put the transmission in
neutral, release the clutch pedal momentarily, and
then try again.
UB7521BA
Page 371 of 627

7-16
Starting and operating
Automatic transmission – 4 speed
The automatic transmission is electronically controlled
and provides 4 forward speeds and 1 reverse speed.
Also, it has a manual mode and a SPORT mode.
Do not shift from the “P” or “N” position into
the “D” or “R” position while depressing the ac-
celerator pedal. This may cause the vehicle to
jump forward or backward.
"
Shift into the “P” or “R” position only after
the vehicle is completely stopped. Shifting
while the vehicle is moving may cause damage
to the transmission. " Do not race the engine for more than five sec-
onds in any position except the “N” or “P” po-
sition when the brake is set or when wheels are
used blocks. This may cause the automatic
transmission fluid to overheat." Avoid shifting from one of the forward driving
positions into the “R” position or vice versa un- til the vehicle has completely stopped. Such
shifting may cause damage to the transmis-
sion.
NOTE
Immediately after ATF (automatic transmission
fluid) is replaced, you may feel that the automatic
transmission operation is somewhat unusual.
This results from invalidation of data which the
on-board computer has collected and stored inmemory to allow the transmission to shift at the
most appropriate times for the current condition
of your vehicle. Optimized shifting will be restored
as the vehicle continues to be driven for a while.
Page 372 of 627

7-17
Starting and operating
– CONTINUED –
!Selector lever
: Shift possible with brake pedal depressed
: Shift possible with brake pedal not depressed
The selector lever has four positions, “P”, “R”, “N”, “D”
and also has manual gate for using “SPORT” mode or
manual mode. ! P (Park)
This position is for parking the vehicle and starting the
engine.
In this position, the transmission is mechanically
locked to prevent the vehicle from rolling freely.
When you park the vehicle, first set the parking brake fully, then shift into the “P” position. Do not hold the ve-
hicle with only the transmission.
To shift the selector lever from the “P” to any other po-
sition, you should depress the brake pedal fully then
move the selector lever. This prevents the vehicle
from lurching when it is started. !
R (Reverse)
This position is for backing the vehicle.
To shift from the “N” to “R” position, stop the vehicle
completely then move the lever to the “R” position. ! N (Neutral)
This position is for restarting a stalled engine.
In this position the wheels and transmission are not
locked. In this position, the transmission is neutral; the
vehicle will roll freely, even on the slightest incline un-
less the parking brake or foot brake is on.
Avoid coasting with the transmission neutral.
During coasting, there is no engine braking effect.
NOTE
If the selector lever is in the “N” position when you
stop the engine for parking, you may not subse-
quently be able to move it to the “R” and “P” posi-tions. If this happens, turn the ignition switch to
the “ON” position. You will then be able to move
UB7522BA