Page 76 of 477
1-43
Seat, seatbelt and SRS airbags
– CONTINUED –
8. If the child restraint system requires a top tether,
latch the hook onto the top tether anchor and tighten
the top tether. See the “Top tether anchorages” for ad-
ditional instructions. 9. To remove the child restraint system, press the re-
lease button on the seatbelt buckle and allow the belt
to retract completely. The belt will return to the ELR
mode. Unhook the top tether hook from the top tether
anchor.
NOTE
When the child restraint system is no longer in
use, remove it and restore the ELR function of the
retractor. That function is restored by allowing the
seatbelt to retract fully.
US1594BAUG1094BA
Page 77 of 477

1-44
Seat, seatbelt and SRS airbags
�„
Installing a booster seat
�yChild restraint systems and seatbelts can be-
come hot in a vehicle that has been closed up
in sunny weather; they could burn a small child.
Check the child restraint system before you
place a child in it. �y Do not leave an unsecured child restraint
system in your vehicle. Unsecured child re-
straint systems can be thrown around inside of
the vehicle in a sudden stop, turn or accident; it
can strike and injure vehicle occupants as well
as result in serious injuries or death to the
child.
When you install a child restraint system, fol-
low the manufacturer’s instructions supplied
with it. After installing the child restraint sys-
tem, check to ensure that it is held securely in
position. If it is not held tight and secure, the
danger of your child suffering personal injury in
the event of an accident may be increased.
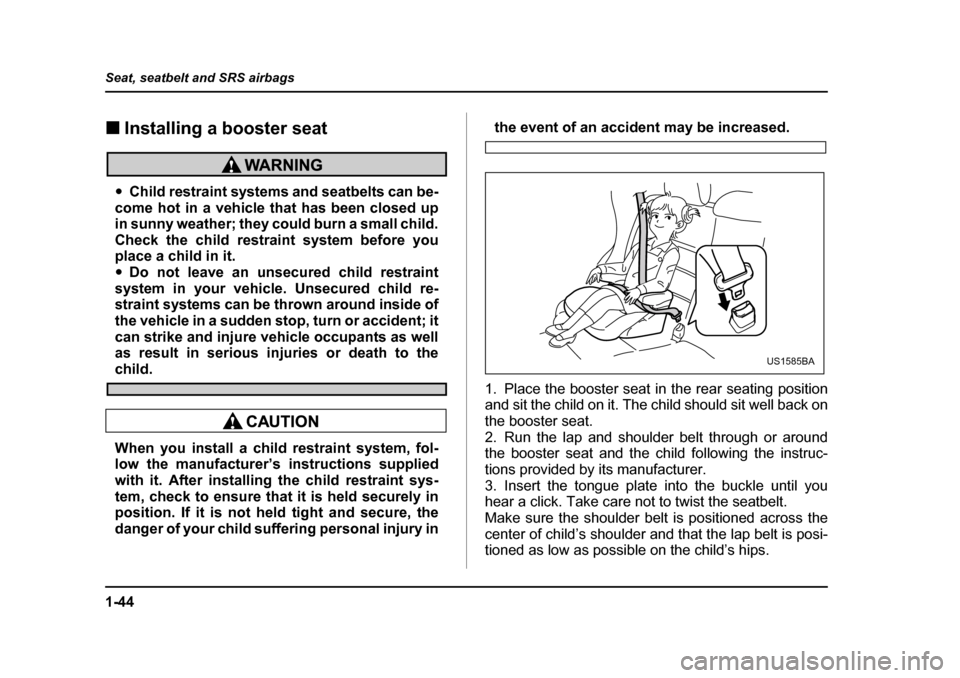
1. Place the booster seat in the rear seating position
and sit the child on it. The child should sit well back on
the booster seat.
2. Run the lap and shoulder belt through or around
the booster seat and the child following the instruc-
tions provided by its manufacturer.
3. Insert the tongue plate into the buckle until you
hear a click. Take care not to twist the seatbelt.
Make sure the shoulder belt is positioned across the
center of child’s shoulder and that the lap belt is posi-
tioned as low as possible on the child’s hips.
US1585BA
Page 78 of 477

1-45
Seat, seatbelt and SRS airbags
– CONTINUED –
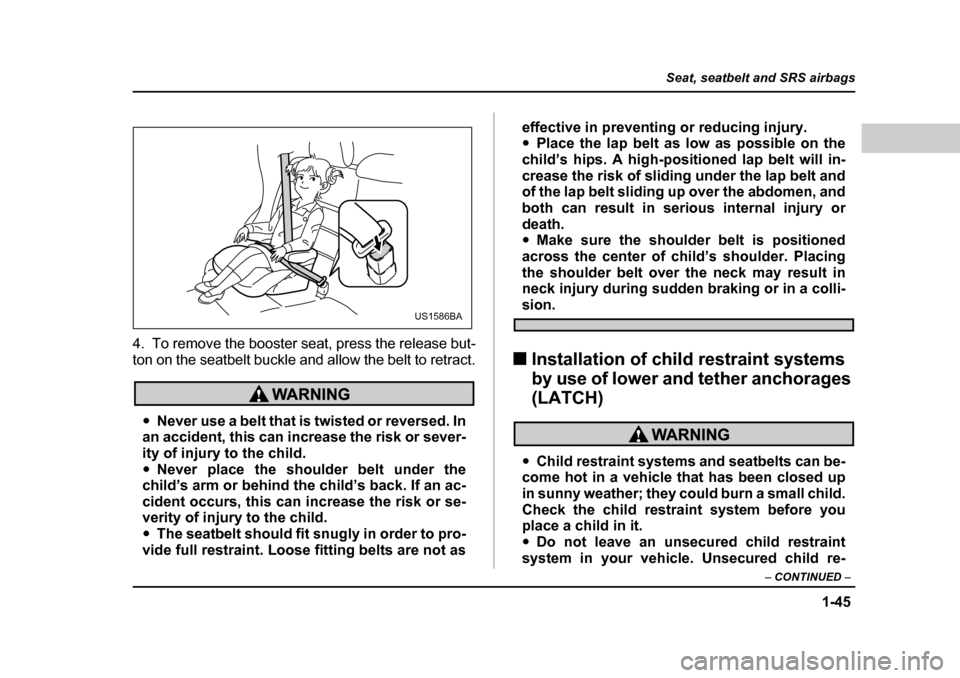
4. To remove the booster seat, press the release but-
ton on the seatbelt buckle and allow the belt to retract.
�yNever use a belt that is twisted or reversed. In
an accident, this can increase the risk or sever-
ity of injury to the child. �y Never place the shoulder belt under the
child’s arm or behind the child’s back. If an ac-
cident occurs, this can increase the risk or se-
verity of injury to the child.�y The seatbelt should fit snugly in order to pro-
vide full restraint. Loose fitting belts are not as effective in preventing or reducing injury.�y
Place the lap belt as low as possible on the
child’s hips. A high-positioned lap belt will in-
crease the risk of sliding under the lap belt and
of the lap belt sliding up over the abdomen, and
both can result in serious internal injury or
death. �y Make sure the shoulder belt is positioned
across the center of child’s shoulder. Placing
the shoulder belt over the neck may result in
neck injury during sudden braking or in a colli-
sion.
�„ Installation of child restraint systems
by use of lower and tether anchorages (LATCH)
�yChild restraint systems and seatbelts can be-
come hot in a vehicle that has been closed up
in sunny weather; they could burn a small child.
Check the child restraint system before you
place a child in it.�y Do not leave an unsecured child restraint
system in your vehicle. Unsecured child re-
US1586BA
Page 79 of 477

1-46
Seat, seatbelt and SRS airbags
straint systems can be thrown around inside of
the vehicle in a sudden stop, turn or accident; it
can strike and injure vehicle occupants as well
as result in serious injuries or death to the
child.
When you install a child restraint system, fol-
low the manufacturer’s instructions supplied
with it. After installing the child restraint sys-
tem, check to ensure that it is held securely in
position. If it is not held tight and secure, the
danger of your child suffering personal injury in
the event of an accident may be increased.
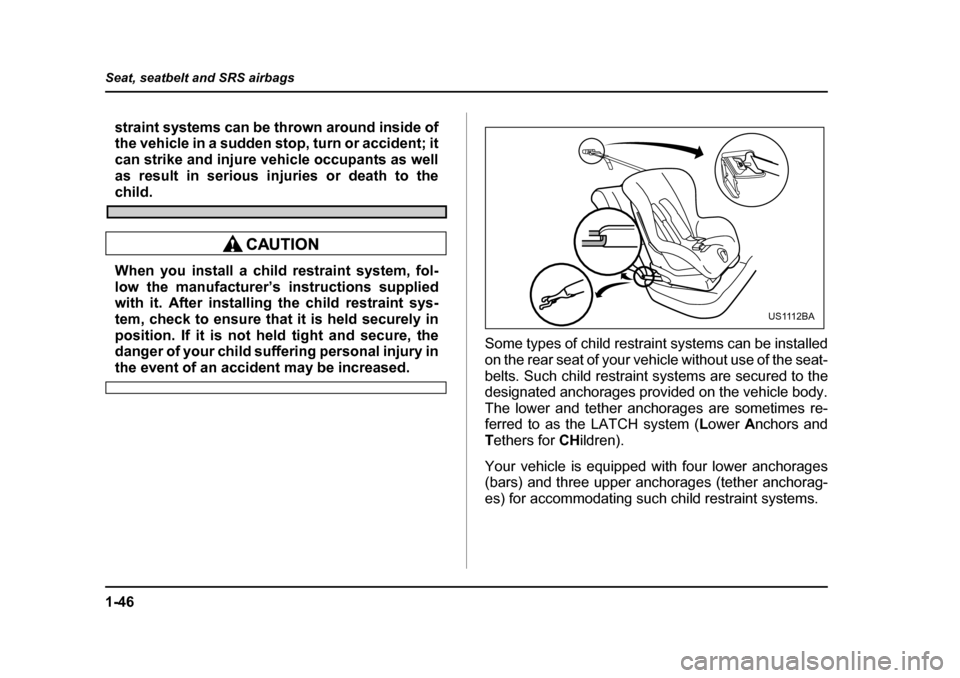
Some types of child restraint systems can be installed
on the rear seat of your vehicle without use of the seat-
belts. Such child restraint systems are secured to the
designated anchorages provided on the vehicle body.
The lower and tether anchorages are sometimes re-
ferred to as the LATCH system (
Lower Anchors and
T ethers for CHildren).
Your vehicle is equipped with four lower anchorages
(bars) and three upper anchorages (tether anchorag-
es) for accommodating such child restraint systems.
US1112BA
Page 80 of 477
1-47
Seat, seatbelt and SRS airbags
– CONTINUED –
The lower anchorages (bars) are used for installing a
child restraint system only on the rear seat window-
side seating positions. For each window-side seating
position, two lower anchorages are provided.
Each anchor bar is located where the seat cushion
meets the seatback. The tether anchorages (upper anchorages) are pro-
vided for all the seating positions (middle and both
window-side ones) of the rear seat.
HS1076BAHS1077BA
Page 81 of 477
1-48
Seat, seatbelt and SRS airbags
You will find marks “ ” at the bottom of the rear
seat seatbacks. These marks indicate the positions of
the lower anchorages (bars).
Each lower anchorage is located where the seat cush-
ion meets the seatback.
1. Use the “ ” marks to locate the two lower an-
chorages (bars) for the position where you want to in-
stall the child restraint system.
HS1078BAHS1079BA
Page 82 of 477
1-49
Seat, seatbelt and SRS airbags
– CONTINUED –
2. While following the instructions supplied by the
child restraint system manufacturer, connect the lower
hooks onto the lower anchorages located at “ ”
marks on the bottom of the rear seatback. When the
hooks are connected, make sure the adjacent seat-
belts are not caught. 3. [If your child restraint system is of a flexible attach-
ment type (which uses tether belts to connect the child
restraint system properly to the lower anchorages)]
While pushing the child restraint into the seat cushion,
pull both left and right lower tether belts up to secure
the child restraint system firmly by taking up the slack
in the belt.
4. Connect the top tether hook to the tether anchor-
age and firmly tighten the tether.
For information on how to set the top tether, read the
following “Top tether anchorages”.
US1588CAUG1098BA
Page 83 of 477
1-50
Seat, seatbelt and SRS airbags
5. Before seating a child in the child restraint system,
try to move seat back and forth and left and right to
verify that it is held securely in position.
6. To remove the child restraint system, follow the re-
verse procedures of installation.
If you have any question concerning this type of child
restraint system, ask your SUBARU dealer. �„
Top tether anchorages
Your vehicle is equipped with three top tether anchor-
ages so that a child restraint system having a top teth-
er can be installed in the rear seat. When installing a
child restraint system using top tether, proceed as fol- lows, while observing the instructions by the child re-
straint system manufacturer.
Since a top tether can provide additional stability by of-
fering another connection between a child restraint
system and the vehicle, we recommend that you use
a top tether whenever one is required or available.
US1113BA