Page 25 of 49
Navigation
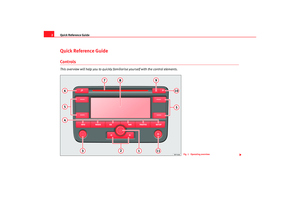
24Preparing the destination guideTo enter the trip destination
To calculate the route an address, special destination or coordinates may be ent ered.
Fig. 12 Entering destinationFig. 13 To enter characters
Radionaveg300_angles Seite 24 Donnerstag, 13. Oktober 2005 11:48 11
Page 26 of 49

Navigation25
If the menu Route planning menu is displayed instead of the
previous menu, then the option Route with intermediate
destination must be deactivated in the menu ⇒page 29.
Pressing a menu with information on the actual loca tion
of the vehicle can be accessed ⇒ page 25, “Navigation menu func-
tion buttons”.
To access the navigation menu and enter a destination
– Press the button. The main NAVIGATION menu appears
⇒ page 24, fig. 12.
– Select how you would like to enter the destination an d press the
menu button ( ⇒page 25, “Methods of entering a destination”).
– To enter a new address, select the country in the list afte r
pushing the Countr y . The previously used address is erased and
a town and post code are entered To w n / P C.
– Press the menus button to access the selection screen ⇒page 24, fig. 13. To enter characters, proceed as follows :
To enter characters
– After selecting an entry (in the example To w n / P C) select charac-
ters by rotating the menu button. Pressing the button, the
selected characters will form part of the name ⇒page 24,
fig. 13 . Invalid characters will be displayed, so that only plac e
names found in the destination country or in the indicated town
included in the navigation CD can be entered.
– Select to enter a number (for example, the post c ode).
– Select to enter special characters. – The entry on the upper line following
To w n / P C alters with each
character entered. If the entry corresponds to a searched name or
is similar, press or the function key to acces s the
list where the entry may be entered by rotating the menu button
and confirm by pushing.
If the destination address has already been entered, th en the information
only needs to be altered to the new destination. For examp le, only the entry
To w n / P C needs to be altered if the new destination corresponds to another
country.
Methods of entering a destination
Using the options Countr y, To w n / P C , Street and Junction the destination
address may be indicated. Following country select ion, the previous entries,
for example special destinations, are limited to the corre sponding countries.
Special destination - To enter real locations such as petrol stations or ho spi-
tals as a destination ⇒page 31, “Special destination”.
Begin Guide – Starts destination guide to the entered destination
⇒ page 37, “Destination guide”.
Position – To enter the longitude and latitude of the destination.
This menu is also used to display poin ts of interest close to the destination;
these may be directly selected. Nearby destinations are t hose that have been
memorized by activating the option Show as nearb y destination ⇒ page 32,
“To record or select a final destination, intermediate des tinations, destina-
tions with a flag or current position”.
To record a trip destination
⇒ page 32, “To record or select a final destination, intermedi ate destina-
tions, destinations with a flag or current position”
Navigation menu function buttons
– Displays the destination memory ⇒page 32, “Destination
memory”.
ROUTE
SYMBOLS
NAV
0-9*?!
OK
LIST / OK
MEMORY
Radionaveg300_angles Seite 25 D onnerstag, 13. Oktober 2005 11:48 11
Page 27 of 49

Navigation
26
– To enter stages, route lists, route options and bloc ked sections
⇒ page 29, “Route options”
– Displays the vehicle position. The actual vehi cle position is
displayed as an address (if the location is on the na vigation CD) and coordi-
nates. The direction of travel is indicated using a compass on the left hand
side of the screen. The SETUP menu may be used to manually enter the
vehicle position ⇒ page 35. While the destination guide is working, vis ual
indications will be given using symbols ⇒page 40.
– Starts destination guide to the indicated destin ation. The
guide may be stopped using the funct ion ⇒page 37, “Destina-
tion guide”.
Function buttons used to enter numbers and figures
– To erase the character to the right hand side of the sc reen (only acti-
vated after entering characters).
– Shows a list from which the destination may be se lected.
button on the NAVIGATION menu
More options are available in the Navigation setup menu ⇒page 35.Note
•
If the destination is changed while the guide is being u sed, you will be
asked if you wish to substitute the actual destinati on or to indicate a stage. If
a stage is added, route planning is automatically selected ⇒ page 27.
•
A mark may be displayed under certain letters. If these let ters are marked
then, after a few seconds, special related symbols wil l appear (see also
⇒ page 32, fig. 18 ).
•
The entries between square brackets [ ... ] can neither be selected or
edited; insufficient data may have been entered. In th e case of address, for
example, the country must first be entered followed by the town then finally
the address.ROUTESYMBOLSSTART GUIDE
END GUIDE
ERASELIST / OKSETUP
Radionaveg300_angles Seite 26 D onnerstag, 13. Oktober 2005 11:48 11
Page 28 of 49

Navigation27
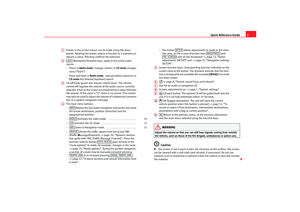
Route planning
Several destinations may be grouped together for one route.To access the route planning menu
– Press the button to enter the main navigation menu.
– If route planning is not displayed, press the function
button, select Route with intermediate destinations ⇒ page 29.
– Select the entry Enter new destination by pressing the menu
button. If a destination is displayed, this may be inserted into the
route. Otherwise, it should be erased ( ⇒page 28, “To modify
the trip or to choose an intermediate destination”).
– Select the enter me thod in the menu Enter new destination as
described in ⇒ page 24, “To enter the trip destination”.
–The Confirm option is used to enter an address into the route
planning (for example, as a departure or destination point). –Pressing
Confirm entr y , the destination entered will become part
of the journey.
– Rotate and press the menu button to determine the position of
the recently entered destination in the journey. The positi on indi-
cates the order of journey destinations and if a new destinatio n
forms part of this journey as a stage ( Stage on the screen) or a
principal destination of the journey ( Destination on the screen.
In route planning ⇒fig. 14 the stages are displayed ( Stage + no.) and the
journey destination ( Destination) on the screen. All of the trip should have at
least one destination and may have up to 6 stag es.
Each stage is accompanied by a number indicating it s position on the route
( Stage 1, Stage 2, etc.). The destinations included in the route p lanning are
Fig. 14 Route planning
NAV
ROUTE
Radionaveg300_angles Seite 27 Donnerstag, 13. Oktober 2005 11:48 11
Page 29 of 49
.
A menu bar on the right hand side (see also ⇒page 5, “Hand")
Navigation
28displayed from up to down, for example, first the stag es Stage 1, Stage 2
down to the final destination ( Destination).
A menu bar on the right hand side (see also ⇒page 5, “Handling the
menus”) indicates that not all of the journey stages or th e menu options are
visible. Turn the menu bu tton to verify stages.
While the destination guide is active, it is possible to add st ages to a journey
(up to six stages)
Menu options Route planning
Pressing Enter new destination new destinations may be added to the trip.
Destination and Stage refer to the final destination and the stages respec-
tively. These entries may be modified.
Pushing Begin destination guide the trip is begun.
To modify the trip or to choo se an intermediate destination
Following the selection of a destinatio n from the route planning by rotating
and pressing the menu button, th e following options are available:
Change – To change, for example, the name of the st reet.
Move – To change the order of the destinations. If an inte rmediate destina-
tion is moved to the end of a trip, it is automatically conv erted to the final
destination and the previous final destination beco mes an intermediate
destination.
Erase – To erase the destination from the trip.
Begin guide – To begin the guide to this destination. The interm ediate desti-
nations are not taken into account. If the required destination is an interme-
diate destination, the trip is resumed when the desti nation is reached
⇒ page 37, “Destination guide”.
To record a trip
⇒ page 32, “To record or select a final destination, int ermediate destina-
tions, destinations with a flag or current position”
Radionaveg300_angles Seite 28 D onnerstag, 13. Oktober 2005 11:48 11
Page 30 of 49

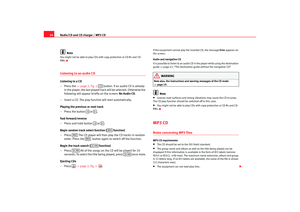
Navigation29
Route options– Press the button and then the function button to
access the route settings.
– Select the options from the list by turning and pushing the menu
knob.Route with intermediate destinations
If this function is active (black box), various desti nations may be entered
( ⇒ page 27, “Route planning”).
Route list
Selecting this option with the destination guide act ive, all of the journey
sections may be consulted up to the following destin ation or stage
⇒ page 42, “To block sections and consult information from a route”. Route options
The route options may be accessed by pressing
and the function
button on the following menu.
Dynamic navigation : The dynamic navigation takes the traffic reports fr om a
TMC station into account ( TMC = Traffic Message Channel). If necessary,
another route will automatica lly be selected if the planned route is blocked or
if there are traffic jams. For this, a TMC station must be available (see
⇒ page 38, “Dynamic destination guide with TMC (Traffic Mess age
Channel)”. To consult the latest reports, press the button .
Route opt. :
•
Short: The shortest route is calculated even if it implie s a longer trip time.
•
Fast: This option calculates the fastest route to a dest ination, even
though deviations may be selected.
•
Optimal : This function searches for a balance between minimum time and
trip distance.
Fig. 15 Route settings
NAV
ROUTE
TRAFFIC
ROUTE OPTIONS
TRAFFIC
Radionaveg300_angles Seite 29 D onnerstag, 13. Oktober 2005 11:48 11
Page 31 of 49

Navigation
30Route options can be altered whilst the destination gui de function is active.
The changed parameters will be used as a basis for the c alculation of the
remaining journey.
Highway , Ferry , To l l or Tunnel: Establishes if the section of a route includes
highways, a ferry, toll roads or tunnels . These options will, however, be used
for route planning if there is no other logical route to the destination (e.g. an
island is to be used without using a ferry) (“ No”).
To avoid a route from a point
During the destination guide, this option may be used to manually block a
section of the route on the menu which follows ⇒page 42, “To block
sections and consult information from a route”.
Note
•
The dynamic route guide option will only function if y ou are receiving at
least one TMC radio station. During the destination gui de, the TMC station
must be selected if the sound source is the radio.
•
The quality of the dynamic destination guide depends on the information
contained in the traffic announcements. The stations and / or traffic informa-
tion providers are responsible for th e quality of the information given.
•
In some cases, in order to avoid a traffic jam using the TMC instructions,
no benefit is noticeable if traffic is heavy on the altern ative route.
To select a destination using its geographical position
A destination can be entered using the exact coordinates for
longitude and latitude.– Press the button.
– Press Position if you want to enter your destination using coordi-
nates. – Use the menu button to enter
the degrees, minutes and seconds
of the location.
If the coordinates entered do not correspond to the in formation on the navi-
gation CD, the destination guide cannot begin. Use the following data to esti-
mate the position of your location:
For latitude, 1° corresponds to approximately 111 km, 1 arc minute approxi-
mately 1.85 km and 0.1 hundredth of an arc minute appr oximately 3 m
For longitude, 1° corresponds to approximately 69 km, 1 arc minute approxi-
mately 1.15 km and 0.1 hundredth of an arc minut e approximately 3 m
Note
If you set the longitude higher than 180° or lower than 0°, the E will be
replaced by a W (western longitude). Latitudes can be set from 90°N via 0° to
90°S and back only.
NAV
Radionaveg300_angles Seite 30 D onnerstag, 13. Oktober 2005 11:48 11
Page 32 of 49

Navigation31
Special destination
Special destinations are, for exampl e, petrol stations or hospitalsTo enter a special destination
– To enter a special destination, select the option Special
destination ⇒ page 24, fig. 12 .
– Select the category ⇒fig. 16 Close locations to select a special
destination close to the actual destination.
– Select a category Close locations to select a special destination
close to the planned final destination.
– Select a category Nationwide to select a special destination from
the navigation CD independently of the position and the destin a-
tion (for example, a mountain pass or a boarder post).
– Select a subcategory and the special destination from the list by
turning and pushing the menu knob.
If you have not changed your destination address entr y, the area close to this
last destination will be analysed for special destin ations.
Special destinations of the same category, e.g. restaurant s, will be displayed
in a list. The nearest destination will be shown in the first position.
Note
The type and number of special destinations will be det ermined by the
content of the Navigation CD.
Fig. 16 To enter a special destination
Radionaveg300_angles Seite 31 D onnerstag, 13. Oktober 2005 11:48 11