2005 Seat Ibiza 5D window
[x] Cancel search: windowPage 159 of 252

Cleaning and caring for your vehicle157
Safety First
Operating instructions
Tips and Maintenance
Te c h n i c a l D a t a
•
The heating element for the rear window is located on the inner side of the
window. To prevent damage, do not put stickers over the heating elements on
the inside of the window.
Cleaning windscreen wiper bladesClean wiper blades are essential for clear vision.
1. Use a soft cloth to remove dust and dirt from the windscreen wiper blades.
2. Use window cleanser to clean the windscreen wiper blades. Use a sponge or a cloth to remove stubborn stains.Care of rubber seals
If rubber seals are well looked after, they will not freeze so
quickly.1. Use a soft cloth to remove dust and dirt from the rubber seals.
2. Apply a specialist care product to the rubber seals.The weather strips on the doors, wind ows, bonnet and rear lid will remain
pliable and last longer if they are treated with a suitable care product (for
example silicone spray).
Caring for rubber seals will also prevent premature ageing and leaks. The
doors will be easier to open. If rubber seals are well looked after, they will not
freeze so quickly in winter.
Door lock cylinders
The door lock cylinders can freeze up in winter.To de-ice the lock cylinders you should only use spray with lubricating and
anti-corrosive properties.Cleaning chrome parts1. Clean chrome parts with a damp cloth.
2. Polish chrome parts with a soft, dry cloth.If this does not provide satisfying results, use a specialist chrome cleaning
product . Chrome cleaning products will remove stains and coatings from the
surface.
Caution
To prevent scratching chrome surfaces:•
Never use an abrasive care product on chrome.
•
Do not clean or polish chrome parts in a sandy or dusty environment.
Steel wheels– Clean steel wheels regularly using a separate sponge.Use an industrial cleanser to remove brake dust. Any damage to the paint on
steel wheels should be repaired be fore the metal starts to rust.
ibiza_ingles Seite 157 Mittwoch, 5. Oktober 2005 5:17 17
Page 182 of 252

Checking and refilling levels
180Changing windscreen wiper blades
If the windscreen wiper blades are in perfect condition, you
will benefit from an improv ed visibility. Damaged wiper
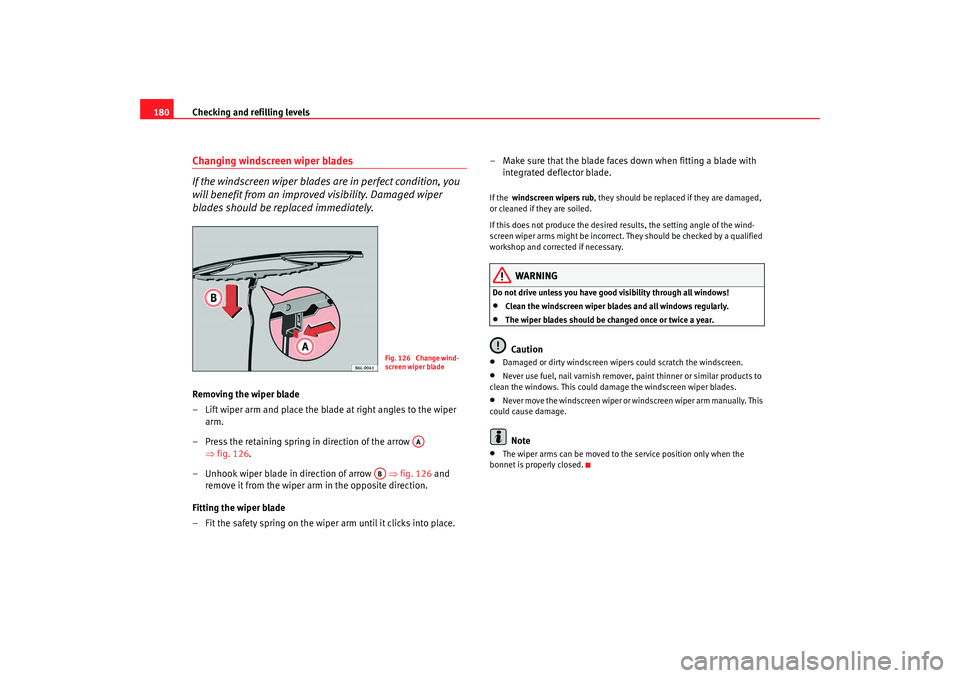
blades should be replaced immediately.Removing the wiper blade
– Lift wiper arm and place the blade at right angles to the wiper
arm.
– Press the retaining spring in direction of the arrow ⇒fig. 126.
– Unhook wiper blade in direction of arrow ⇒fig. 126 and
remove it from the wiper arm in the opposite direction.
Fitting the wiper blade
– Fit the safety spring on the wiper arm until it clicks into place. – Make sure that the blade faces down when fitting a blade with
integrated deflector blade.
If the windscreen wipers rub , they should be replaced if they are damaged,
or cleaned if they are soiled.
If this does not produce the desired results, the setting angle of the wind-
screen wiper arms might be incorrect. They should be checked by a qualified
workshop and corrected if necessary.
WARNING
Do not drive unless you have good visibility through all windows!•
Clean the windscreen wiper blades and all windows regularly.
•
The wiper blades should be changed once or twice a year.Caution
•
Damaged or dirty windscreen wipers could scratch the windscreen.
•
Never use fuel, nail varnish remover, paint thinner or similar products to
clean the windows. This could damage the windscreen wiper blades.
•
Never move the windscreen wiper or windscreen wiper arm manually. This
could cause damage.Note
•
The wiper arms can be moved to the service position only when the
bonnet is properly closed.
Fig. 126 Change wind-
screen wiper blade
AA
AB
ibiza_ingles Seite 180 Mittwoch, 5. Oktober 2005 5:17 17
Page 183 of 252

Checking and refilling levels181
Safety First
Operating instructions
Tips and Maintenance
Te c h n i c a l D a t a
Changing the rear wiper blade
A good rear wiper blade is essential for clear rear vision.
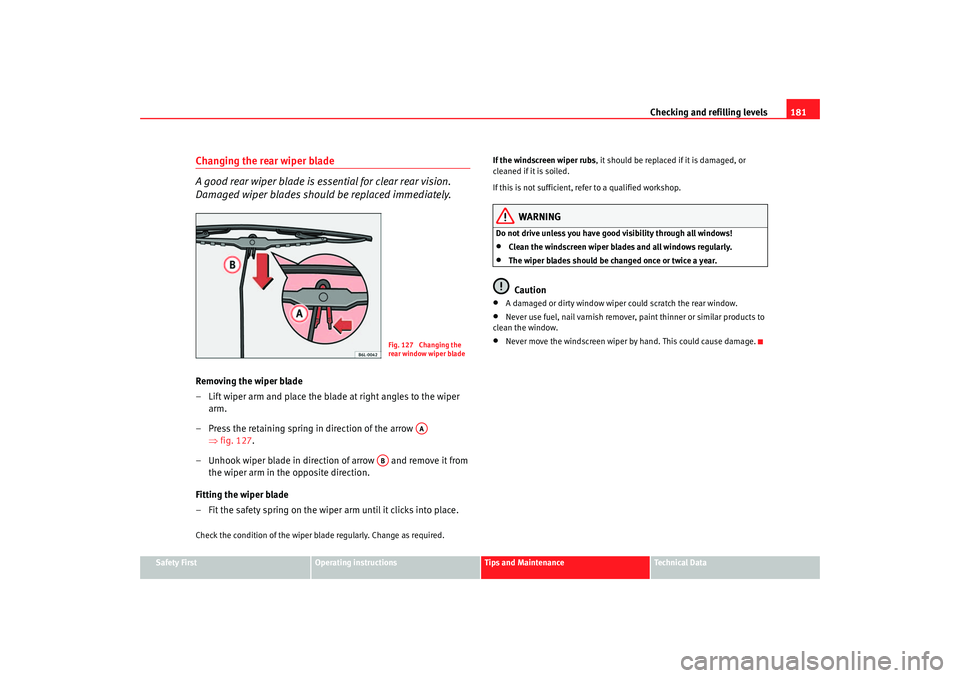
Damaged wiper blades should be replaced immediately.Removing the wiper blade
– Lift wiper arm and place the blade at right angles to the wiper
arm.
– Press the retaining spring in direction of the arrow ⇒fig. 127 .
– Unhook wiper blade in direction of arrow and remove it from the wiper arm in the opposite direction.
Fitting the wiper blade
– Fit the safety spring on the wiper arm until it clicks into place.Check the condition of the wiper blade regularly. Change as required. If the windscreen wiper rubs
, it should be replaced if it is damaged, or
cleaned if it is soiled.
If this is not sufficient, refer to a qualified workshop.
WARNING
Do not drive unless you have good visibility through all windows!•
Clean the windscreen wiper blades and all windows regularly.
•
The wiper blades should be changed once or twice a year.Caution
•
A damaged or dirty window wiper could scratch the rear window.
•
Never use fuel, nail varnish remover, paint thinner or similar products to
clean the window.
•
Never move the windscreen wiper by hand. This could cause damage.
Fig. 127 Changing the
rear window wiper blade
AA
AB
ibiza_ingles Seite 181 Mittwoch, 5. Oktober 2005 5:17 17
Page 186 of 252

Checking and refilling levels
184charge. Never short the battery terminals. High-energy sparks can cause
injury.•
A highly explosive mixture of gases is given off when the battery is
under charge. The batteries should be charged in a well-ventilated room
only.
•
Keep children away from acid and batteries.
•
Before working on the electrical system, you must switch off the
engine, the ignition and all consumers. The minus cable on the battery
must be disconnected. When a light bulb is changed, you need only switch
off the light.
•
Deactivate the anti-theft alarm by unlocking the vehicle before you
disconnect the battery! The alarm will otherwise be triggered.
•
When disconnecting the battery from the vehicle electrical system,
disconnect first the negative cable and then the positive cable.
•
Switch off all electrical consumers before reconnecting the battery.
Reconnect first the positive cable and then the negative cable. Never
reverse the polarity of the connections. This could cause an electrical fire.
•
Never charge a frozen battery, or one which has thawed. This could
result in explosions and chemical burns. Always replace a battery which
has frozen. A flat battery can freeze at temperatures around 0
°C.
•
Ensure that the vent hose is always connected to the battery.
•
Never use a defective battery. This may be fatally explosive. Replace a
damaged battery immediately.Caution
•
Never disconnect the battery if the ignition is switched on or if the engine
is running. This could damage the electrical system or electronic compo-
nents.
•
Do not expose the battery to direct sunlight over a long period of time, as
the intense ultraviolet radiation can damage the battery housing.
•
If the vehicle is left standing in cold conditions for a long period, protect
the battery from frost. If it “freezes” it will be damaged.
Checking the electrolyte level
The electrolyte level should be checked regularly in high-
mileage vehicles, in hot countries and in older batteries.– Open the bonnet and open the battery cover at the front ⇒ in
“Safety instructions on working in the engine compartment” on
page 169 ⇒ in “Warnings on handling the battery” on
page 183.
– Check the colour display in the magic eye on the top of the battery.
– If there are air bubbles in the window, tap the window gently until they disperse.The position of the battery is show n in the corresponding engine compart-
ment diagram ⇒page 224.
The round window (“magic eye”) on the top of the battery changes colour,
depending on the charge level and electrolyte level of the battery.
If the colour in the window is colourless or bright yellow, the electrolyte level
of the battery is too low. Have the battery checked by a qualified workshop.
The colours green and black are used by the workshops for diagnostic
purposes.
WARNING (continued)
ibiza_ingles Seite 184 Mittwoch, 5. Oktober 2005 5:17 17
Page 200 of 252

If and when
198steering wheel on the right the fuses are on the right-hand side of the instru-
ment panel, behind a cover.
The electric windows are protected by circuit breakers. These reset automat-
ically after a few seconds when the overload (caused for example by frozen
windows) has been corrected.
Colour coding of fuses
WARNING
Never “repair” damaged fuses and never replace them with fuses with a
higher rating. Failure to comply could result in fire. This could also cause
damage to other parts of the electrical system.
Note
•
If a newly replaced fuse blows again after a short time, the electrical
system must be checked by a qualified workshop as soon as possible.
•
If you replace a fuse with a stronger fuse, you could cause damage to
another location in the electrical system.
•
Always keep some spare fuses in the vehicle. These are available from
official Service. Colour
Amperes
Beige 5
Brown 7,5
red 10
blue 15
yellow 20
natural (white) 25
green 30
ibiza_ingles Seite 198 Mittwoch, 5. Oktober 2005 5:17 17
Page 202 of 252

If and when
200
22 Main beam headlight, left 10
23 Number plate light/si de light indicator 5
24 Rear windscreen wiper 10
25 Injectors(fuel) 10
26 Brake light switch /ESP (Turn sensor) 10
27 Instrument panel/Diagnosis 5
28 Unit: glovebox light, boot light, interior light 10
29 Climatronic 5
30 Power supply central locking unit 5
31 Left front window control 25
32 Vacant
33 Self powered alarm horn 15
34 Engine control unit 15
35 Sunroof 20
36 Engine ventilator heating /blower 25
37 Headlight washer pump 20
38 Front and rear fog lights 15
39 Engine control unit (petrol) 15
40 Engine control unit diesel + SDI Fuel pump 30
41 Fuel gauge 15
42 Ignition transformer+ Engine control unit T70 15
43 Dipped headlight (right side) 15
44 Left rear window control 25
45 Front right window control 25
Number
Electrical equipment Amperes
ibiza_ingles Seite 200 Mittwoch, 5. Oktober 2005 5:17 17
Page 203 of 252

If and when201
Safety First
Operating instructions
Tips and Maintenance
Te c h n i c a l D a t a
Fuses below steering wheel in relay holderPTC fuses46
Windscreen wiper unit 20
47 Heated rear window unit 20
48 Indicator unit 15
49 Cigarette lighter 15
50 Locking unit 15
51 Radio/CD/GPS/Telephone 20
52 Horn 20
53 Dipped headlight (left side) 15
54 Right rear window control 25a)The signal “S”is a system which includes the starter and steering lock and enables, after the ignition is switched off and with out removing the key from the steering and starter lock,
certain electrical components to be switched on, including for example, the radio, the courtesy light, etc. This function is de activated on removing the key from the steering and starter
lock.
Number Electrical equipment Amperes
1 PTCs (Supplementary electrical heating using air) 40
2 PTCs (Supplementary electrical heating using air) 40
3 PTCs (Supplementary electrical heating using air) 40
Number
Electrical equipment Amperes
ibiza_ingles Seite 201 Mittwoch, 5. Oktober 2005 5:17 17
Page 217 of 252

If and when215
Safety First
Operating instructions
Tips and Maintenance
Te c h n i c a l D a t a
Jump leads
Jump leads must comply with the standard
DIN 72553 (see manufacturer's
documentation). The wire cross section must be at least 25 mm
2 for petrol
engines and at least 35 mm
2 for diesel engines.
Note
•
The vehicles must not touch each other, otherwise electricity could flow as
soon as the positive terminals are connected.
•
The discharged battery must be properly connected to the vehicles elec-
trical system.
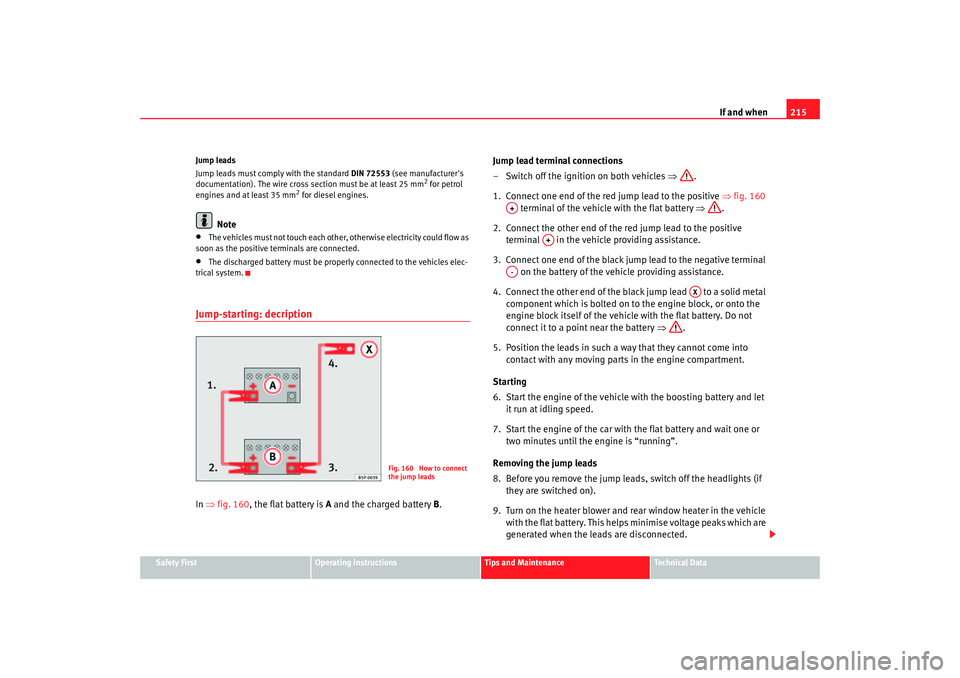
Jump-starting: decriptionIn ⇒ fig. 160, the flat battery is A and the charged battery B. Jump lead terminal connections
– Switch off the ignition on both vehicles
⇒.
1. Connect one end of the red jump lead to the positive ⇒fig. 160
terminal of the vehicle with the flat battery ⇒.
2. Connect the other end of the red jump lead to the positive terminal in the vehicle providing assistance.
3. Connect one end of the black jump lead to the negative terminal on the battery of the vehicle providing assistance.
4. Connect the other end of the black jump lead to a solid metal component which is bolted on to the engine block, or onto the
engine block itself of the vehicle with the flat battery. Do not
connect it to a point near the battery ⇒.
5. Position the leads in such a way that they cannot come into contact with any moving parts in the engine compartment.
Starting
6. Start the engine of the vehicle with the boosting battery and let
it run at idling speed.
7. Start the engine of the car with the flat battery and wait one or two minutes until the engine is “running”.
Removing the jump leads
8. Before you remove the jump leads, switch off the headlights (if they are switched on).
9. Turn on the heater blower and rear window heater in the vehicle with the flat battery. This helps minimise voltage peaks which are
generated when the leads are disconnected.
Fig. 160 How to connect
the jump leads
A+
A+
A-
AX
ibiza_ingles Seite 215 Mittwoch, 5. Oktober 2005 5:17 17