2005 RENAULT MEGANE light
[x] Cancel search: lightPage 184 of 250
Downloaded from www.Manualslib.com manuals search engine
1
NU761_2_G4-FRA.qxd 14/11/05 10:11 Page 4.10
4.10
LEVELS (continued)FILTERS
The replacement of filter elements
(air filter, passenger compartment
filter, diesel filter, etc.) is scheduled
in the servicing and maintenance
operations for your vehicle.
Frequency for replacing filter
elements: refer to the Warranty and
Services booklet for your vehicle.
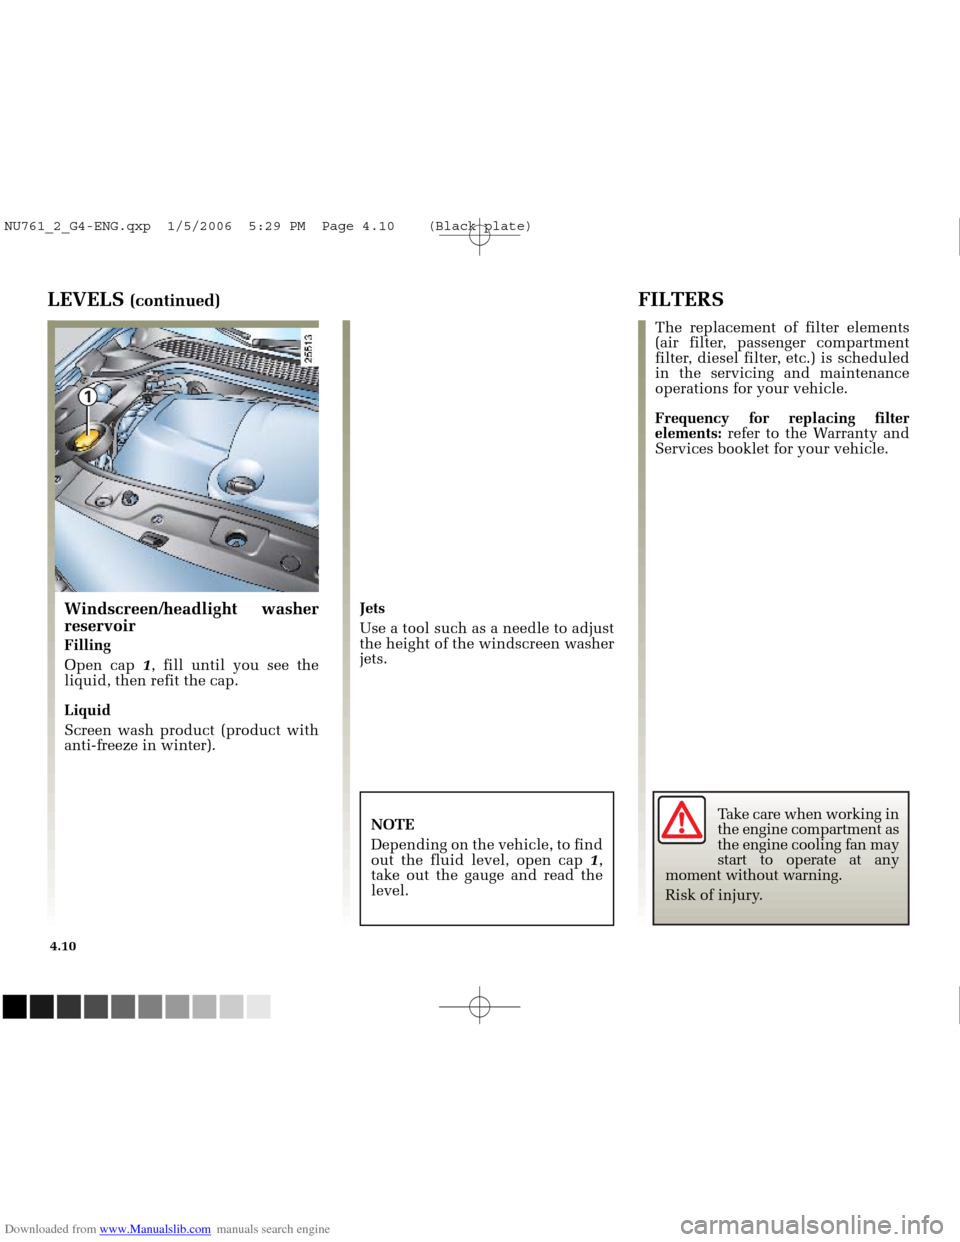
Windscreen/headlight washer
reservoir
Filling
Open cap 1, fill until you see the
liquid, then refit the cap.
Liquid
Screen wash product (product with
anti-freeze in winter). Jets
Use a tool such as a needle to adjust
the height of the windscreen washer
jets.
NOTE
Depending on the vehicle, to find
out the fluid level, open cap 1,
take out the gauge and read the
level.
Take care when working in
the engine compartment as
the engine cooling fan may
start to operate at any
moment without warning.
Risk of injury.
NU761_2_G4-ENG.qxp 1/5/2006 5:29 PM Page 4.10 (Black plate)
Page 186 of 250
Downloaded from www.Manualslib.com manuals search engine
NU761_2_G4-FRA.qxd 14/11/05 10:11 Page 4.12
4.12
BODYWORK MAINTENANCE
Protection against the effects of
corrosive agents
Although your vehicle has been
treated with very effective anti-
corrosion products, it nevertheless
remains subject to the effects of:
• corrosives in the atmosphere- atmospheric pollution (urbanand industrial areas).
- saline atmospheres (near the sea, particularly in hot weather),
- seasonal and damp climatic conditions, (e.g: road salt in
winter, water from road
cleaners).
abrasives Wind-borne dust and sand, mud,
road grit thrown up by other
vehicles.
minor impacts
You should take a number of minor
precautions in order to safeguard
your vehicle against such risks and
not to lose the benefit of your
vehicle’s anti-corrosion protection.
You should not
Wash the vehicle in bright
sunlight or freezing temperatures.
Scrape off mud or dirt without
pre-wetting.
Allow dirt to accumulate.
Allow rust to form following
minor impacts.
Use solvents not approved by
RENAULT’s Technical Department
to remove stains as this could
damage the paintwork.
Drive frequently in snow or
muddy conditions without
periodically washing the vehicle,
particularly under the wheel
arches and body.
Degrease or clean mechanical
components (e.g. engine
compartment), underneath the
bodywork, parts with hinges (e.g.
inside the fuel tank flap) and
painted plastic external fittings
(e.g. bumpers) using high pressure
cleaning apparatus or by spraying
on products not approved by
RENAULT’s Technical Department.
If adequate precautions are not
taken, this could give rise to
corrosion or operational faults.
NU761_2_G4-ENG.qxp 1/5/2006 5:29 PM Page 4.12 (Black plate)
Page 187 of 250
Downloaded from www.Manualslib.com manuals search engine
NU761_2_G4-FRA.qxd 14/11/05 10:11 Page 4.13
4.13
BODYWORK MAINTENANCE (continued)
You should
- Frequently wash your car, with the
engine off , with cleaning products
recommended by us (never use
abrasive products) and be sure to
rinse the wheel arches and
underneath the bodywork to
eliminate:
- spots of tree resin and industrial grime;
- bird droppings , which contain
chemicals that rapidly discolour
paintwork and may even cause
the paint to peel off;
The vehicle must bewashed
immediately to remove these
marks since it is impossible to
remove them by polishing.
- salt deposited in the wheel arches and the underside of the body
after driving in areas where the
roads have been gritted,
- mud in the wheel arches and the underside of the body which
forms damp patches. - Observe the vehicle stopping
distances when driving on gravelled
surfaces to prevent paint damage.
- Repair, or have repaired quickly, areas where the paint has been
damaged to prevent corrosion
spreading.
- Remember to visit the body shop periodically in order to maintain
your RENAULT anti-corrosion
warranty. Refer to the Warranty
and Services booklet.
- Respect local regulations about washing vehicles (e.g. do not wash
your vehicle on a public highway). - Before using a roller type car wash,
return the wiper stalk to the Stop
position (refer to the
Wipers/Washers information in
section 1). Check the mounting of
external accessories, additional
lights and rear-view mirrors and
take care to attach the wiper blades
and radio aerial with an adhesive.
Remove the car phone aerial if your
vehicle is fitted with this
equipment.
- Spray mechanical components, hinges, etc. with products
approved by RENAULT’s Technical
Department to protect them after
they have been cleaned.
We have selected special
products to care for your vehicle
and you can obtain these from
RENAULT accessory outlets.
NU761_2_G4-ENG.qxp 1/5/2006 5:29 PM Page 4.13 (Black plate)
Page 188 of 250
Downloaded from www.Manualslib.com manuals search engine
NU761_2_G4-FRA.qxd 14/11/05 10:11 Page 4.14
4.14
INTERIOR TRIM MAINTENANCE
Whatever type of stain is on the
trim, use soapy water (if possible,
warm water) containing:
natural soap,
washing up liquid (with one partwashing up liquid to 200 parts
water).
Rinse off with a soft, damp cloth.
Special instructions
Instrumentation glass panels (e.g.:
instrument panel, clock, external
temperature display, radio
display, etc.)
Use a soft cloth (or cotton wool).
If this does not clean it properly,
use a soft cloth (or cotton wool)
slightly moistened with soapy
water and then wipe clean with a
soft damp cloth/cotton.
Finally, carefully dry off with a
soft dry cloth.
Cleaning products containing
alcohol must not be used under
any circumstances. Seat belts
These must be kept clean.
Use products selected by
RENAULT’s Technical Department
(RENAULT accessory outlets) or
warm soapy water and a sponge
and dry off with a dry cloth.
Detergents or dyes must not be
used under any circumstances.What you should not do
You are strongly recommended not
to use high-pressure or atomising
cleaning equipment inside the
passenger compartment: unless
carefully used, such equipment
could interfere with correct
functioning of the electrical or
electronic components in the
vehicle, amongst other effects.
You are strongly recommended not
to place objects such as air
fresheners, perfumes, etc. near the
air vents, as they could damage the
dashboard.
NU761_2_G4-ENG.qxp 1/5/2006 5:29 PM Page 4.14 (Black plate)
Page 189 of 250
Downloaded from www.Manualslib.com manuals search engine
NU761_2_G5-FRA.qxd 4/11/05 11:09 Page 5.01
Section 5: Practical advice
Emergency spare wheel ........................................................................\
...........................................................................5.02
Toolkit (Jack - Wheelbrace, etc.)
........................................................................\
....................................................... .....5.03
Wheel trims
........................................................................\
....................................................... .........................................5.04
Changing a wheel
........................................................................\
....................................................... ..............................5.05
Tyres (tyre safety, wheels, winter use)
........................................................................\
....................................5.06 ➟5.08
Headlights (replacing bulbs)
........................................................................\
.....................................................5.09 ➟5.12
Rear lights (replacing bulbs)
........................................................................\
.......................................................5.13 - 5.14
Side mounted indicators (replacing bulbs)
........................................................................\
.........................................5.14
Interior lighting (replacing bulbs)
........................................................................\
............................................5.15 ➟5.17
Fuses
........................................................................\
....................................................... .........................................5.18 - 5.19
Battery
........................................................................\
....................................................... .....................................5.20 ➟5.22
RENAULT card: battery
........................................................................\
....................................................... ....................5.23
Fitting a radio/accessories
........................................................................\
....................................................... ....5.24 - 5.25
Wipers (replacing the blades)
........................................................................\
.....................................................5.26 - 5.27
Towing
........................................................................\
....................................................... ....................................5.28 ➟5.30
Operating faults
........................................................................\
....................................................... ....................5.31 ➟5.38
5.01
NU761_2_G5-ENG.qxp 1/5/2006 5:30 PM Page 5.01 (Black plate)
Page 193 of 250
Downloaded from www.Manualslib.com manuals search engine
3
4
2
1
NU761_2_G5-FRA.qxd 4/11/05 11:09 Page 5.05
5.05
CHANGING A WHEEL
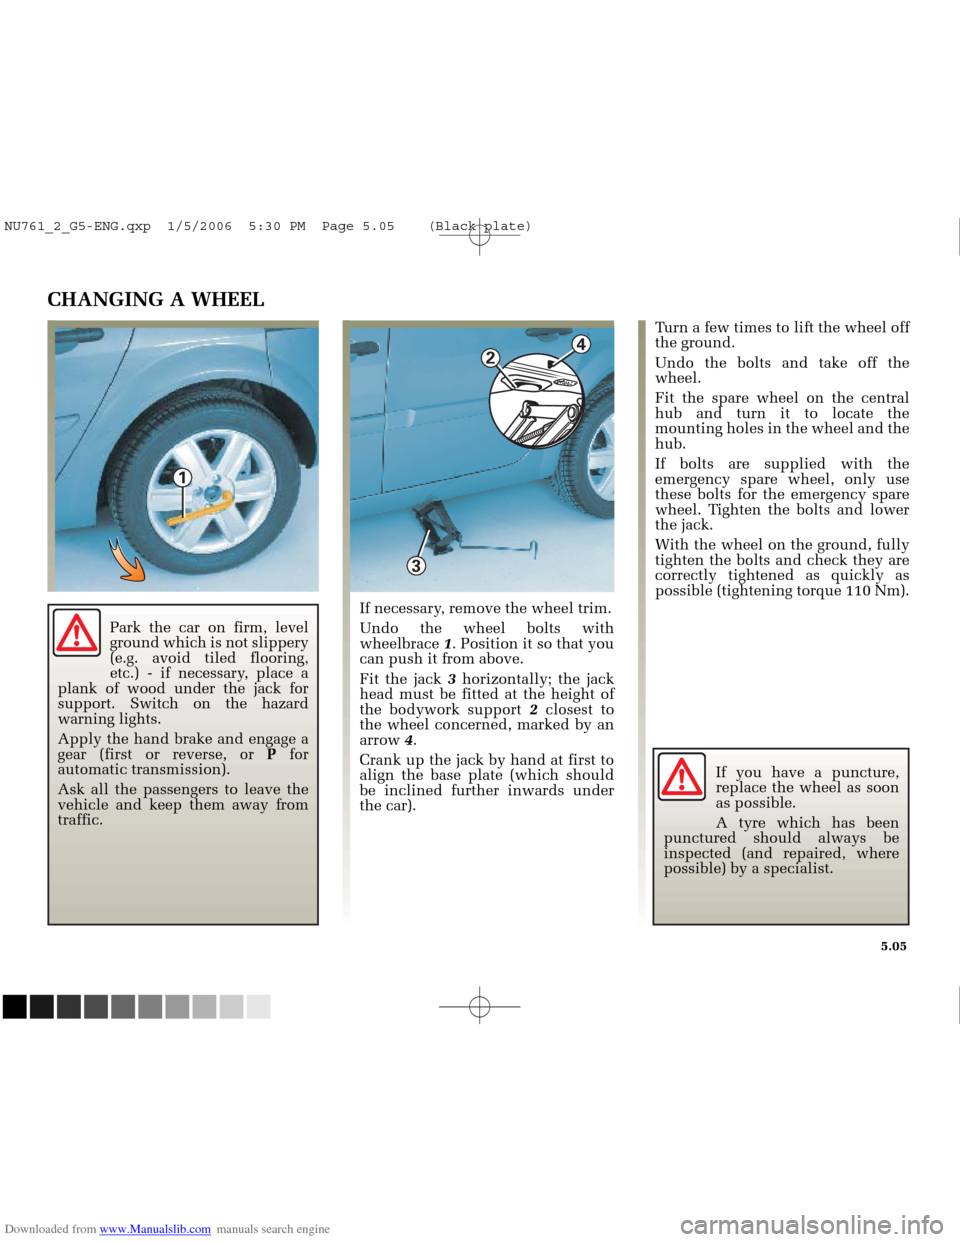
If necessary, remove the wheel trim.
Undo the wheel bolts with
wheelbrace 1. Position it so that you
can push it from above.
Fit the jack 3horizontally; the jack
head must be fitted at the height of
the bodywork support 2closest to
the wheel concerned, marked by an
arrow 4.
Crank up the jack by hand at first to
align the base plate (which should
be inclined further inwards under
the car). Turn a few times to lift the wheel off
the ground.
Undo the bolts and take off the
wheel.
Fit the spare wheel on the central
hub and turn it to locate the
mounting holes in the wheel and the
hub.
If bolts are supplied with the
emergency spare wheel, only use
these bolts for the emergency spare
wheel. Tighten the bolts and lower
the jack.
With the wheel on the ground, fully
tighten the bolts and check they are
correctly tightened as quickly as
possible (tightening torque 110 Nm).
If you have a puncture,
replace the wheel as soon
as possible.
A tyre which has been
punctured should always be
inspected (and repaired, where
possible) by a specialist.
Park the car on firm, level
ground which is not slippery
(e.g. avoid tiled flooring,
etc.) - if necessary, place a
plank of wood under the jack for
support. Switch on the hazard
warning lights.
Apply the hand brake and engage a
gear (first or reverse, or Pfor
automatic transmission).
Ask all the passengers to leave the
vehicle and keep them away from
traffic.
NU761_2_G5-ENG.qxp 1/5/2006 5:30 PM Page 5.05 (Black plate)
Page 197 of 250
Downloaded from www.Manualslib.com manuals search engine
2
1
NU761_2_G5-FRA.qxd 4/11/05 11:09 Page 5.09
5.09
HALOGEN HEADLIGHTS: ACCESS
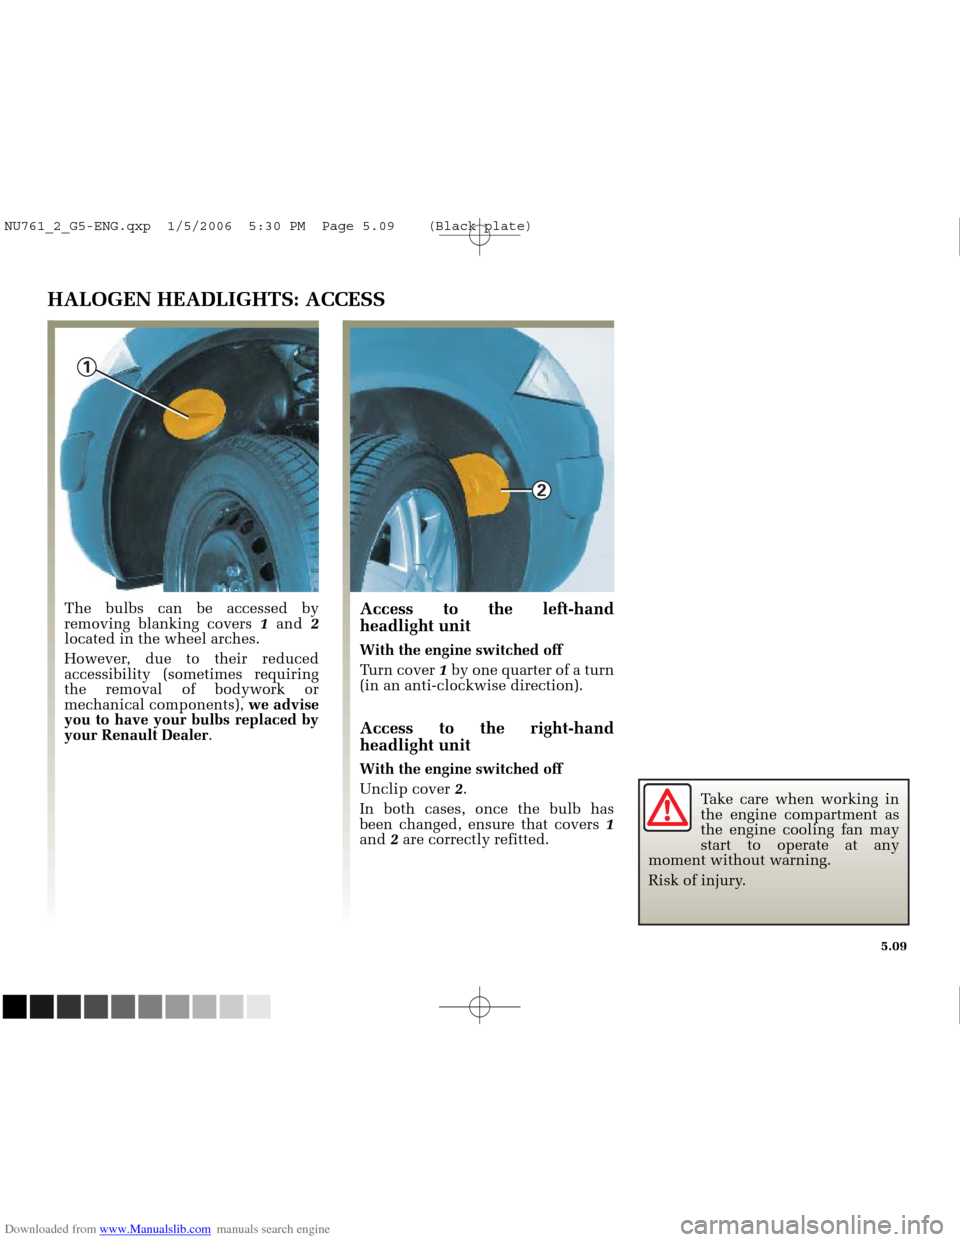
Access to the left-hand
headlight unit
With the engine switched off
Turn cover 1by one quarter of a turn
(in an anti-clockwise direction).
Access to the right-hand
headlight unit
With the engine switched off
Unclip cover 2.
In both cases, once the bulb has
been changed, ensure that covers 1
and 2 are correctly refitted.
The bulbs can be accessed by
removing blanking covers
1and 2
located in the wheel arches.
However, due to their reduced
accessibility (sometimes requiring
the removal of bodywork or
mechanical components), we advise
you to have your bulbs replaced by
your Renault Dealer .
Take care when working in
the engine compartment as
the engine cooling fan may
start to operate at any
moment without warning.
Risk of injury.
NU761_2_G5-ENG.qxp 1/5/2006 5:30 PM Page 5.09 (Black plate)
Page 198 of 250
Downloaded from www.Manualslib.com manuals search engine
A
B
2
7
4
1
5
6
3
NU761_2_G5-FRA.qxd 4/11/05 11:09 Page 5.10
5.10
HALOGEN HEADLIGHTS: changing bulbs
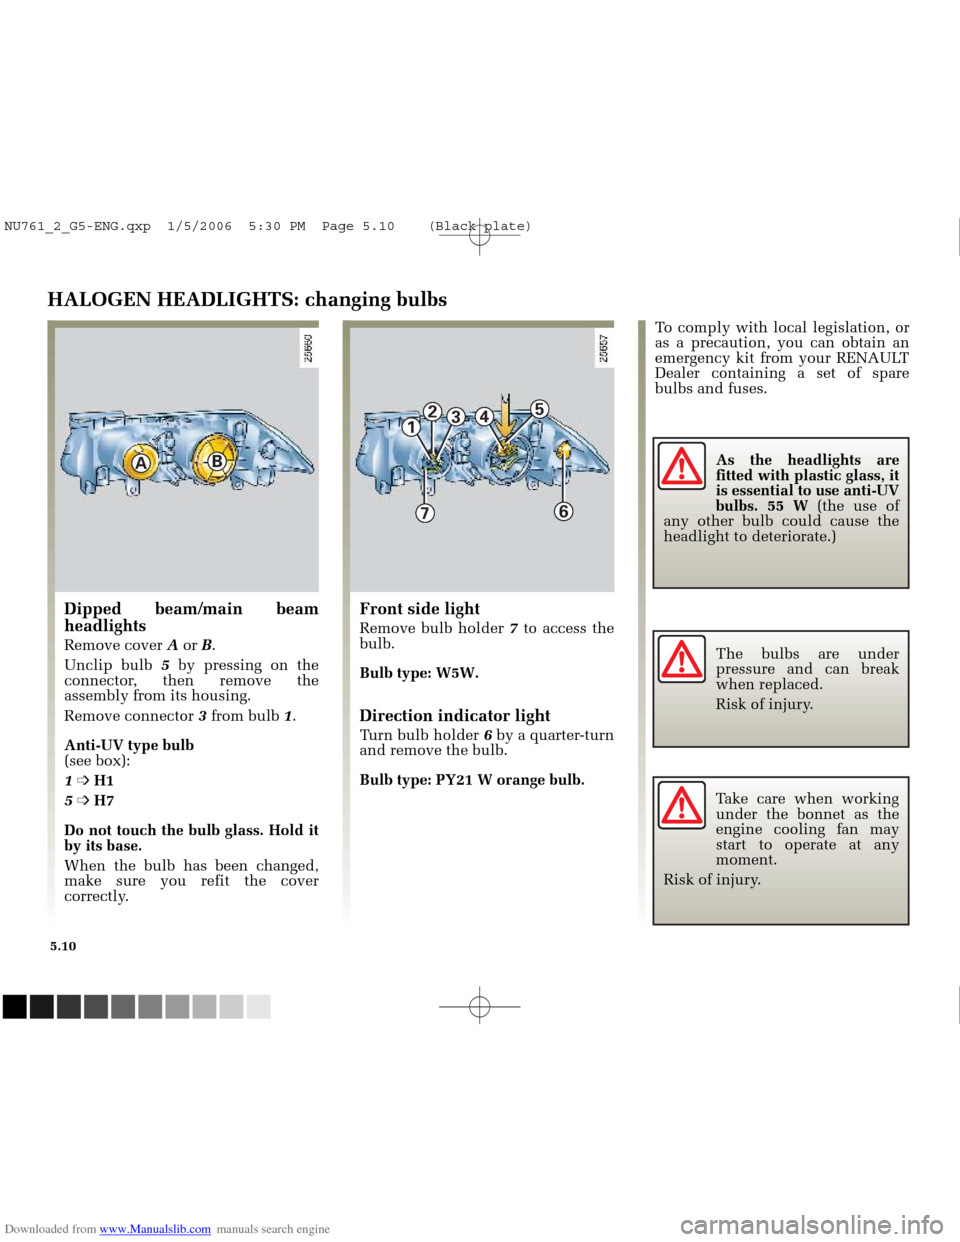
Front side light
Remove bulb holder 7to access the
bulb.
Bulb type: W5W.
Direction indicator light
Turn bulb holder 6by a quarter-turn
and remove the bulb.
Bulb type: PY21 W orange bulb.
Dipped beam/main beam
headlights
Remove cover Aor B.
Unclip bulb 5by pressing on the
connector, then remove the
assembly from its housing.
Remove connector 3 from bulb 1.
Anti-UV type bulb
(see box):
1 ➩ H1
5 ➩ H7
Do not touch the bulb glass. Hold it
by its base.
When the bulb has been changed,
make sure you refit the cover
correctly. To comply with local legislation, or
as a precaution, you can obtain an
emergency kit from your RENAULT
Dealer containing a set of spare
bulbs and fuses.
As the headlights are
fitted with plastic glass, it
is essential to use anti-UV
bulbs. 55 W (the use of
any other bulb could cause the
headlight to deteriorate.)
The bulbs are under
pressure and can break
when replaced.
Risk of injury.
Take care when working under the bonnet as the
engine cooling fan may
start to operate at any
moment.
Risk of injury.
NU761_2_G5-ENG.qxp 1/5/2006 5:30 PM Page 5.10 (Black plate)