Page 283 of 369
Practical Tips, Minor Repairs
283
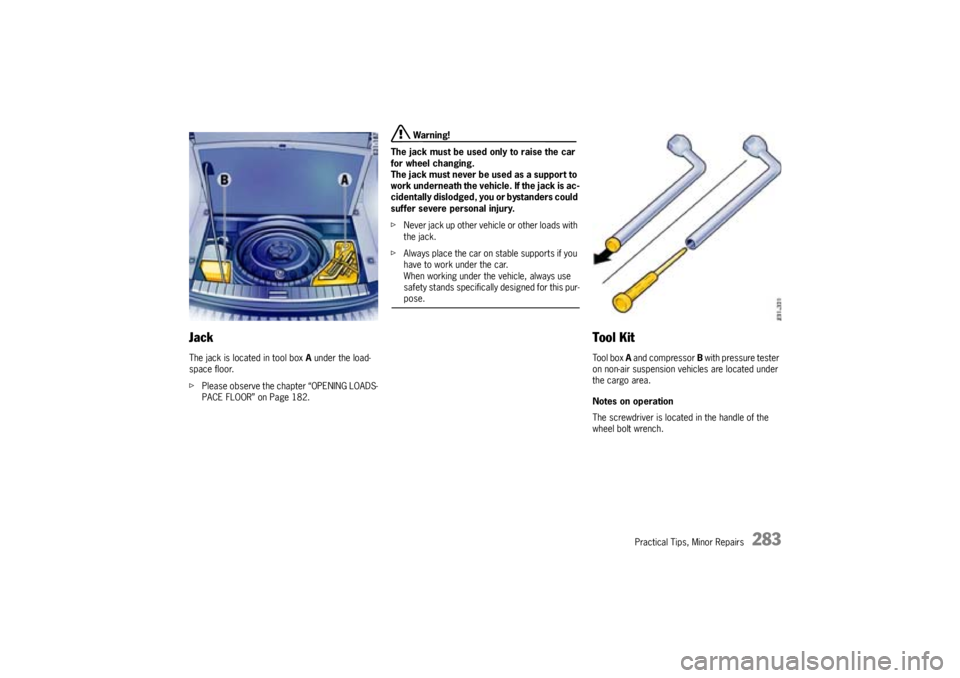
JackThe jack is located in tool box A under the load-
space floor.
fPlease observe the chapter “OPENING LOADS-
PACE FLOOR” on Page 182.
Warning!
The jack must be used only to raise the car
for wheel changing.
The jack must never be used as a support to
work underneath the vehicle. If the jack is ac-
cidentally dislodged, you or bystanders could
suffer severe personal injury.
fNever jack up other vehicle or other loads with
the jack.
fAlways place the car on stable supports if you
have to work under the car.
When working under the vehicle, always use
safety stands specifically designed for this pur-pose.
Tool KitTool box A and compressor B with pressure tester
on non-air suspension vehicles are located under
the cargo area.
Notes on operation
The screwdriver is located in the handle of the
wheel bolt wrench.
Page 285 of 369

Practical Tips, Minor Repairs
285
CompressorOn vehicles without level-control systems, there is
an additional compressor with pressure tester un-
der the loadspace floor.
On vehicles with level control, you can use the
compressor of the level-control system to fill the
tires.
The filler hose required for this purpose can be
found under the left rear seat.
fPlease observe the chapter “FOLDING REAR
SEATS FORWARD” on Page 37.
fPlease observe the chapter “INFLATING TIRES
ON VEHICLES WITHOUT AIR SUSPENSION” on
Page 295.
Wheel BoltsfAlways clean the wheel bolts before installing.
Maintenance note
fWheel bolts must not be greased.
fReplace damaged wheel bolts.
Only use the original Porsche wheel bolts spe-
cially designed for this vehicle type.Tightening torque
Tightening torque of the wheel bolts 118 ftlb.
(160 Nm).
Security wheel boltsThe adapter (wrench socket) for the security
wheel bolts is located in the tool box.
To loosen or tighten the wheel bolt with anti-theft
protection, the adapter must be used between the
wheel bolt and the wheel bolt wrench.
fWhen positioning the wrench socket, ensure
that it engages fully in the teeth of the wheel
bolt.
Note on operation
If the wheels have to be removed at the workshop,
please do not forget to hand over the socket for
the security wheel bolts along with the car key.
Page 294 of 369

294
Practical Tips, Minor Repairs
Collapsible spare wheelThe collapsible spare wheel is fastened under the
floor in the luggage compartment.
1. Take out rotary knob A and put it on bolt B.
2. Unscrew the screw and take out the collapsible
spare wheel.
3. Mount the collapsible spare wheel on the vehi-
cle before inflating it. Leave the car jacked up.
Please observe the chapter “LIFTING THE VE-
HICLE WITH A JACK” on Page 290.4. Inflate the tire.
Please observe the chapter “TIRE PRESSU-
RES, COLD” on Page 350.
Warning!
Risk of accident.
fThe collapsible spare wheel must be used only
over short distances in cases of emergency.
For safety reasons, replace the tires before
the wear indicators appear (webs in the tire
grooves, 1.6 mm high).
fNever deactivate the Porsche Stability Man-
agement (PSM) system.
fAvoid hard acceleration and high cornering
speeds.
The maximum permitted speed is 50 mph
(80 km/h) and must not be exceeded be-
cause of altered driving characteristics and for
reasons of wear.
The tread depth of the spare wheel is subject
to the same laws as the original tires.
fDo not use a collapsible spare wheel from a
different vehicle type.
fDo not mount the collapsible spare wheel from
your car on a different vehicle.fOnly fit one collapsible spare wheel on the ve-
hicle at a time.
fOn vehicles with air suspension, use the tire fill-
ing connection A only to inflate the collapsible
spare wheel.
fTo avoid damage, do not use automatic car
washes when the spare wheel is installed.
After using the collapsible spare wheel
fRelease air by unscrewing the valve insert.
Notes on operation
The tire will revert to its original shape only after
several hours. Only then can it be stowed in the
spare wheel recess in the luggage compartment.
There is a plastic sheet in the tool box to store the
damaged wheel.
Maintenance note
The collapsible spare wheel must be repaired only
by the manufacturer.
fPlease consult your authorized Porsche dealer
if the collapsible spare wheel is defective.
Page 295 of 369
Practical Tips, Minor Repairs
295
Checking tire pressure with a pressure
gauge1. Remove the valve stem cap from the tire.
2. Press the pressure gauge onto the valve stem.
Note on operation
fDo not press too hard or force the valve stem
sideways, or air will escape.
If the sound of air escaping from the tire is
heard, reposition the pressure gauge.
3. Read the tire pressure on the gauge stem and
compare it to the permissble tire pressure.
This information can be found on the tire pres-
sure plate.
Please observe the chapter “TIRE PRESSU-
RES, COLD” on Page 350.
4. Remove the gauge.
fPlease observe the chapter “TIRE PRESSURE”
on Page 85.
Inflating tires on vehicles without air
suspension1. Open front lid of the compressor.
2. Screw filler hose A of the compressor onto the
tire valve.3. Remove cover of A the engine-compartment
cover.
f f f
Page 296 of 369

296
Practical Tips, Minor Repairs
+ = Positive terminal for jump lead starting
– = Grounding point for jump lead starting4. Connect clamps of the compressor to the
jump lead starting terminals.
Always observe the following sequence:
– Open the cap of the positive terminal for jump
lead starting (+).
– Connect positive lead (red) B to the positive
terminal for jump lead starting (+).
– Connect negative lead (black) C to the nega-
tive terminal for jump lead starting (
–).
Warning!
Danger of burning. The compressor filler
hose can become hot during the inflation
process.
fWear gloves.
5. Switch on compressor with switch D.
The required filling pressure will be reached af-
ter a few minutes.
6. Switch off compressor with switch D.
7. Check filling pressure with pressure tester E.
Then reduce tire pressure or add more air if
necessary.
Recheck the filling pressure.
8. Unscrew filler hose of the compressor.Reducing filling pressure on vehicles
without air suspension1. Switch off compressor with switch D.
2. Open air bleed screw F until the correct filling
pressure is achieved.
Page 297 of 369
Practical Tips, Minor Repairs
297
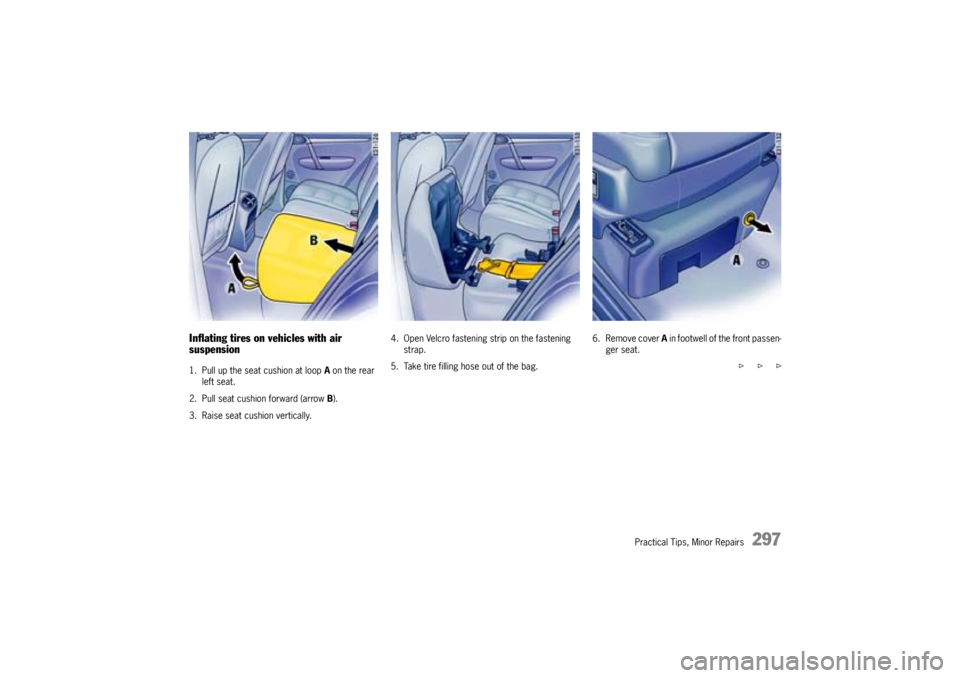
Inflating tires on vehicles with air
suspension1. Pull up the seat cushion at loop A on the rear
left seat.
2. Pull seat cushion forward (arrow B).
3. Raise seat cushion vertically.4. Open Velcro fastening strip on the fastening
strap.
5. Take tire filling hose out of the bag.6. Remove cover A in footwell of the front passen-
ger seat.
f f f
Page 298 of 369

298
Practical Tips, Minor Repairs
B- Screw coupling for compressor connection
C- Pressure tester
D- Hand valve for tire filling
E- Air bleed screw
F- Filler connection for tire valve7. Screw screw coupling B into the compressor
connection (in footwell of the front passenger
seat).
8. Screw filler connection F onto the tire valve.
Warning!
D a n g e r o f i n j u r y a n d r i s k o f d a m a g e i f t h e o p -
erating unit is used improperly.
fUse this operating unit only to inflate or to bleed air from the tires of this vehicle.
9. Switch ignition on.
10.Press hand valve Duntil the correct tire pres-
sure is achieved.
Monitor the tire pressure with pressure tester
C during the inflation process.
11.Unscrew the screw coupling from the com-
pressor connection.
12.Unscrew filler connection from the tire valve.
13.Stow tire filler hose in the bag.
14.Close bag with Velcro strip.
15.Lower the seat cushion, push it under the
backrest and press it down at the front.
Make sure that the buckles are accessible.Note on operation
The compressor features a protective function
against overheating and switches itself off auto-
matically if necessary. The compressor must cool
down for a few minutes after automatic deactiva-
tion.
Reducing tire pressure on vehicles with
air suspensionfOpen air bleed screw E until the correct tire
pressure is achieved.
Monitor the tire pressure with pressure tester
C while correcting the tire pressure.
Page 309 of 369
Practical Tips, Minor Repairs
309
22 Electrical seat adjustment, front right; seat heating, front right, rear right 3023
Air conditioning
10
24 Electrical seat adjustment, front right30
25
Air-conditioning system, rear
5
26
27
Level control, Porsche Active Suspension Management
15
28
29
Tiptronic conrol unit
10
30 Rear lid power closing mechanism20
31
Comfort systems, rear
15
32 Central locking, right10
3334 Power window, front right2535
Turn signal, side light, right
10
36 Roof module, telephone, compass5
3738 Porsche Stability Management103940 Center differential lock1041
Towing attachment
10
42 Roof module, garage door opener5
43
Back up light
5
44 Heated washer nozzles, level control5 No. Designation Rating in A