2005 PONTIAC BONNEVILLE transmission
[x] Cancel search: transmissionPage 105 of 438
If your vehicle is equipped with the HomeLink®
Transmitter, it complies with Part 15 of the FCC Rules.
Operation is subject to the following two conditions:
(1) this device may not cause harmful interference, and
(2) this device must accept any interference received,
including interference that may cause undesired
operation.
This device complies with RSS-210 of Industry Canada.
Operation is subject to the following two conditions:
(1) this device may not cause interference, and (2) this
device must accept any interference, including
interference that may cause undesired operation of the
device.
Changes and modi�cations to this system by other than
an authorized service facility could void authorization
to use this equipment.
Programming the HomeLink®
Transmitter
Do not use the HomeLink®Transmitter with any garage
door opener that does not have the “stop and reverse”
feature. This includes any garage door opener model
manufactured before April 1, 1982. If you have a newer
garage door opener with rolling codes, please be
sure to follow Steps 6 through 8 to complete the
programming of your HomeLink
®Transmitter.Read the instructions completely before attempting to
program the HomeLink
®Transmitter. Because of
the steps involved, it may be helpful to have another
person available to assist you in programming the
transmitter.
Keep the original transmitter for use in other vehicles as
well as for future HomeLink
®programming. It is also
recommended that upon the sale of the vehicle,
the programmed HomeLink
®buttons should be erased
for security purposes. Refer to “Erasing HomeLink®
Buttons” or, for assistance, contact HomeLink®on the
internet at: www.homelink.com or by calling
1-800-355-3515.
Be sure that people and objects are clear of the garage
door or gate operator you are programming. When
programming a garage door, it is advised to park outside
of the garage.
It is recommended that a new battery be installed in
your hand-held transmitter for quicker and more
accurate transmission of the radio frequency.
2-41
Page 107 of 438
8. Return to the vehicle. Firmly press and hold the
programmed HomeLink®button for two seconds,
then release. Repeat the press/hold/release
sequence a second time, and depending on the
brand of the garage door opener (or other rolling
code device), repeat this sequence a third time
to complete the programming.
HomeLink
®should now activate your rolling-code
equipped device.
To program the remaining two HomeLink
®buttons,
begin with Step 2 of “Programming HomeLink®.” You do
not want to repeat Step 1, as this will erase all
previous programming.
Gate Operator and Canadian
Programming
Canadian radio-frequency laws require transmitter
signals to “time out” or quit after several seconds of
transmission. This may not be long enough for
HomeLink
®to pick up the signal during programming.
Similarly, some U.S. gate operators are manufactured to
“time out” in the same manner.If you live in Canada, or you are having difficulty
programming a gate operator by using the
“Programming HomeLink
®” procedures (regardless of
where you live), replace Step 3 under “Programming
HomeLink
®” with the following:
Continue to press and hold the HomeLink
®button while
you press and release every two seconds (cycle)
your hand-held transmitter until the frequency signal has
been successfully accepted by HomeLink
®. The
indicator light will �ash slowly at �rst and then rapidly.
Proceed with Step 4 under “Programming HomeLink
®”
to complete.
Using HomeLink®
Press and hold the appropriate HomeLink®button for at
least half of a second. The indicator light will come
on while the signal is being transmitted.
2-43
Page 174 of 438
When you have the oil changed according to the
maintenance schedule, you will have to reset the engine
oil life system. To reset the engine oil life system, see
“How to Reset the Engine Oil Life System” underEngine
Oil Life System on page 5-20.
Tire Pressure Status:Press the SELECT button until
TIRE PRESSURE appears in the display. TIRE
PRESSURE NORMAL is displayed when the Check
Tire Pressure System believes your vehicle’s tire
pressures are normal. If a potential problem is detected,
the display will show CHECK TIRE PRESSURE and
the tire pressure status will show TIRE PRESSURE
LOW. If you see the CHECK TIRE PRESSURE
message, you should stop as soon as you can and
check all your tires for damage. If a tire is �at, seeIf a
Tire Goes Flat on page 5-92. Also check the tire
pressure in all four tires as soon as you can. See
In�ation - Tire Pressure on page 5-80andCheck Tire
Pressure System on page 5-83.DIC Warnings and Messages
Other messages or warnings may appear in the DIC
display. For Canadian drivers, in addition to the
DIC message your DIC will display EXP with a number
after it which re�ects the following messages:
EXP
(Export ID) Warning Message
6 TRANSMISSION HOT IDLE ENGINE**
9 CHECK GAGES VOLT
11 CHECK GAGES LOW FUEL
15 LOW ENGINE COOLANT**
16 ENGINE HOT A/C DISABLED
20 TURN SIGNAL ON?
24 TRUNK AJAR
25 WASHER FLUID LOW
27 BATTERY SAVER ACTIVE
32 ENGINE HOT IDLE ENGINE**
33 STARTING DISABLED — THEFT*
34 SERVICE THEFT SYSTEM
35 CHECK GAGES OIL PRESSURE*
36 OIL LEVEL LOW
37 BRAKE FLUID LOW*
40 ALARM OCCURRED
44 CHECK GAGES TEMPERATURE*
3-62
Page 337 of 438
Tire Size
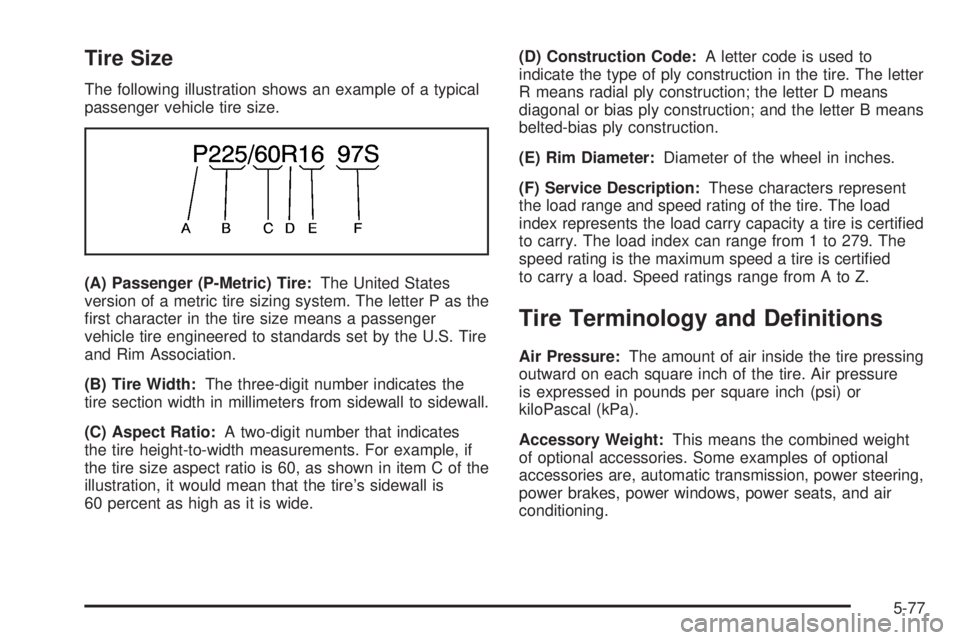
The following illustration shows an example of a typical
passenger vehicle tire size.
(A) Passenger (P-Metric) Tire:The United States
version of a metric tire sizing system. The letter P as the
�rst character in the tire size means a passenger
vehicle tire engineered to standards set by the U.S. Tire
and Rim Association.
(B) Tire Width:The three-digit number indicates the
tire section width in millimeters from sidewall to sidewall.
(C) Aspect Ratio:A two-digit number that indicates
the tire height-to-width measurements. For example, if
the tire size aspect ratio is 60, as shown in item C of the
illustration, it would mean that the tire’s sidewall is
60 percent as high as it is wide.(D) Construction Code:A letter code is used to
indicate the type of ply construction in the tire. The letter
R means radial ply construction; the letter D means
diagonal or bias ply construction; and the letter B means
belted-bias ply construction.
(E) Rim Diameter:Diameter of the wheel in inches.
(F) Service Description:These characters represent
the load range and speed rating of the tire. The load
index represents the load carry capacity a tire is certi�ed
to carry. The load index can range from 1 to 279. The
speed rating is the maximum speed a tire is certi�ed
to carry a load. Speed ratings range from A to Z.
Tire Terminology and De�nitions
Air Pressure:The amount of air inside the tire pressing
outward on each square inch of the tire. Air pressure
is expressed in pounds per square inch (psi) or
kiloPascal (kPa).
Accessory Weight:This means the combined weight
of optional accessories. Some examples of optional
accessories are, automatic transmission, power steering,
power brakes, power windows, power seats, and air
conditioning.
5-77
Page 407 of 438
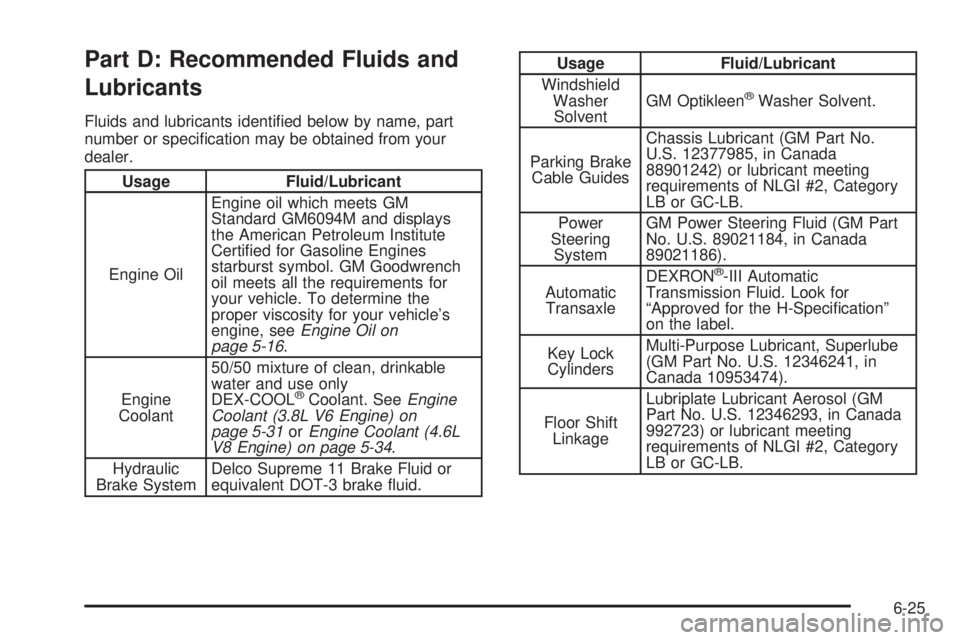
Part D: Recommended Fluids and
Lubricants
Fluids and lubricants identi�ed below by name, part
number or speci�cation may be obtained from your
dealer.
Usage Fluid/Lubricant
Engine OilEngine oil which meets GM
Standard GM6094M and displays
the American Petroleum Institute
Certi�ed for Gasoline Engines
starburst symbol. GM Goodwrench
oil meets all the requirements for
your vehicle. To determine the
proper viscosity for your vehicle’s
engine, seeEngine Oil on
page 5-16.
Engine
Coolant50/50 mixture of clean, drinkable
water and use only
DEX-COOL
®Coolant. SeeEngine
Coolant (3.8L V6 Engine) on
page 5-31orEngine Coolant (4.6L
V8 Engine) on page 5-34.
Hydraulic
Brake SystemDelco Supreme 11 Brake Fluid or
equivalent DOT-3 brake �uid.
Usage Fluid/Lubricant
Windshield
Washer
SolventGM Optikleen
®Washer Solvent.
Parking Brake
Cable GuidesChassis Lubricant (GM Part No.
U.S. 12377985, in Canada
88901242) or lubricant meeting
requirements of NLGI #2, Category
LB or GC-LB.
Power
Steering
SystemGM Power Steering Fluid (GM Part
No. U.S. 89021184, in Canada
89021186).
Automatic
TransaxleDEXRON
®-III Automatic
Transmission Fluid. Look for
“Approved for the H-Speci�cation”
on the label.
Key Lock
CylindersMulti-Purpose Lubricant, Superlube
(GM Part No. U.S. 12346241, in
Canada 10953474).
Floor Shift
LinkageLubriplate Lubricant Aerosol (GM
Part No. U.S. 12346293, in Canada
992723) or lubricant meeting
requirements of NLGI #2, Category
LB or GC-LB.
6-25
Page 423 of 438
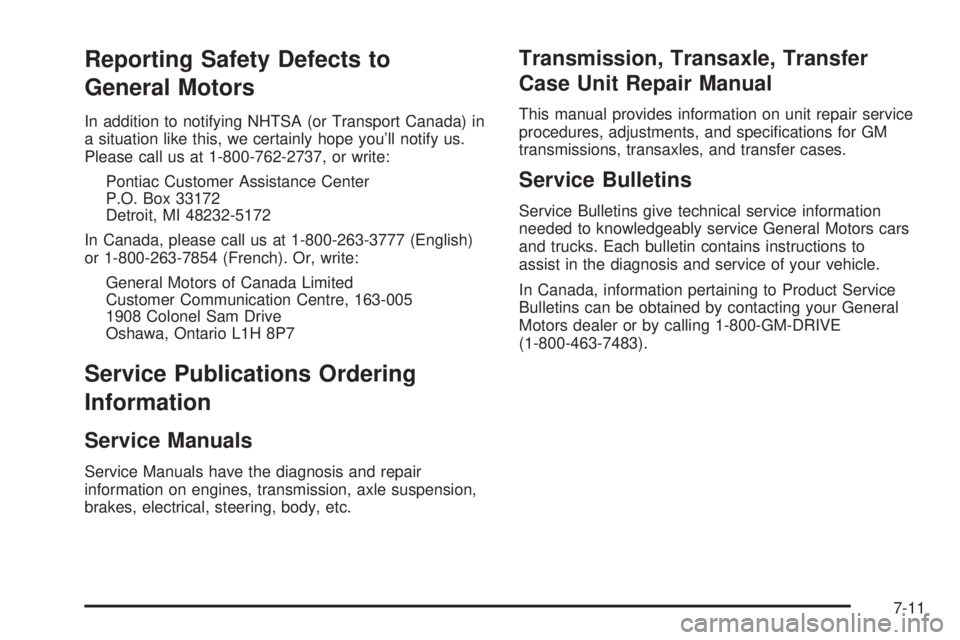
Reporting Safety Defects to
General Motors
In addition to notifying NHTSA (or Transport Canada) in
a situation like this, we certainly hope you’ll notify us.
Please call us at 1-800-762-2737, or write:
Pontiac Customer Assistance Center
P.O. Box 33172
Detroit, MI 48232-5172
In Canada, please call us at 1-800-263-3777 (English)
or 1-800-263-7854 (French). Or, write:
General Motors of Canada Limited
Customer Communication Centre, 163-005
1908 Colonel Sam Drive
Oshawa, Ontario L1H 8P7
Service Publications Ordering
Information
Service Manuals
Service Manuals have the diagnosis and repair
information on engines, transmission, axle suspension,
brakes, electrical, steering, body, etc.
Transmission, Transaxle, Transfer
Case Unit Repair Manual
This manual provides information on unit repair service
procedures, adjustments, and speci�cations for GM
transmissions, transaxles, and transfer cases.
Service Bulletins
Service Bulletins give technical service information
needed to knowledgeably service General Motors cars
and trucks. Each bulletin contains instructions to
assist in the diagnosis and service of your vehicle.
In Canada, information pertaining to Product Service
Bulletins can be obtained by contacting your General
Motors dealer or by calling 1-800-GM-DRIVE
(1-800-463-7483).
7-11