2005 PONTIAC BONNEVILLE fuse panel
[x] Cancel search: fuse panelPage 120 of 438
Turn and Lane-Change Signals
The turn signal has two upward for right, and two
downward for left, positions. These positions allow you
to signal a turn or a lane change.
To signal a turn, move the lever all the way up or down.
When the turn is �nished, the lever will return
automatically.
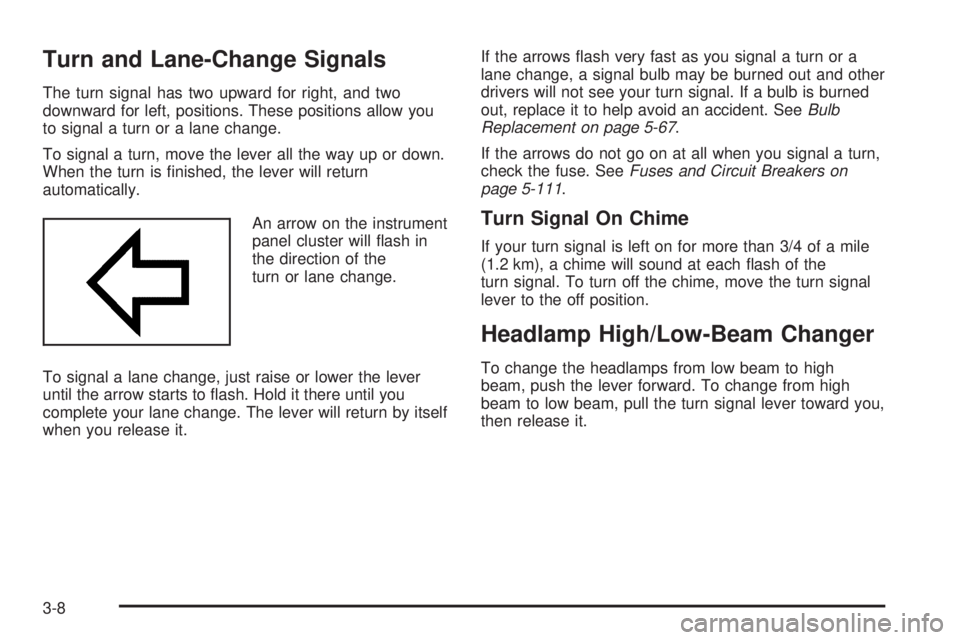
An arrow on the instrument
panel cluster will �ash in
the direction of the
turn or lane change.
To signal a lane change, just raise or lower the lever
until the arrow starts to �ash. Hold it there until you
complete your lane change. The lever will return by itself
when you release it.If the arrows �ash very fast as you signal a turn or a
lane change, a signal bulb may be burned out and other
drivers will not see your turn signal. If a bulb is burned
out, replace it to help avoid an accident. SeeBulb
Replacement on page 5-67.
If the arrows do not go on at all when you signal a turn,
check the fuse. SeeFuses and Circuit Breakers on
page 5-111.
Turn Signal On Chime
If your turn signal is left on for more than 3/4 of a mile
(1.2 km), a chime will sound at each �ash of the
turn signal. To turn off the chime, move the turn signal
lever to the off position.
Headlamp High/Low-Beam Changer
To change the headlamps from low beam to high
beam, push the lever forward. To change from high
beam to low beam, pull the turn signal lever toward you,
then release it.
3-8
Page 135 of 438

2. Adjust the seat, if necessary, before setting the
height using the IMAGE switch.
Press and hold the top of the IMAGE switch, raising
the HUD image as far as possible. Then press on
the bottom of the HUD IMAGE switch to move
the image down, so the image is as low as possible,
but in full view.
3. Turn the INTENSITY knob counterclockwise until
the HUD image is no brighter than necessary. To
turn the HUD off, turn the HUD INTENSITY knob all
the way counterclockwise.
If the sun comes out, or it becomes cloudy, or if you
turn on your headlamps, you may need to adjust
the HUD brightness using the HUD INTENSITY knob.
Polarized sunglasses could make the HUD image
harder to see.
Clean the inside of the windshield as needed to remove
any dirt or �lm that reduces the sharpness or clarity
of the HUD image.Spray household glass cleaner on a soft, clean cloth.
Wipe the HUD lens gently, then dry it. Do not spray
cleaner directly on the lens, because the cleaner �uid
could leak inside the unit.
If you cannot see the HUD image when the ignition is
on, check to see if:
The HUD unit is covered.
The HUD INTENSITY knob is adjusted correctly.
The HUD image is adjusted to the proper height.
A fuse in the fuse panel may have blown. See
Fuses and Circuit Breakers on page 5-111.
If the HUD image is not clear, it could be too bright.
Move the HUD INTENSITY knob counterclockwise. You
may need to clean the windshield and HUD lens.
Your windshield is part of the HUD system. If you ever
have to have a new windshield, be sure to get one
designed for HUD. If you do not, the HUD image may
look blurred and out of focus.
3-23
Page 136 of 438
Accessory Power Outlets
With the accessory power outlet you can plug in
auxiliary electrical equipment such as a cellular
telephone or CB radio.
If your vehicle has a front console, the 12-volt accessory
power outlet is located at the rear of the front console.
If your vehicle has a �oor console, the outlet is
located at the rear of the �oor console.
To use the outlet, remove the protective cap which
covers it. When not using it, always cover the outlet with
the protective cap.
Notice:Leaving electrical equipment on for
extended periods will drain the battery. Always turn
off electrical equipment when not in use and do
not plug in equipment that exceeds the maximum
amperage rating.
Certain electrical accessories may not be compatible
with the accessory power outlet and could result
in blown vehicle or adapter fuses. If you experience a
problem, see your dealer for additional information
on accessory power outlets.Notice:Adding any electrical equipment to your
vehicle may damage it or keep other components
from working as they should. The repairs would not
be covered by your warranty. Check with your
dealer before adding electrical equipment.
When adding electrical equipment, be sure to follow the
proper installation instructions included with the
equipment.
Notice:Improper use of the power outlet can cause
damage not covered by your warranty. Do not
hang any type of accessory or accessory bracket
from the plug because the power outlets are
designed for accessory power plugs only.
Ashtrays and Cigarette Lighter
Push down on the cover to reveal the front ashtray.
To clean the ashtray, lift it out by pulling on the �nger
holes on each side.
On models without a console, an ashtray is located
underneath the instrument panel. To clean the ashtray,
lift it out by pulling up on the tabs on either side. It
snaps back into place.
3-24
Page 262 of 438
When It Is Time for New Tires.......................5-86
Buying New Tires.........................................5-86
Uniform Tire Quality Grading..........................5-87
Wheel Alignment and Tire Balance..................5-89
Wheel Replacement......................................5-89
Tire Chains..................................................5-90
Accessory In�ator.........................................5-91
If a Tire Goes Flat........................................5-92
Changing a Flat Tire.....................................5-93
Removing the Spare Tire and Tools................5-94
Removing the Flat Tire and Installing the
Spare Tire................................................5-95
Storing a Flat or Spare Tire and Tools...........5-100
Compact Spare Tire....................................5-100
Appearance Care..........................................5-101
Fabric/Carpet..............................................5-102
Vinyl.........................................................5-103
Leather......................................................5-104
Instrument Panel.........................................5-104
Interior Plastic Components..........................5-104
Glass Surfaces...........................................5-104
Care of Safety Belts....................................5-104
Weatherstrips.............................................5-105
Washing Your Vehicle..................................5-105
Cleaning Exterior Lamps/Lenses....................5-105
Finish Care................................................5-106Windshield and Wiper Blades.......................5-106
Aluminum or Chrome-Plated Wheels..............5-107
Tires.........................................................5-107
Sheet Metal Damage...................................5-108
Finish Damage...........................................5-108
Underbody Maintenance...............................5-108
Chemical Paint Spotting...............................5-108
Vehicle Care/Appearance Materials................5-109
Vehicle Identi�cation.....................................5-110
Vehicle Identi�cation Number (VIN)................5-110
Service Parts Identi�cation Label...................5-110
Electrical System..........................................5-111
Add-On Electrical Equipment.........................5-111
Headlamp Wiring........................................5-111
Windshield Wiper Fuses...............................5-111
Power Windows and Other
Power Options........................................5-111
Fuses and Circuit Breakers..........................5-111
Engine Compartment Fuse Block
(3.8L V6 Engine).....................................5-112
Engine Compartment Fuse Block
(4.6L V8 Engine).....................................5-114
Rear Underseat Fuse Block..........................5-116
Capacities and Speci�cations........................5-121
Normal Maintenance Replacement Parts.........5-122
Section 5 Service and Appearance Care
5-2
Page 374 of 438
Engine Compartment Fuse Block
(4.6L V8 Engine)
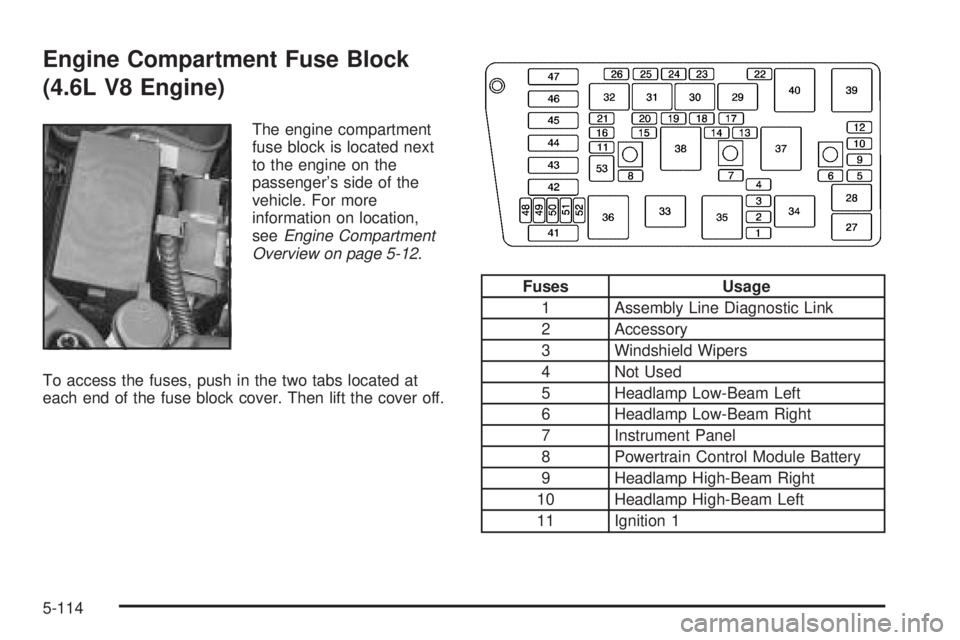
The engine compartment
fuse block is located next
to the engine on the
passenger’s side of the
vehicle. For more
information on location,
seeEngine Compartment
Overview on page 5-12.
To access the fuses, push in the two tabs located at
each end of the fuse block cover. Then lift the cover off.
Fuses Usage
1 Assembly Line Diagnostic Link
2 Accessory
3 Windshield Wipers
4 Not Used
5 Headlamp Low-Beam Left
6 Headlamp Low-Beam Right
7 Instrument Panel
8 Powertrain Control Module Battery
9 Headlamp High-Beam Right
10 Headlamp High-Beam Left
11 Ignition 1
5-114
Page 377 of 438
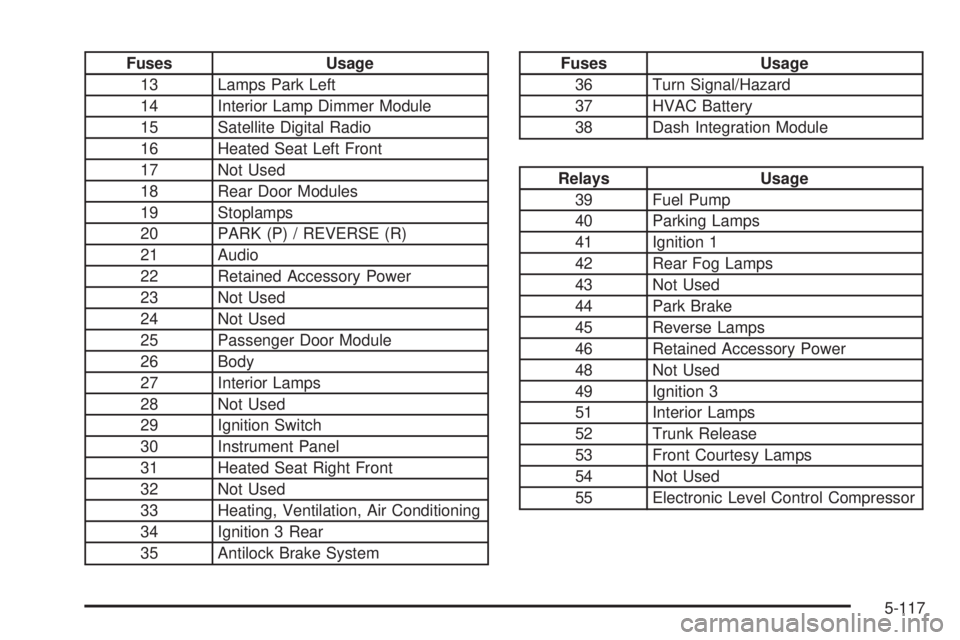
Fuses Usage
13 Lamps Park Left
14 Interior Lamp Dimmer Module
15 Satellite Digital Radio
16 Heated Seat Left Front
17 Not Used
18 Rear Door Modules
19 Stoplamps
20 PARK (P) / REVERSE (R)
21 Audio
22 Retained Accessory Power
23 Not Used
24 Not Used
25 Passenger Door Module
26 Body
27 Interior Lamps
28 Not Used
29 Ignition Switch
30 Instrument Panel
31 Heated Seat Right Front
32 Not Used
33 Heating, Ventilation, Air Conditioning
34 Ignition 3 Rear
35 Antilock Brake SystemFuses Usage
36 Turn Signal/Hazard
37 HVAC Battery
38 Dash Integration Module
Relays Usage
39 Fuel Pump
40 Parking Lamps
41 Ignition 1
42 Rear Fog Lamps
43 Not Used
44 Park Brake
45 Reverse Lamps
46 Retained Accessory Power
48 Not Used
49 Ignition 3
51 Interior Lamps
52 Trunk Release
53 Front Courtesy Lamps
54 Not Used
55 Electronic Level Control Compressor
5-117