2005 PONTIAC BONNEVILLE display
[x] Cancel search: displayPage 88 of 438
Ignition Positions
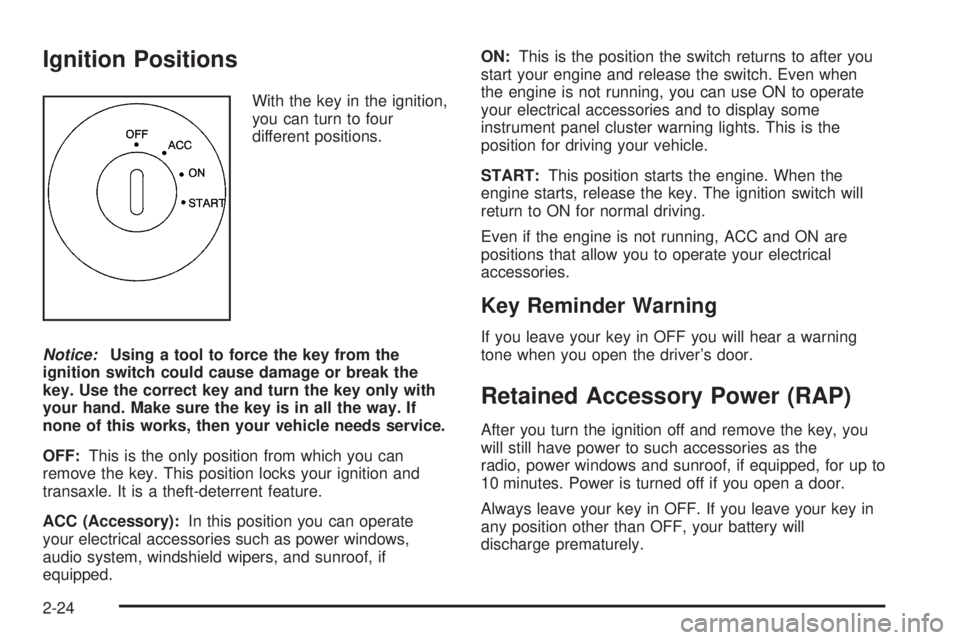
With the key in the ignition,
you can turn to four
different positions.
Notice:Using a tool to force the key from the
ignition switch could cause damage or break the
key. Use the correct key and turn the key only with
your hand. Make sure the key is in all the way. If
none of this works, then your vehicle needs service.
OFF:This is the only position from which you can
remove the key. This position locks your ignition and
transaxle. It is a theft-deterrent feature.
ACC (Accessory):In this position you can operate
your electrical accessories such as power windows,
audio system, windshield wipers, and sunroof, if
equipped.ON:This is the position the switch returns to after you
start your engine and release the switch. Even when
the engine is not running, you can use ON to operate
your electrical accessories and to display some
instrument panel cluster warning lights. This is the
position for driving your vehicle.
START:This position starts the engine. When the
engine starts, release the key. The ignition switch will
return to ON for normal driving.
Even if the engine is not running, ACC and ON are
positions that allow you to operate your electrical
accessories.
Key Reminder Warning
If you leave your key in OFF you will hear a warning
tone when you open the driver’s door.
Retained Accessory Power (RAP)
After you turn the ignition off and remove the key, you
will still have power to such accessories as the
radio, power windows and sunroof, if equipped, for up to
10 minutes. Power is turned off if you open a door.
Always leave your key in OFF. If you leave your key in
any position other than OFF, your battery will
discharge prematurely.
2-24
Page 111 of 438
2. Adjust the driver’s seat and lumbar position to a
safe and comfortable driving position. Adjust both
outside mirrors to suit you. SeeDIC Vehicle
Personalization on page 3-64.
3. Press and hold the memory button corresponding
with your DRIVER # displayed on the DIC for
longer than three seconds. You will hear two beeps
con�rming that the seat and mirror positions
have been entered into memory.
To set the seat and mirror positions for a second driver,
follow the previous steps, but start by pressing the unlock
button on the remote keyless entry transmitter that
displays the other DRIVER # on the DIC. Be sure to use
the memory button which corresponds to the DRIVER #
identi�ed by the second remote keyless entry transmitter.
To recall your memory positions, your vehicle must be
in PARK (P). Press and release the memory button
corresponding to the desired driving position. The seat
and mirrors will move to the position previously
stored for the identi�ed driver. You will hear one beep.
To store the exit position for an easy exit, do the
following:
1. First identify the DRIVER # by pressing memory
button 1 or 2 or by pressing the unlock button on
the remote keyless entry transmitter.2. Adjust the driver’s seat to the desired exit position.
3. Press and hold the EXIT button for longer than
three seconds. You will hear two beeps con�rming
that the seat exit position has been entered into
memory.
To set the exit position for a second driver, follow the
previous steps, but start by pressing the unlock
button on the remote keyless entry transmitter that
displays the other DRIVER # on the DIC. Be sure to use
the memory button which corresponds to the DRIVER #
identi�ed by the other remote keyless entry transmitter.
To recall the exit position, your vehicle must be in
PARK (P). Press and release the EXIT button and the
seat will move to the exit position previously stored
for the current identi�ed driver. You will hear one beep.
If an exit position has not been stored for the current
identi�ed driver, the seat will move all the way back.
To stop recall movement of the seat at any time, press
the driver’s power seat control located on the outboard
side of the front seat.
Mirrors and lumbar positions will not be stored or
recalled for the exit position.
If you would like your stored driving or exit position to
be recalled when unlocking your vehicle with the remote
keyless entry transmitter, seeDIC Vehicle
Personalization on page 3-64.
2-47
Page 113 of 438
Instrument Panel Overview...............................3-4
Hazard Warning Flashers................................3-6
Other Warning Devices...................................3-6
Horn.............................................................3-6
Tilt Wheel.....................................................3-6
Turn Signal/Multifunction Lever.........................3-7
Turn and Lane-Change Signals........................3-8
Headlamp High/Low-Beam Changer..................3-8
Flash-to-Pass.................................................3-9
Windshield Wiper Lever...................................3-9
Cruise Control..............................................3-11
Exterior Lamps.............................................3-14
Wiper Activated Headlamps............................3-14
Headlamps on Reminder................................3-15
Daytime Running Lamps (DRL).......................3-15
Fog Lamps..................................................3-16
Twilight Sentinel
®..........................................3-16
Exterior Lighting Battery Saver........................3-17
Instrument Panel Brightness...........................3-17
Courtesy Lamps...........................................3-17
Entry Lighting...............................................3-18
Delayed Entry Lighting...................................3-18
Theater Dimming..........................................3-18
Delayed Exit Lighting.....................................3-18
Perimeter Lighting.........................................3-18
Parade Dimming...........................................3-19
Front Reading Lamps....................................3-20Rear Reading Lamps....................................3-20
Battery Load Management.............................3-20
Inadvertent Power Battery Saver.....................3-21
Head-Up Display (HUD).................................3-21
Accessory Power Outlets...............................3-24
Ashtrays and Cigarette Lighter........................3-24
Climate Controls............................................3-25
Climate Control System.................................3-25
Automatic Climate Control System...................3-28
Outlet Adjustment.........................................3-32
Climate Controls Personalization.....................3-32
Warning Lights, Gages, and Indicators............3-33
Instrument Panel Cluster................................3-33
Speedometer and Odometer...........................3-37
Trip Odometer..............................................3-37
Tachometer.................................................3-38
Safety Belt Reminder Light.............................3-38
Airbag Readiness Light..................................3-38
Voltmeter Gage............................................3-40
Brake System Warning Light..........................3-41
Anti-Lock Brake System Warning Light.............3-42
Traction Control System (TCS) Warning Light......3-43
Low Traction Active Light...............................3-44
Engine Coolant Temperature Gage
(V6 Engine)..............................................3-45
Section 3 Instrument Panel
3-1
Page 114 of 438
Engine Coolant Temperature Gage
(V8 Engine)..............................................3-46
Tire Pressure Light.......................................3-47
Malfunction Indicator Lamp.............................3-48
Oil Pressure Gage (V6 Engine).......................3-51
Oil Pressure Gage (V8 Engine).......................3-52
Check Oil Level Light....................................3-53
Security Light...............................................3-53
Highbeam On Light.......................................3-54
Low Washer Fluid Warning Light.....................3-54
Check Gages Warning Light...........................3-54
Door Ajar Light.............................................3-54
Trunk Ajar Light............................................3-55
Service Vehicle Soon Light............................3-55
Fuel Gage (V6 Engine)..................................3-56
Fuel Gage (V8 Engine)..................................3-57
Systems Monitor............................................3-58
Driver Information Center (DIC).......................3-59
DIC Controls and Displays.............................3-60
DIC Warnings and Messages.........................3-62
Driver Identi�er DIC Display...........................3-64
DIC Vehicle Personalization............................3-64Secondary Information Center (SIC).................3-70
Electronic Compass......................................3-70
Audio System(s).............................................3-72
Setting the Time...........................................3-72
Radio with CD..............................................3-73
Radio with Cassette and CD..........................3-83
Trunk-Mounted CD Changer...........................3-95
Theft-Deterrent Feature..................................3-99
Audio Steering Wheel Controls.......................3-99
Radio Reception.........................................3-100
Care of Your Cassette Tape Player...............3-101
Care of Your CDs.......................................3-102
Care of Your CD Player...............................3-102
Diversity Antenna System.............................3-102
XM™ Satellite Radio Antenna System............3-103
Chime Level Adjustment...............................3-103
Section 3 Instrument Panel
3-2
Page 129 of 438
If the Twilight Sentinel®lighting is active, it can be
disabled by turning on the manual parking lamps. This
lighting will be disabled until the key is turned from
ON or until the manual parking lamps are turned off.
Also, it is possible that your headlamps may go
out if you drive from a dark area into a bright area like a
lighted parking lot. If this happens, turn on your
headlamps with the exterior lamp control.
Exterior Lighting Battery Saver
If the exterior lamp control has been left on, the exterior
lamps will turn off about 10 minutes after the ignition
is turned to OFF and a door has been opened.
This protects against draining the battery in case you
have accidentally left the headlamps or parking
lamps on. If you need to leave the lamps on for more
than 10 minutes, use the exterior lamp control to turn the
lamps back on after turning the ignition to OFF and
opening a door. To delay the lamps from turning off, see
“Twilight Sentinel
®,” listed previously.
Instrument Panel Brightness
When it is dark outside, you can brighten or dim your
instrument panel cluster lights using the DIM knob,
located to the left of the steering wheel on the
instrument panel.
Turn the knob clockwise to brighten the instrument
panel cluster lights and displays. Turn the knob
clockwise all the way to turn on the interior courtesy
lamps. Turn the knob counterclockwise to dim the
instrument panel cluster lights and displays and to turn
off the courtesy lamps.
Courtesy Lamps
If it is dark enough outside, when any door is opened,
several lamps will come on. They make it easier for you
to enter and leave the vehicle. Turn the DIM knob all
the way clockwise to turn the interior courtesy lamps on.
3-17
Page 131 of 438
Personal Choice Programming
This feature can be programmed in the on or off mode
for each transmitter.
If your vehicle is equipped with the Driver Information
Center (DIC), you must program this feature through the
DIC. SeeDIC Vehicle Personalization on page 3-64.
To turn the feature off, do the following:
1. Keep all doors closed, the vehicle in PARK (P) and
the ignition on throughout this procedure.
2. Press and hold LOCK on the power door lock
switch throughout this procedure. All the doors
will lock.
3. Press the remote alarm button on the transmitter.
Perimeter lighting remains on at this time and the
horn will chirp twice.
4. Press the remote alarm button again. Perimeter
lighting is disabled and the horn will chirp once.
5. Release the door lock switch. The perimeter lighting
feature is now off.To turn the feature on, do the following:
1. Keep all doors closed, the vehicle in PARK (P) and
the ignition on throughout this procedure.
2. Press and hold LOCK on the power door lock
switch throughout this procedure. All the doors
will lock.
3. Press the remote alarm button on the transmitter.
Perimeter lighting remains off at this time and the
horn will chirp once.
4. Press the remote alarm button again. Perimeter
lighting is now enabled and the horn will chirp twice.
5. Release the door lock switch. The perimeter lighting
feature is now on.
This procedure only changes the mode for the
transmitter used to change this setting.
Parade Dimming
To activate the instrument panel backlighting during the
day, turn the exterior lamp switch to the parking lamp or
headlamp position. Dimming of the instrument panel
display is not possible during daylight hours. The
instrument panel display can only be adjusted when the
parking lamps or headlamps are on and it is dark outside.
3-19
Page 132 of 438
Front Reading Lamps
The front reading lamps, located on the headliner, will
come on as courtesy lamps when you open any of
the doors while it is dark outside. They will also come
on as part of the interior lighting features listed
previously.
To turn on a reading lamp when the doors are closed,
press either button. Press it again to turn the lamp off.
To avoid draining your vehicle’s battery, be sure to
turn off the reading lamps when leaving your vehicle.
See “Inadvertent Power Battery Saver” later in this
section for more information.
Rear Reading Lamps
The rear reading lamps, located over each rear door,
will come on as courtesy lamps when you open
any of the doors while it is dark outside. They will also
come on as part of the interior lighting features listed
previously.
To turn on a reading lamp when the doors are closed,
press either button. Press it again to turn the lamp off.
Battery Load Management
The battery load management feature is designed to
monitor the vehicle’s electrical load and determine when
the battery is in a heavy discharge condition. During
times of high electrical loading, the engine may idle at
higher revolutions per minute (RPM) than normal to make
sure the battery charges. High electrical loads may occur
when several of the following are on: headlamps, high
beams, fog lamps, rear window defogger, fan on high
speed, heated seats, and engine cooling fans.
If your vehicle’s battery remains in a heavy discharge
condition for a long period of time, the fan, rear
defogger, heated seats and heated mirrors will be
disabled and the DIC will display BATTERY SAVER
ACTIVE. This can happen either under long periods of
idling or low speed driving with high electrical loading,
or in the event of a charging system fault.
Monitor the battery voltage when in the BATTERY
SAVER ACTIVE mode.
If the voltmeter remains in the shaded area, below
11 volts, when driving then have the charging
system serviced immediately.
If the voltage increases above 12 volts then the
battery needs to be recharged. Try driving on
the highway with as few electrical accessories on
as possible.
3-20
Page 133 of 438
Inadvertent Power Battery Saver
This feature is designed to protect your vehicle’s battery
against drainage from the interior lamps, trunk lamp
or glove box lamp. When the ignition is turned off, the
power to these features will automatically turn off
after 10 minutes. Power will be restored for an additional
10 minutes if any door is opened, the trunk is opened
or the courtesy lamps are turned on.
Head-Up Display (HUD)
{CAUTION:
If the HUD image is too bright, or too high in
your �eld of view, it may take you more time to
see things you need to see when it is dark
outside. Be sure to keep the HUD image dim
and placed low in your �eld of view.
If you have the optional Head-Up Display (HUD), you
can see some of the driver information also available on
your instrument panel cluster. The information maybe displayed in English or metric units and appears as
an image focused out toward the front of your vehicle.
The HUD shows the following:
Speedometer Reading
Turn Signal Indicators
High-beam Indicator Symbol
CHECK GAGES Message (for low oil pressure,
high coolant temperature, low oil level, high/low
battery, brake, ABS and air bag)
Low Fuel Warning Symbol
Radio Frequency and Playback Mode (with the
exception of the XM™ radio)
3-21