Page 108 of 417

107 Controls in detail
Lighting
Daytime running lamp mode�
Turn the exterior lamp switch to
positionM orU.
When the engine is running, the low beam
headlamps are switched on.
In low ambient light conditions, the
following lamps will switch on additionally:
�
Tail and parking lamps
�
License plate lamps
�
Side marker lamps
For nighttime driving you should turn the
exterior lamp switch to positionB to
permit activation of the high beam head-
lamps.Canada only:
The daytime running lamp mode is manda-
tory and therefore in a constant mode.
When the engine is running, and you shift
from a driving position to positionN orP,
the low beam headlamps will switch off
with a three-minute delay.
When the engine is running, and you
�
turn the exterior lamp switch to
positionC, the parking lamps
switch on additionally.
�
turn the exterior lamp switch to
positionB, the manual headlamp
mode has priority over the daytime
running lamp mode.
The corresponding exterior lamps
switch on (
�page 105).USA only:
By default, the daytime running lamp mode
is deactivated. Activate the daytime
running lamp mode using the control
system, see “Setting daytime running lamp
mode (USA only)” (
�page 131).
When the engine is running, and you turn
the exterior lamp switch to positionC
orB, the manual headlamp mode has
priority over the daytime running lamp
mode.
The corresponding exterior lamps switch
on (
�page 105).
iWith the daytime running lamp mode
activated and the exterior lamp switch
in positionM, the high beam head-
lamps cannot be switched on.
The high beam flasher is available at all
times.
Page 111 of 417
110 Controls in detailLightingHazard warning flasher
The hazard warning flasher can be
switched on at all times, even with the
SmartKey removed from the starter
switch.
The hazard warning flasher switches on
automatically when an airbag deploys.
The hazard warning flasher switch is
located on the upper part of the center
console.
1Hazard warning flasher switchSwitching on hazard warning flasher
�
Press hazard warning flasher
switch1.
All turn signals are flashing.Switching off hazard warning flasher
�
Press hazard warning flasher switch1
again.
iWith the hazard warning flasher
activated and the combination switch
set for either left or right turn, only the
respective turn signals will operate
when the ignition is switched on.
iIf the hazard warning flasher has been
activated automatically, press hazard
warning flasher switch1 once to
switch it off.
Page 116 of 417
.
�
If it is not d")
115 Controls in detail
Instrument cluster
Resetting the trip odometer�
Make sure you are viewing the trip
odometer and main odometer in the
right multifunction display
(�page 117).
�
If it is not displayed, press buttonè
orÿ on the multifunction steering
wheel until the trip odometer appears
in the right multifunction display.
�
Press and hold reset button 4
(�page 29) until the trip odometer is
reset.
Tachometer
The red marking on the tachometer
(�page 29) denotes excessive engine
speed.
To help protect the engine, the fuel supply
is interrupted if the engine is operated
within the red marking.
Outside temperature indicator
The outside temperature is displayed in
the right multifunction display
(�page 29). For information on how to se-
lect the unit of the displayed temperature,
i.e. degrees Celsius (°C) or degrees Fahr-
enheit (°F), see “Selecting temperature
display mode” (
�page 129).
!Avoid driving at excessive engine
speeds, as it may result in serious
engine damage that is not covered by
the Mercedes-Benz Limited Warranty.
Warning!
G
The outside temperature indicator is not de-
signed to serve as an ice-warning device and
is therefore unsuitable for that purpose.
Indicated temperatures just above the freez-
ing point do not guarantee that the road sur-
face is free of ice. The road may still be icy,
especially in wooded areas or on bridges.
Page 124 of 417
123 Controls in detail
Control system
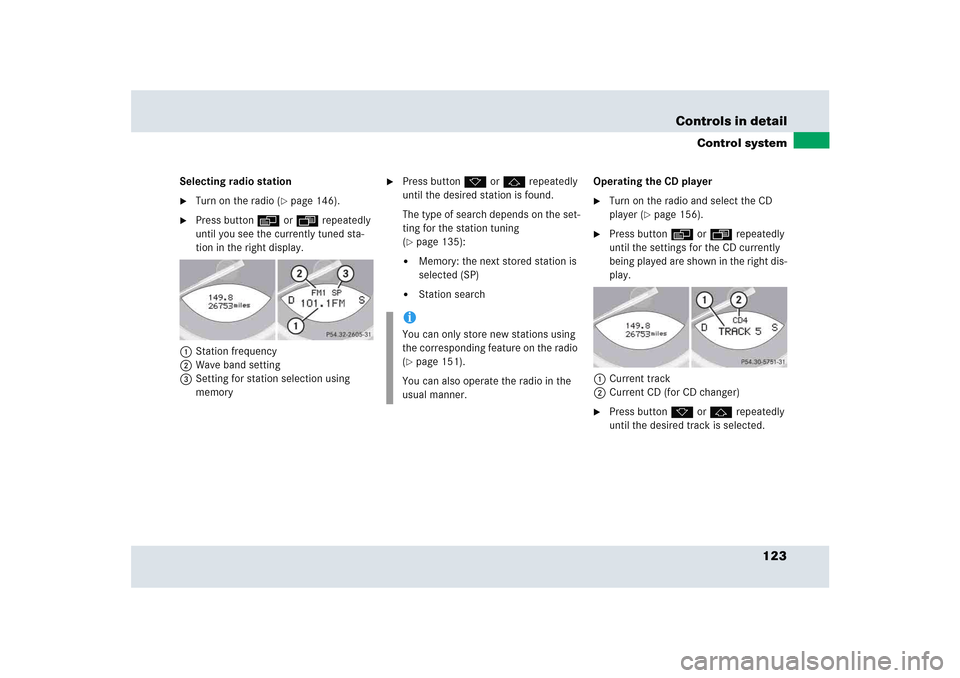
Selecting radio station�
Turn on the radio (
�page 146).
�
Press button è or ÿ repeatedly
until you see the currently tuned sta-
tion in the right display.
1Station frequency
2Wave band setting
3Setting for station selection using
memory
�
Press buttonk orj repeatedly
until the desired station is found.
The type of search depends on the set-
ting for the station tuning
(�page 135):
�
Memory: the next stored station is
selected (SP)
�
Station searchOperating the CD player
�
Turn on the radio and select the CD
player (
�page 156).
�
Press button è or ÿ repeatedly
until the settings for the CD currently
being played are shown in the right dis-
play.
1Current track
2Current CD (for CD changer)
�
Press button k or j repeatedly
until the desired track is selected.
iYou can only store new stations using
the corresponding feature on the radio
(�page 151).
You can also operate the radio in the
usual manner.
Page 125 of 417

124 Controls in detailControl systemVehicle status message memory
Use the vehicle status message memory
menu to scan malfunction and warning
messages that may be stored in the
system. Such messages appear in the mul-
tifunction display and are based on condi-
tions or system status the vehicle’s system
has recorded.
�
Press buttonè orÿ repeatedly
until the vehicle status message
memory appears in the right display.
The following functions are available:
No vehicle status messages
If no conditions are recorded in memory,
the message in the right display is:
Malfunction memory, no malfunctions
Vehicle status messages have been
recorded
If conditions have occurred causing status
messages to be recorded, the number of
messages appears in the right display:
1Number of messages�
Press button k or j.
The stored messages will now be
displayed in the order in which they
have occurred.
For malfunction and warning messag-
es, see “What to do if ...” (
�page 296).
Warning!
G
Malfunction and warning messages are only
indicated for certain systems and are inten-
tionally not very detailed. The malfunction
and warning messages are simply a remind-
er with respect to the operation of certain
systems and do not replace the owner’s
and/or driver’s responsibility to maintain
the vehicle’s operating safety by having all
required maintenance and safety checks
performed on the vehicle and by bringing
the vehicle to an authorized Mercedes-Benz
Center to address the malfunction and
warning messages (
�page 296).
Function
Page
No malfunction messages
124
Malfunctions occurred
124
Page 132 of 417
�
Move the selection marker with button
æ or ç to the
Lighting
sub-
menu.
�
Press button j or k repeatedly
unti")
131 Controls in detail
Control system
Setting daytime running lamp mode
(USA only)�
Move the selection marker with button
æ or ç to the
Lighting
sub-
menu.
�
Press button j or k repeatedly
until you see this message in the left
display:
Light circuit Headlamp
mode
.
The selection marker is on the current
setting.
�
Press buttonæ orç to select
manual operation (
Manual
) or daytime
running lamp mode (
Constant
)
activated.
With daytime running lamp mode activated
and the exterior lamp switch in
positionM orU, the low beam
headlamps are switched on when the
engine is running.
In low ambient light conditions the
following lamps will switch on additionally:
�
Parking lamps
�
Tail lamps
�
License plate lamps
�
Side marker lampsFor more information on the daytime
running lamp mode, see “Daytime running
lamp mode” (
�page 107).
iThis function is not available in
countries where the daytime running
lamp mode is mandatory and therefore
in a constant mode.
iIf you turn the exterior lamp switch to
another position, the corresponding
lamp(s) will switch on.
For safety reasons, resetting the Lighting
submenu to factory settings
(
�page 126) will not reset the daytime
running lamp mode.
In the right display you will then see the
message:
Cannot be fully reset to
factory settings while driv.!
.
Page 151 of 417
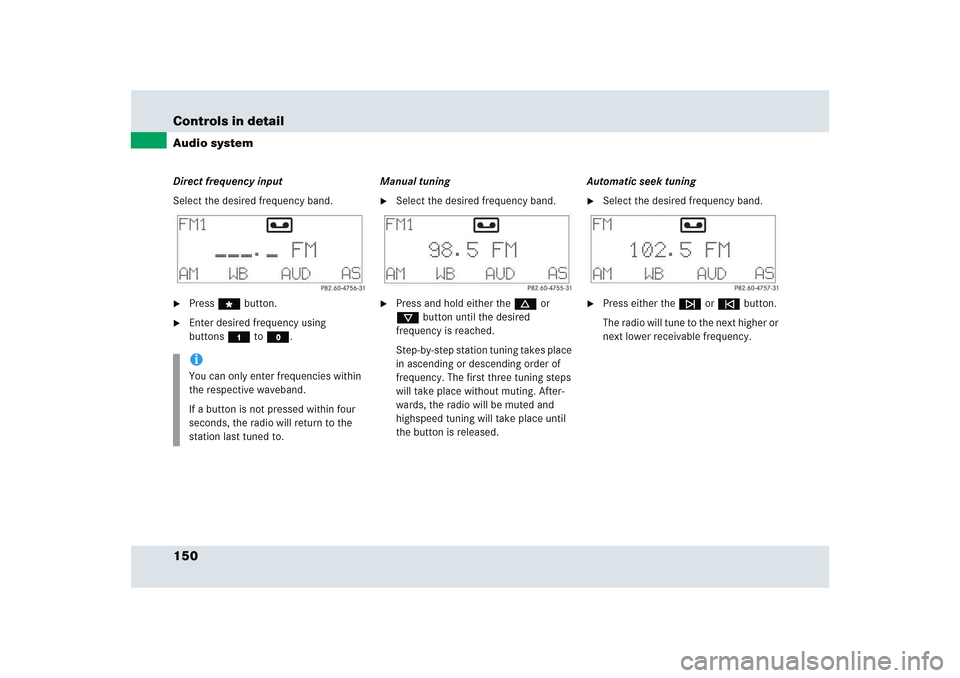
150 Controls in detailAudio systemDirect frequency input
Select the desired frequency band.�
Press“ button.
�
Enter desired frequency using
buttons4 toM.Manual tuning
�
Select the desired frequency band.
�
Press and hold either thed or
cbutton until the desired
frequency is reached.
Step-by-step station tuning takes place
in ascending or descending order of
frequency. The first three tuning steps
will take place without muting. After-
wards, the radio will be muted and
highspeed tuning will take place until
the button is released.Automatic seek tuning
�
Select the desired frequency band.
�
Press either thef or ebutton.
The radio will tune to the next higher or
next lower receivable frequency.
iYou can only enter frequencies within
the respective waveband.
If a button is not pressed within four
seconds, the radio will return to the
station last tuned to.
Page 157 of 417

156 Controls in detailAudio systemCD changer operation
General notes
Should excessively high temperatures oc-
cur while in CD mode,
CD TEMP HIGH
will
appear on the display and the CD will be
muted. The unit will then switch back to
the last operating mode used until the tem-
perature has decreased to a safe operating
level.
Should excessively low temperatures oc-
cur while in CD mode,
CD TEMP LOW
will ap-
pear on the display, but the CD will
continue to play.
Handle CDs carefully to prevent interfer-
ence during playback. Avoid fingerprints
and dust on CDs. Do not write on CDs or
apply any labels or other material to them.Only use original CDs. Using copied CDs
may create problems during playback.
Clean CDs from time to time with a com-
mercially available cleaning cloth. Do not
use solvents, anti-static sprays, etc. for
cleaning. Replace the CD in its case after
use. Protect CDs from heat and direct sun-
light.
Only use CDs, which bear the label shown
and that conform to the compact disc
digital audio standard (IEC 60908). You
can therefore only use CDs with a maxi-
mum thickness of 1.3 mm.
iUse of CDs which do not meet this
standard may cause damage to the CD
changer. Do not play single-CDs
(80 mm) with an adapter.
Your CD drive has been designed to
play CDs which correspond to the
EN 60908 standard.
If you insert thicker data carriers, e.g.
ones that have data on both sides (one
side with DVD data, the other side with
audio data), they cannot be ejected and
will damage the drive.Warning!
G
The CD changer is a Class 1 laser product.
There is a danger of invisible laser radiation
if the cover is opened or damaged.
Do not remove the cover. The CD changer
does not contain any parts which can be ser-
viced by the user. For safety reasons, have
any service work which may be necessary
performed only by qualified personnel.