Page 84 of 417
83 Safety and Security
Driving safety systems
Switching off the ESP
To improve the vehicle’s traction, turn off
the ESP in driving situations where it would
be advantageous to have the drive wheels
spin and thus cut into surfaces for better
grip such as:�
starting out on slippery surfaces and in
deep snow in conjunction with snow
chains
�
in sand or gravelWhen you switch off the ESP
�
the ESP does not stabilize the vehicle
�
the engine output is not limited, which
allows the drive wheels to spin and
thus cut into surfaces for better grip
�
the traction control will still brake a
spinning wheel
�
the ESP continues to operate when you
are braking
Turn on the ESP immediately if the afore-
mentioned circumstances do not apply
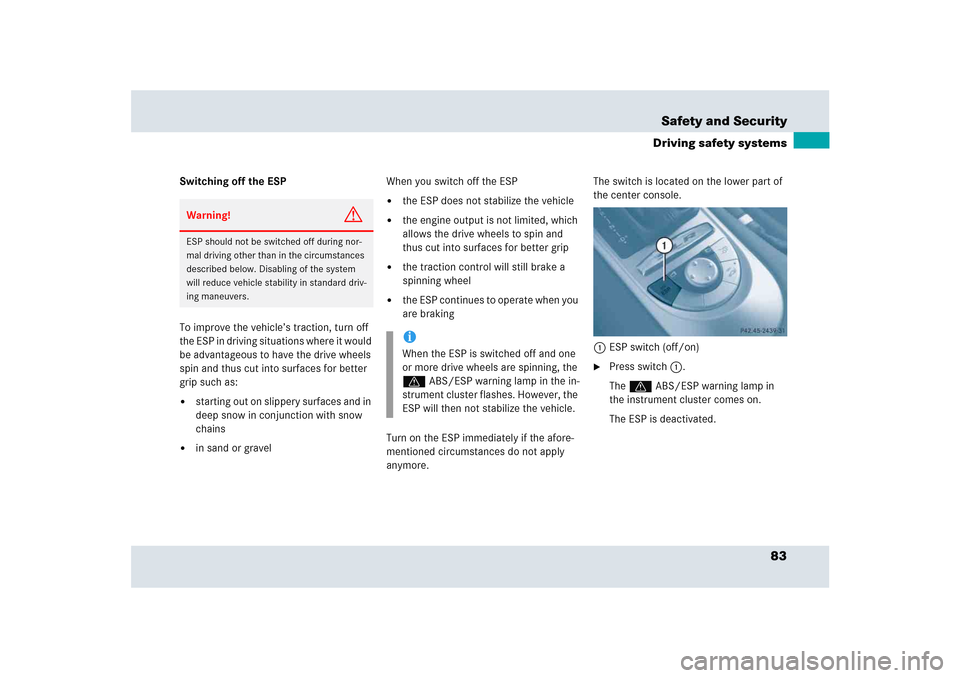
anymore.The switch is located on the lower part of
the center console.
1ESP switch (off/on)
�
Press switch1.
The v ABS/ESP warning lamp in
the instrument cluster comes on.
The ESP is deactivated.
Warning!
G
ESP should not be switched off during nor-
mal driving other than in the circumstances
described below. Disabling of the system
will reduce vehicle stability in standard driv-
ing maneuvers.
iWhen the ESP is switched off and one
or more drive wheels are spinning, the
v ABS/ESP warning lamp in the in-
strument cluster flashes. However, the
ESP will then not stabilize the vehicle.
Page 85 of 417
84 Safety and SecurityDriving safety systemsSwitching on the ESP�
Press switch1 again.
The ESP warning lampv in the
speedometer goes out.
You are now again in normal driving
mode with the ESP switched on.
SBC brake system
The SBC brake system combines a hydrau-
lic brake circuit with electronically con-
trolled brake servo assistance. You have
increased braking safety and improved
braking comfort.
Warning!
G
When the v ABS/ESP warning lamp is
illuminated continuously, the ESP is
switched off.
Adapt your speed and driving to the prevail-
ing road conditions and to the non-operating
status of the ESP.!Avoid spinning of a drive wheel for an
extended period with the ESP switched
off. This may cause serious damage to
the drivetrain which is not covered by
the Mercedes-Benz Limited Warranty.
Warning!
G
Never ignore a brake malfunction indicated
in the speedometer display, for example by
the
;
(USA only) or
3
(Canada only)
indicator lamp. Refer to the “Practical hints”
section (
�page 298). Also read and ob-
serve the messages in the instrument clus-
ter multifunction display (
�page 312).
Warning!
G
The SBC brake system requires electrical
power to operate.
A malfunction in the vehicle’s power supply
or electrical system may impair brake sys-
tem operation and switch it into its emer-
gency operation mode. In such a case, the
red brake warning lamp (
�page 298)
comes on and warning messages
(
�page 312) appear in the multifunction
display while driving. To brake, the driver
must then apply significantly greater brake
pedal pressure and depress the pedal much
further to obtain the expected braking ef-
fect. If necessary, apply full pressure to the
brake pedal. Stopping distance is increased!
Page 88 of 417
87 Safety and Security
Performance enhancement system
�Performance enhancement system
Airbrake
The Airbrake enhances the vehicle’s driv-
ing stability. It adapts the aerodynamics of
the vehicle to the driving conditions ac-
cording to the speed and the mode set.
This is achieved using a moveable spoiler.
The Airbrake is located at the rear edge of
the trunk lid.Warning!
G
When operating the Airbrake, make sure
there is no danger of anyone being harmed
by the Airbrake operation (i.e. raising and
lowering of flap). Be especially careful when
small children are around.
Warning!
G
The following factors increase the risk of ac-
cidents:�
Excessive speed, especially in turns
�
Wet and slippery road surfaces
�
Following another vehicle too closely
The Airbrake cannot reduce this risk.
Always adjust your driving style to the pre-
vailing road and weather conditions.
iIf the ESP is active, the Airbrake is
automatically deactivated.iIn winter operation, the maximum ef-
fectiveness of the Airbrake is only
achieved with winter tires (M + S tires)
or snow chains as required.
Page 91 of 417
90 Safety and SecurityAnti-theft systemsImmobilizer
The immobilizer prevents unauthorized
persons from starting your vehicle.
Activating
Removing the SmartKey from the starter
switch activates the immobilizer.
Deactivating
Inserting the SmartKey in the starter
switch deactivates the immobilizer.
Anti-theft alarm system
Once the alarm system has been armed, a
visual and audible alarm is triggered when
someone opens �
a door
�
the trunk lid
�
the hood
�
a storage compartment in the rear
�
the storage compartment under the
armrest
is opened.The alarm system will also be triggered
when
�
someone attempts to raise the vehicle
�
someone opens a door from the inside
if the vehicle was locked from the out-
side with the SmartKey
�
someone opens the trunk lid with the
emergency release button
iIn case the engine cannot be started
(yet the vehicle’s battery is charged),
the system is not operational. Contact
an authorized Mercedes-Benz Center
or call 1-800-FOR-MERCedes (in the
USA), or 1-888-881-6611 (in Canada).
iThe alarm will stay on, even if the acti-
vating element (a door, for example) is
immediately closed.
If the alarm stays on for more than
30 seconds, a call to the Response
Center is initiated automatically by the
Tele Aid system (
�page 215) provided
Tele Aid service was subscribed to and
properly activated, and that necessary
cellular service and GPS coverage are
available.
Page 92 of 417
91 Safety and Security
Anti-theft systems
Arming the alarm system�
Lock the vehicle with the SmartKey.
The turn signal lamps flash three times
to indicate that the alarm system is
activated. The indicator lamp in the
central locking switch (
�page 104) be-
gins to flash after arming the alarm
system.Disarming the alarm system
�
Unlock your vehicle with the SmartKey.
The turn signal lamps flash once to
indicate that the alarm system is
deactivated.
Canceling the alarm
To cancel the alarm:
�
Press theŒ or‹ button on the
SmartKey.
or
�
Insert the SmartKey in the starter
switch.
Tow-away alarm
Once the tow-away alarm is armed, a visual
and audible alarm will be triggered when
someone attempts to raise the vehicle.
iIf the turn signal lamps do not flash
three times, one of the following
elements may not be properly closed:�
a door
�
the trunk
�
the hood
Close the respective element and lock
the vehicle again.
iThe alarm system will rearm automati-
cally after approximately 40 seconds if
neither a door nor the trunk lid was
opened.
iThe tow-away protection alarm is
triggered, for example, if the vehicle is
lifted on one side.
If the alarm stays on for more than
30 seconds, a call to the Response
Center is initiated automatically by the
Tele Aid system (
�page 215) provided
Tele Aid service was subscribed to and
properly activated, and that necessary
cellular service and GPS coverage are
available.
Page 97 of 417

96 Controls in detailIn the “Controls in detail” section you will
find detailed information on how to oper-
ate the equipment installed on your vehi-
cle. If you are already familiar with the
basic functions of your vehicle, this section
will be of particular interest to you.
To quickly familiarize yourself with the ba-
sic functions of the vehicle, refer to the
“Getting started” section of this manual.
The corresponding page numbers are giv-
en at the beginning of each segment.Locking and unlocking
SmartKey
Your vehicle comes supplied with two
SmartKeys, each with remote control and
a removable mechanical key.
The SmartKey provides an extended oper-
ating range. To prevent theft, however, it is
advisable to only unlock the vehicle when
you are in close proximity to it.
The SmartKey centrally locks and unlocks:�
the doors
�
the trunk
�
the fuel filler flap
Key with remote control1‹ Lock button
2Š Unlock button for the trunk lid
3Mechanical key locking tab
4ŒUnlock button
5Battery check lamp
6Â Panic button
Page 103 of 417
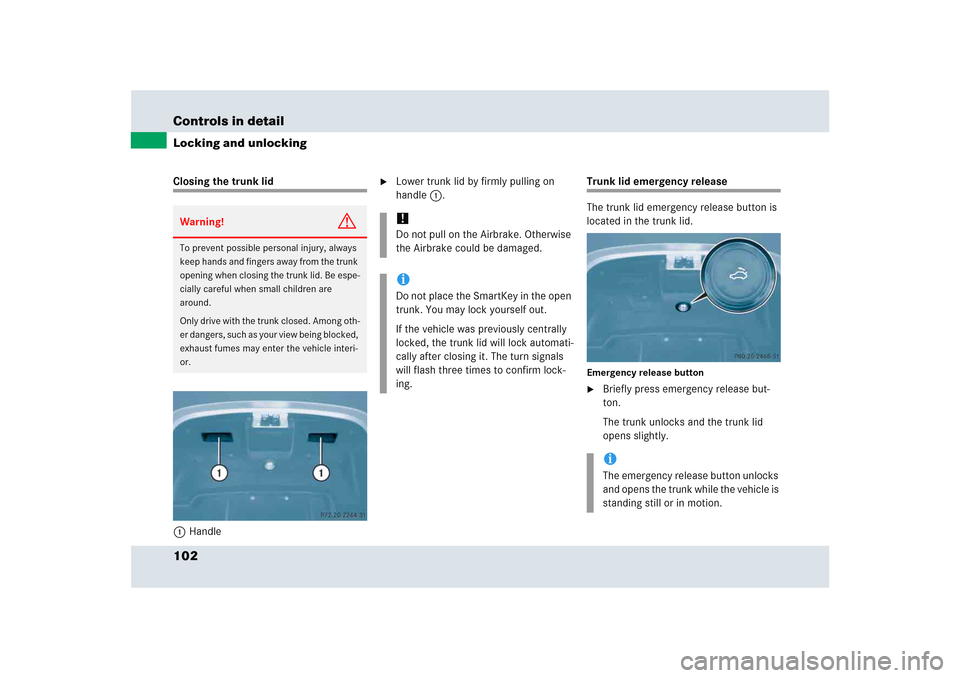
102 Controls in detailLocking and unlockingClosing the trunk lid
1Handle
�
Lower trunk lid by firmly pulling on
handle1.
Trunk lid emergency release
The trunk lid emergency release button is
located in the trunk lid.Emergency release button�
Briefly press emergency release but-
ton.
The trunk unlocks and the trunk lid
opens slightly.
Warning!
G
To prevent possible personal injury, always
keep hands and fingers away from the trunk
opening when closing the trunk lid. Be espe-
cially careful when small children are
around.
Only drive with the trunk closed. Among oth-
er dangers, such as your view being blocked,
exhaust fumes may enter the vehicle interi-
or.
!Do not pull on the Airbrake. Otherwise
the Airbrake could be damaged.iDo not place the SmartKey in the open
trunk. You may lock yourself out.
If the vehicle was previously centrally
locked, the trunk lid will lock automati-
cally after closing it. The turn signals
will flash three times to confirm lock-
ing.
iThe emergency release button unlocks
and opens the trunk while the vehicle is
standing still or in motion.
Page 107 of 417
106 Controls in detailLightingManual headlamp mode
The low beam headlamps and the parking
lamps can be switched on and off with the
exterior lamp switch.
Automatic headlamp mode
The following lamps switch on and off
automatically depending on the brightness
of the ambient light:�
Low beam headlamps
�
Tail and parking lamps
�
License plate lamps
�
Side marker lamps
�
Turn the exterior lamp switch to
positionU.
With the SmartKey in starter switch
position1, only the parking lamps will
switch on and off automatically.
When the engine is running, the low
beam headlamps, the tail and parking
lamps, the license plate lamps, and the
side marker lamps will switch on and
off automatically.
Warning!
G
If the exterior lamp switch is set toU,�
the headlamps may switch off unexpect-
edly when the system senses bright
ambient light, for example light from
oncoming traffic.
�
the headlamps will not be automatically
switched on under foggy conditions.
To minimize risk to you and to others,
activate headlamps by turning exterior lamp
switch toB when driving or when traffic
and/or ambient lighting conditions require
you to do so.
In low ambient lighting conditions, only
switch from positionU toB with the
vehicle at a standstill. Switching fromU
toB will briefly switch off the
headlamps. Doing so while driving in low
ambient lighting conditions may result in an
accident.
The automatic headlamp feature is only an
aid to the driver. The driver is responsible for
the operation of the vehicle's lights at all
times.iFog lamps cannot be switched on with
the exterior lamp switch in
positionU. For switching on the fog
lamps, turn the exterior lamp switch to
positionB first.