Page 356 of 417

355 Practical hints
Batteries
Charging the batteries
You can obtain detailed information on
charging the battery from your authorized
Mercedes-Benz Center.
Warning!
G
The brake system requires electrical power
to operate.
A malfunction in the vehicle’s power supply
or electrical system may impair brake sys-
tem operation and switch it into its emer-
gency operation mode. The same applies if
battery is disconnected. To brake, the driver
must then apply significantly greater brake
pedal pressure and depress the pedal much
further to obtain the expected braking ef-
fect. If necessary, apply full pressure to the
brake pedal. Brakes are only applied to the
front wheels. Stopping distance is in-
creased! Adjust your driving style according-
ly. For more information, see “SBC brake
system” (
�page 84).
Warning!
G
With a disconnected battery�
you will no longer be able to turn the
SmartKey in the starter switch
�
the gear selector lever will remain
locked in positionP
Warning!
G
Never charge a battery while still installed in
the vehicle unless the battery charge unit
approved by Mercedes-Benz (supplied with
your vehicle) is being used. Gases may es-
cape during charging and cause explosions
that may result in paint damage, corrosion
or personal injury.
A battery charge unit specially adapted for
Mercedes-Benz vehicles and tested and ap-
proved by Mercedes-Benz is available, per-
mitting the charging of the battery in its
installed position. Contact an authorized
Mercedes-Benz Center for information and
availability. Charge battery in accordance
with the separate operating instructions for
the battery charger.
Page 357 of 417

356 Practical hintsBatteriesCharging with the battery charger
Only use the battery charge unit approved
by Mercedes-Benz and supplied with your
vehicle. This charger is designed to auto-
matically control the charge rate, and
charge the battery or maintain the existing
charge in the battery while the vehicle is
parked and not being driven for long peri-
ods of time (on average approximately
three weeks or more). Not driving the vehi-
cle for such extended periods may cause
the charge in the vehicle battery to drop.
Using the charging point
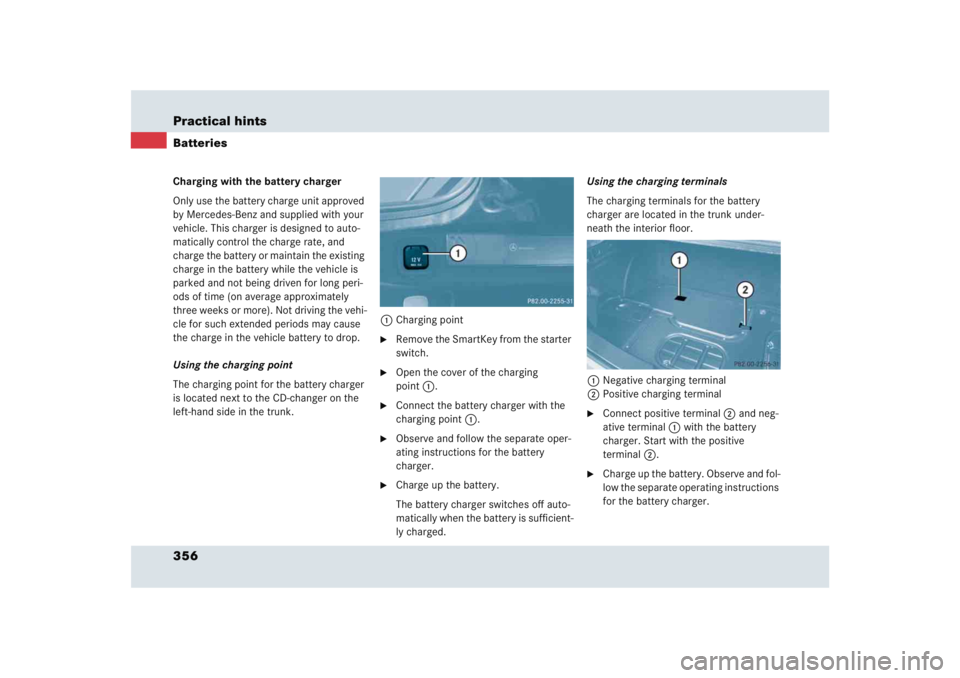
The charging point for the battery charger
is located next to the CD-changer on the
left-hand side in the trunk.1Charging point
�
Remove the SmartKey from the starter
switch.
�
Open the cover of the charging
point1.
�
Connect the battery charger with the
charging point 1.
�
Observe and follow the separate oper-
ating instructions for the battery
charger.
�
Charge up the battery.
The battery charger switches off auto-
matically when the battery is sufficient-
ly charged.Using the charging terminals
The charging terminals for the battery
charger are located in the trunk under-
neath the interior floor.
1Negative charging terminal
2Positive charging terminal
�
Connect positive terminal2 and neg-
ative terminal1 with the battery
charger. Start with the positive
terminal2.
�
Charge up the battery. Observe and fol-
low the separate operating instructions
for the battery charger.
Page 360 of 417

359 Practical hints
Towing the vehicle
Installing/reinstalling towing eye bolt�
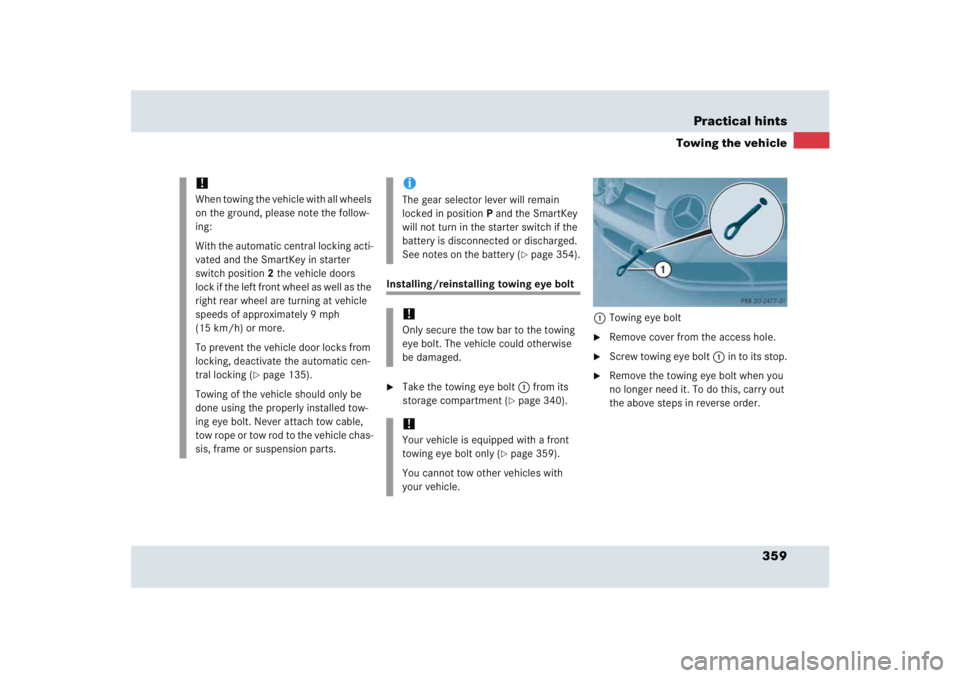
Take the towing eye bolt1 from its
storage compartment (
�page 340).1Towing eye bolt
�
Remove cover from the access hole.
�
Screw towing eye bolt1 in to its stop.
�
Remove the towing eye bolt when you
no longer need it. To do this, carry out
the above steps in reverse order.
!When towing the vehicle with all wheels
on the ground, please note the follow-
ing:
With the automatic central locking acti-
vated and the SmartKey in starter
switch position2 the vehicle doors
lock if the left front wheel as well as the
right rear wheel are turning at vehicle
speeds of approximately 9 mph
(15 km/h) or more.
To prevent the vehicle door locks from
locking, deactivate the automatic cen-
tral locking (
�page 135).
Towing of the vehicle should only be
done using the properly installed tow-
ing eye bolt. Never attach tow cable,
tow rope or tow rod to the vehicle chas-
sis, frame or suspension parts.
iThe gear selector lever will remain
locked in positionP and the SmartKey
will not turn in the starter switch if the
battery is disconnected or discharged.
See notes on the battery (
�page 354).
!Only secure the tow bar to the towing
eye bolt. The vehicle could otherwise
be damaged.!Your vehicle is equipped with a front
towing eye bolt only (
�page 359).
You cannot tow other vehicles with
your vehicle.
Page 361 of 417
360 Practical hintsTowing the vehiclePoints to bear in mind�
The vehicle must not be tow-started.
�
If the vehicle is to be towed, only tow it
with all wheels on the ground.
�
If the vehicle has suffered transmission
damage, only tow it with the propeller
shaft disconnected.
�
Before towing the vehicle, make sure
the battery is connected and charged.
Otherwise you will not be able to switch
on the ignition and move the selector
lever to N. There will then be no power
assistance when steering and braking.
Transporting the vehicle
The towing eye bolt can be used to pull the
vehicle onto a trailer or transporter for
transporting purposes.�
Move the selector lever to N.!Due to the low clearance height of the
SLR, care must be taken when loading
and unloading from a transporter to
avoid damaging the vehicle body work.
To secure the vehicle, only tie it down
by the wheels or tires. Otherwise it
could be damaged.
Page 373 of 417
372 Technical dataElectrical systemGenerator (alternator)
14 V/150 A
Starter motor
12 V/1.7 kW
BatteryStarter battery
12 V/35 Ah
Battery for electrical consumers
12 V/70 Ah
Spark plugs
NGK ILFR6A
Electrode gap
0.031 in (0.8 mm)
Tightening torque
18 – 22 lb-ft (25 – 30 Nm)
Page 390 of 417

389 Technical terms
Sidewall
(
�page 280)
SRS
(Supplemental R
estraint S
ystem)
Seat belts, emergency tensioning de-
vice and airbags. Though independent
systems, they are closely interfaced to
provide effective occupant protection.
Tele Aid
(Tele
matic A
larm I
dentification on D
e--
mand)
The Tele Aid system consists of three
types of response: automatic and man-
ual emergency, roadside assistance
and information. Tele Aid is initially ac-
tivated by completing a subscriber
agreement and placing an acquain-
tance call.
The Tele Aid system is operational pro-
vided that the vehicle’s battery is
charged, properly connected, not dam-
aged and cellular and GPS coverage is
available.Tightening torque
Force times lever arm (e.g. a lug
wrench) with which threaded fasteners
such as wheel bolts are tightened.
TIN
(T
ire I
dentification N
umber)
(
�page 280)
Tire load rating
(�page 280)
Tire ply composition and material used
(�page 280)
Tire speed rating
(�page 280)
TIREFIT kit
Accessory for emergency and tempo-
rary tire repair. The TIREFIT kit consists
of a container with sealant material, a
filler hose and an air compressor.
Traction
(�page 280)Tread
(
�page 280)
Treadwear indicators
(�page 280)
Uniform Tire Quality Grading Standards
(�page 281)
Vehicle capacity weight
(�page 281)
Vehicle maximum load on the tire
(�page 281)
VIN
(Vehicle I
dentification N
umber)
The number set by the manufacturer
and placed on the body to uniquely
identify each vehicle produced.
Page 394 of 417

393 Index
B
BabySmart
TM
Self-test 75
BabySmart
TM airbag deactivation
system 75, 385
BabySmartTM compatible child
seats 385
Back up lamp 347
Bar 278
BAS 79, 81, 385
BAS/ESP
Indicator lamp 296
Batteries, SmartKey
Check lamp 99
Replacing 344
Batteries, vehicle 250
Charging 355
Consumer battery 250, 354
Maintenance 354
Messages in the multifunction
display 310
Starter battery 250
Battery charger 356
Bead 278Bi-Xenon headlamps 385
Body surface 289
Brake fluid 375, 378
Checking 241
Brake lamp
High mounted 347
Brake pads
Messages in the multifunction
display 317
Brake warning lamp 29, 298
Brake/parking lamp 347
Brakes 230
Break-in period 228
Bulbs
Changing 346
Front 347
Messages in the multifunction
display 323
Rear 347
Button
Audio system 146C
CAC 385
CAN system 386
Capacities
Fuels, coolants, lubricants etc. 375
Cargo area see Trunk
Cassette operation
Playing cassettes 152
Catalytic converter 237
CD changer 156
Loading/unloading a CD
magazine 157
Location 157
CD operation 156
CD player
Operating 123
Cellular phone
Delayed switch-off time 205
Inserting the cradle 205
Making calls in hands-free mode 207
Making calls in private mode 206
Re-inserting 206
Removing the cradle 204
Page 395 of 417

394 IndexCenter air vents 31
Center console
Lower part 32
Upper part 31
Center storage compartment 201
Centigrade
Setting temperature units 129
Central locking
Automatic 103
Central locking switch 31, 103
Switching on/off (control
system) 135
Unlocking from inside 103
Changing
Bulbs 346
CDs 156
Charging the batteries (vehicle) 355
Battery charger 356Checking
Brake fluid 241
Coolant level 241, 249
Engine oil level 241
Tire inflation pressure 242
Vehicle lighting 242
Washer reservoir level 242
Child safety
Airbags 64
Automatic child seat recognition 75
Infant and child restraint systems 62
Cigarette lighter 202
Cleaning
Headlamps 178, 293
Vehicle 290
Windows 292
Windshield 53
Wiper blades 291Cleaning tires 255
Clearing
Service display 286
Clock 128
Closing
Hood 246
Trunk lid 102
Windows 193, 194
Windows with SmartKey 195
Cockpit 26, 386
Cold tire inflation pressure 278
Combination switch 27, 51, 109
High beam flasher 51
Windshield wipers 52
Comfort
Shift program mode 173
Compact guide 341
Control and operation of radio
transmitters 237