Page 115 of 464
.
The multifunction display")
115 Controls in detail
Instrument cluster
�Instrument cluster
A full view illustration of the instrument
cluster can be found in the “At a glance”
section (
�page 24).
The multifunction display in the instrument
cluster is activated when you
�
open a door
�
switch on exterior lighting
�
switch on ignition (
�page 35)
�
press reset buttonJ or one of the
knobs for the instrument cluster illumi-
nation (
�page 24)
For information on changing the instru-
ment cluster settings, e.g. the language,
see “Instrument cluster submenu”
(
�page 131).
Instrument cluster illumination
Adjusting
The knobs for adjusting the instrument
cluster illumination are on the left side of
the instrument cluster (
�page 24).
Brightening illumination
�
Press knob+ briefly.
The instrument cluster illumination
brightens.
Dimming illumination
�
Press knob- briefly.
The instrument cluster illumination
dims.
Tachometer
The red marking on the tachometer
(�page 24) denotes excessive engine
speed.
To help protect the engine, the fuel supply
is interrupted if the engine is operated
within the red marking.
iOpening a door or pressing the reset
buttonJwithout switching on the ig-
nition or the exterior lighting activates
the multifunction display illumination
only for 30 seconds.
iWith the exterior lighting switched on,
the brightness of the switches in the
center console will be adjusted simul-
taneously.
!Avoid driving at excessive engine
speeds, as it may result in serious en-
gine damage that is not covered by the
Mercedes-Benz Limited Warranty.
Page 167 of 464
167 Controls in detail
Good visibility
�Good visibility
For information on the windshield wipers,
see (
�page 53).
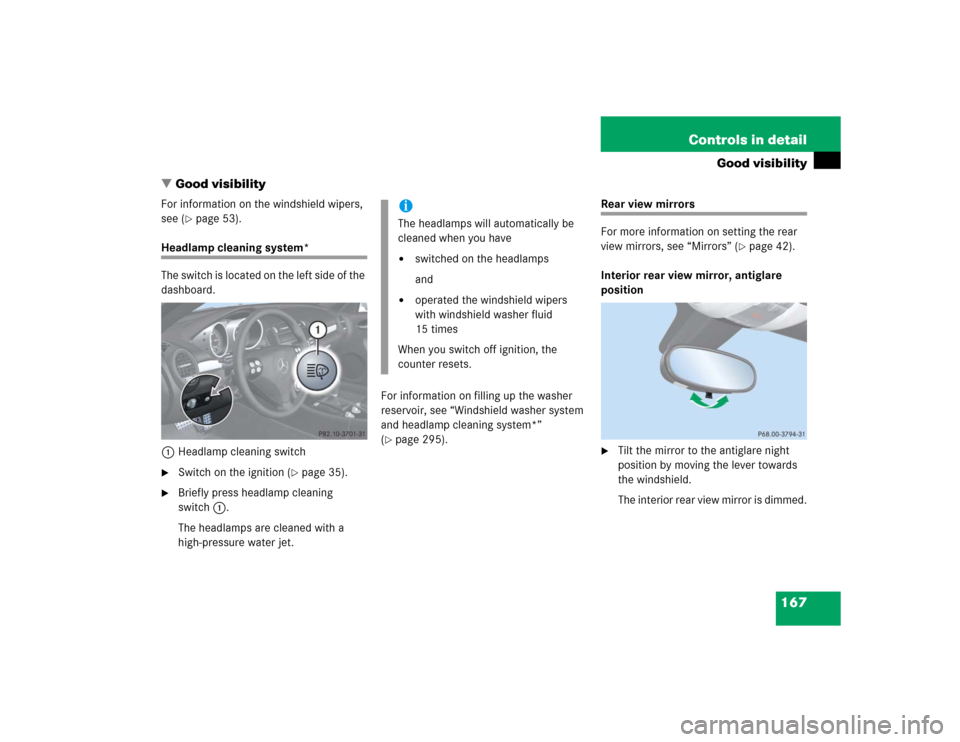
Headlamp cleaning system*
The switch is located on the left side of the
dashboard.
1Headlamp cleaning switch�
Switch on the ignition (
�page 35).
�
Briefly press headlamp cleaning
switch1.
The headlamps are cleaned with a
high-pressure water jet.For information on filling up the washer
reservoir, see “Windshield washer system
and headlamp cleaning system*”
(
�page 295).
Rear view mirrors
For more information on setting the rear
view mirrors, see “Mirrors” (
�page 42).
Interior rear view mirror, antiglare
position
�
Tilt the mirror to the antiglare night
position by moving the lever towards
the windshield.
The interior rear view mirror is dimmed.
iThe headlamps will automatically be
cleaned when you have�
switched on the headlamps
and
�
operated the windshield wipers
with windshield washer fluid
15 times
When you switch off ignition, the
counter resets.
Page 168 of 464

168 Controls in detailGood visibilityAuto-dimming mirror*
The reflection brightness of the exterior
rear view mirrors and the interior rear view
mirror will respond automatically to glare
when�
ignition is switched on
and
�
incoming light from headlamps falls on
the sensor in the interior rear view
mirror
The rear view mirrors will not react if
�
reverse gearR is engaged
�
interior lighting is switched on
Warning!
G
The auto-dimming function does not react if
incoming light is not aimed directly at sen-
sors in the interior rear view mirror.
The interior rear view mirror and the exterior
rear view mirror on the driver’s side do not
react, for example, if the wind screen is in-
stalled.
Glare can endanger you and others.
Warning!
G
In the case of an accident, liquid electrolyte
may escape from the mirror housing if the
mirror glass breaks.
Electrolyte has an irritating effect. Do not al-
low the liquid to come into contact with
eyes, skin, clothing, or the respiratory sys-
tem. In case it does, immediately flush af-
fected area with water, and seek medical
help if necessary.!Electrolyte drops coming into contact
with the vehicle paint finish can only be
completely removed while in their
liquid state and by applying plenty of
water.
Page 169 of 464

Follow these steps to activate the mirror
parking position so that the passen-
ger-side ext")
169 Controls in detail
Good visibility
Activating exterior rear view mirror
parking position (parking aid)
Follow these steps to activate the mirror
parking position so that the passen-
ger-side exterior rear view mirror will be
turned downward during parking maneu-
vers to the stored position.
The switches are located on the lower part
of the center console.
1Driver-side exterior rear view mirror
2Adjustment switch
3Passenger-side exterior rear view
mirror
�
Switch on the ignition (
�page 35).
�
Store a parking position for the passen-
ger-side exterior rear view mirror
(�page 105).
�
Switch the
Mirror adjustment Park-
ing aid
function in the
Convenience
submenu of the control system to ON
(
�page 144).
�
Press switch3 for the passenger-side
exterior rear view mirror.
�
Shift into reverse gearR.
The passenger-side exterior rear view
mirror turns downwards to the stored
position.
Warning!
G
Exercise care when using the passen-
ger-side exterior rear view mirror. The mirror
surface is convex (outwardly curved surface
for a wider field of view). Objects in mirror
are closer than they appear. Check your in-
terior rear view mirror or glance over your
shoulder before changing lanes.
Page 181 of 464
181 Controls in detail
Climate control
Deactivating�
Press air condition on/off switch°
again (
�page 175).
The indicator lamp on the air condition
on/off switch° goes out.
The residual heat switches off
automatically
�
when you switch on ignition
(�page 35)
�
after about 30 minutes
�
if the battery voltage drops
Defrosting
Windows fogged up on the inside�
Press defrosting switchP
(�page 175).
The indicator lamp on defrosting
switchP comes on.
The temperature rises and the ventila-
tion operates with maximum blower
speed.
�
Press defrosting switchP again.
The indicator lamp on defrosting
switchP goes out.
The previous climate control settings
will be activated again.Windshield fogged up on the outside
�
Switch on the windshield wipers
(�page 53).
�
Turn air distribution control3 to
positionaorY (
�page 176).
Page 189 of 464

189 Controls in detail
Automatic climate control*
Residual heat and ventilation
With the engine switched off, it is possible
to continue to heat or ventilate the interior
for up to 30 minutes, depending on the
temperature setting of the climate control.
This feature makes use of the residual heat
produced by the engine.
Activating�
Turn the SmartKey in the starter switch
to position1or0, or remove it from
the starter switch.
�
Press residual heat/ventilation
switchT (
�page 185).
The indicator lamp on the residual
heat/ventilation switchT comes
on.Deactivating
�
Press residual heat/ventilation
switchT again (
�page 185).
The indicator lamp on the residual
heat/ventilation switchT goes out.
The residual heat switches off
automatically
�
when you switch on ignition
(�page 35)
�
after about 30 minutes
�
if the battery voltage drops
Defrosting
Windows fogged up on the inside�
Press defrosting switchP
(�page 185).
The indicator lamp on defrosting
switchP comes on.
The temperature rises and the ventila-
tion operates with maximum blower
speed.
�
Press defrosting switchP again.
The previous automatic climate control
settings will be activated again.
iHow long the system will provide heat-
ing depends on the coolant tempera-
ture and the temperature set by the
operator. The blower will run at speed
setting1 regardless of the air distribu-
tion control setting.
Page 233 of 464
.Opening the door windows
�
Press and hold switch1or2 at the
symbolk to the resistance point.
The corresponding window will mo")
233 Controls in detail
Power windows
�
Switch on the ignition (
�page 35).Opening the door windows
�
Press and hold switch1or2 at the
symbolk to the resistance point.
The corresponding window will move
downwards until you release the
switch.
Closing the door windows
�
Press and hold switch1or2 at the
symbolj to the resistance point.
The corresponding window will move
upwards until you release the switch.Fully opening the door windows
(Express-open)
�
Press switch1or2 at the
symbolk past the resistance point
and release.
The corresponding window opens
completely.
Fully closing the door windows
(Express-close)
�
Press switch1or2 at the
symbolj past the resistance point
and release.
The corresponding window closes
completely.
iYou can also open or close the win-
dows using the SmartKey* (summer
opening/convenience closing feature)
(�page 235) or the retractable hard-
top switch (
�page 234).
You can close and reopen the windows
using the air recirculation switch,
in the control panel of the climate con-
trol (
�page 176) or the automatic cli-
mate control* (
�page 186).
Warning
G
If you press and hold the switch when clos-
ing the window, and upward movement of
the window is blocked by some obstruction
including but not limited to arms, hands, fin-
gers, etc., the automatic reversal will not op-
erate.
Warning!
G
Driver’s door only:
If the switch is pressed again past the resis-
tance point and released within
five seconds, the automatic reversal will not
operate.
��
Page 234 of 464

234 Controls in detailPower windowsStopping windows during
Express-operation�
Briefly press the respective switch at
the symbolkorj again.Opening and closing the windows with
the retractable hardtop switch
All windows can be opened or closed with
the retractable hardtop switch.
The retractable hardtop switch is located
on the lower part of the center console.
Retractable hardtop switch1Opening all side windows
2Closing all side windows
�
Switch on the ignition (
�page 35).
!If the upward movement of the window
is blocked during the closing proce-
dure, the window will stop and open
slightly.
Remove the obstruction, press the re-
spective switch at the symbolj
again past the resistance point and re-
lease.
If the window still does not close when
there is no obstruction, press and hold
the respective switch at the
symbolj. The window will then
close without the obstruction sensor
function.
Warning!
G
Never operate the windows if there is the
possibility of anyone being harmed by the
opening or closing procedure.
In case the procedure causes potential dan-
ger, the procedure can be immediately halt-
ed by releasing the retractable hardtop
switch.
If a door window encounters an obstruction
that blocks its path in a circumstance where
you are closing the windows using the re-
tractable hardtop switch, the automatic re-
versal function will not operate.
��