Page 160 of 464
160 Controls in detailAutomatic transmission*Maneuvering
When you maneuver in tight areas,
e.g. when pulling into a parking space:�
Control the vehicle speed by gradually
releasing the brakes.
�
Accelerate gently.
�
Never abruptly step on the accelerator.Working on the vehicle
Steering wheel gearshift control
When driving in the automatic program
modesC orS, or in the manual program
modeM (SLK 55 AMG only), you can
change the gears manually on the steering
wheel or by using the gear selector lever
(�page 154).
Warning!
G
When working on the vehicle, set the
parking brake and move gear selector lever
to positionP. Otherwise the vehicle could
roll away.
iTo avoid overrevving the engine when
downshifting with steering wheel
gearshift buttons, the transmission will
not shift to a lower gear if the engine’s
max. speed would be exceeded.
Page 161 of 464
161 Controls in detail
Automatic transmission*
Steering wheel gearshift control*
SLK 350
The steering wheel gearshift buttons are
located to the left and right of the steering
wheel.
1Button, inside: downshift
2Button, outside: upshift
!Allow engine to warm up under low
load use. Do not place full load on the
engine until the operating temperature
has been reached.
Shift into reverse gearR or parking
positionP only when the vehicle is
stopped.
Avoid spinning of a drive wheel for an
extended period when driving off on
slippery road surfaces. This may cause
serious damage to the drivetrain which
is not covered by the Mercedes-Benz
Limited Warranty.
iYou cannot shift with the steering
wheel gearshift buttons when the gear
selector lever is in positionP,N orR.
The last selected program
mode (CorS) is switched on when the
engine is restarted.
Page 162 of 464
162 Controls in detailAutomatic transmission*Downshifting�
Press the inside1 of one of the
buttons on the steering wheel.
The transmission will shift to the next
lower gear as permitted by the shift
program. This action simultaneously limits
the gear range of the transmission
(
�page 155).Upshifting
�
Press the outside2 of one of the
buttons on the steering wheel.
The transmission will shift to the next
higher gear as permitted by the shift
program. This action simultaneously
extends the gear range of the transmis-
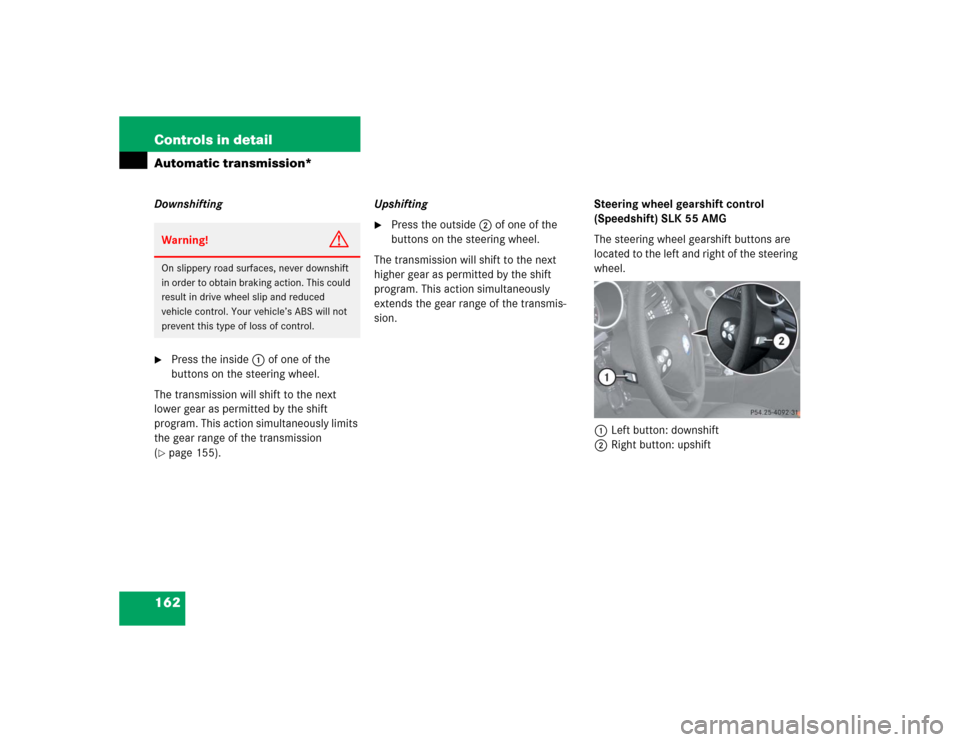
sion.Steering wheel gearshift control
(Speedshift) SLK 55 AMG
The steering wheel gearshift buttons are
located to the left and right of the steering
wheel.
1Left button: downshift
2Right button: upshift
Warning!
G
On slippery road surfaces, never downshift
in order to obtain braking action. This could
result in drive wheel slip and reduced
vehicle control. Your vehicle’s ABS will not
prevent this type of loss of control.
Page 163 of 464

163 Controls in detail
Automatic transmission*
Downshifting�
Press button1 on the left side of the
steering wheel.
The transmission will shift to the next
lower gear as permitted by the shift
program. This action simultaneously limits
the gear range of the transmission
(
�page 155) when you are driving in the
automatic program mode (CorS).Upshifting
�
Press button2 on the right side of the
steering wheel.
The transmission will shift to the next
higher gear as permitted by the shift
program. This action simultaneously
extends the gear range of the transmission
when you are driving in the automatic
program mode (CorS).
iYou cannot shift with the steering
wheel gearshift buttons when the gear
selector lever is in positionP,N orR.
The manual program modeM will not
be stored. When the engine is turned
off with the manual program modeM
selected, the transmission will go to
the automatic program mode (CorS)
when the engine is restarted.
The last selected program
mode (CorS) is switched on when the
engine is restarted in the automatic
program mode.
Warning!
G
On slippery road surfaces, never downshift
in order to obtain braking action. This could
result in drive wheel slip and reduced
vehicle control. Your vehicle’s ABS will not
prevent this type of loss of control.
Page 194 of 464
194 Controls in detailAudio systemButton and soft key operation
In these instructions, the alphanumeric
keypad (right side of radio panel) and the
function buttons (left side of radio panel)
are referred to as “buttons”. The four keys
below the display panel are referred to as
“soft keys”.
Operation
Switching the unit on/off
Switching on�
Turn the SmartKey in the starter switch
to position1 or2 (
�page 35).
�
If the audio system was on as you
removed the SmartKey from the starter
switch, the audio system will
automatically come back on as you
turn the SmartKey to position1 or2.
or
�
Press
D
button.
!Do not press directly in the display
face. Otherwise, the display will be
damaged.
iIf the radio is switched on without the
SmartKey in the starter switch, it will
automatically switch off again after
approx. 30 minutes.
If your vehicle is equipped with a
telephone, the display may prompt you
to enter your PIN (GSM network) or
code (TDMA or CDMA network).
Page 199 of 464

199 Controls in detail
Audio system
Direct frequency input�
Select desired waveband.
�
Press * button.
�
Enter desired frequency with
buttons1to R.Manual tuning
�
Select desired waveband.
�
PressGorHbutton for approx.
three seconds.
�
Press button repeatedly until desired
frequency has been reached.
Step-by-step station tuning takes place
in ascending or descending order. Each
time the button is pressed, the radio
tunes further by 0.2 MHz. During
manual tuning, the radio is muted.
Automatic seek tuning
�
Select desired waveband.
�
PressGorHbutton briefly.
The radio will tune to the next highest
or next lowest receivable frequency.Scan search
�
Starting scan search�
Select desired waveband.
�
Press
SC soft key.
SC will appear in the display. The
radio briefly (approximately
eight seconds) tunes in all receiv-
able stations on the waveband
selected.
�
Ending scan search�
Press
SC soft key orGorH.
The station last played will be
selected and
SC disappears from
the display.
iYou can only enter frequencies within
the respective waveband.
If a button is not pressed within
four seconds, the radio will return to
the last station tuned.
iIf no station is received after two
consecutive scans of the complete
frequency range, then the scan stops
at the frequency from which it began.
Page 200 of 464

200 Controls in detailAudio systemStation memory
You can store ten AM and ten FM stations
in the memory.�
Storing stations�
Tune in desired station.
�
Press and hold desired station
button1 to R until a brief
signal tone is heard.
The frequency is stored on the
selected station button.
�
Calling up stations�
Press desired station button1
to R briefly.Autostore – automatic station memory
The Autostore memory function provides
an additional memory level. The station
memory for manually stored stations is not
overwritten.
�
Calling up Autostore memory level and
storing stations�
Press
AS soft key briefly.
The radio switches to the Autostore
memory level.
AS and
SEARCH
appear in the display and the radio
finds the ten stations with the
strongest signals. These stations
are stored on the station
buttons1 to R in order of
signal strength.
�
Calling up stations�
Press desired station button1
to R.
�
Leaving the Autostore memory level�
Press
FM or
AM
soft key briefly.
Interrupting radio mode
The radio mode is interrupted by an
incoming call on the telephone*
(
�page 221).
�
Mute on�
PressFbutton.
The radio mode is interrupted and MUTED
appears in the display.
�
Mute off�
PressFbutton.
The radio mode is again active.
Page 201 of 464
201 Controls in detail
Audio system
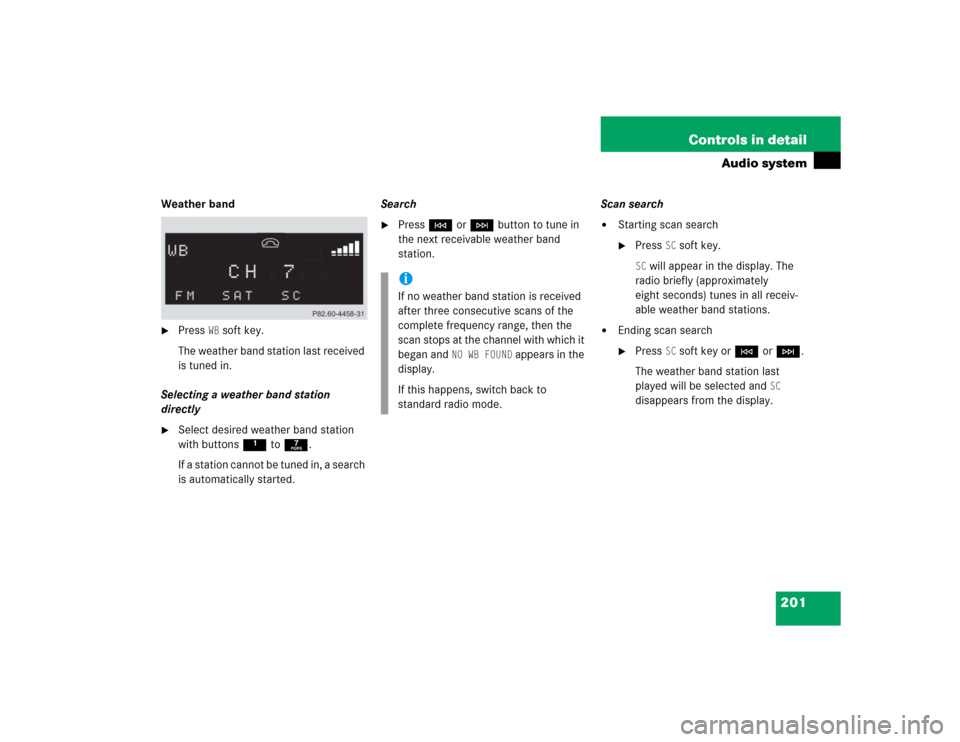
Weather band�
Press
WB soft key.
The weather band station last received
is tuned in.
Selecting a weather band station
directly
�
Select desired weather band station
with buttons 1 to 7.
If a station cannot be tuned in, a search
is automatically started.Search
�
PressGorHbutton to tune in
the next receivable weather band
station.Scan search
�
Starting scan search�
Press
SC soft key.
SC will appear in the display. The
radio briefly (approximately
eight seconds) tunes in all receiv-
able weather band stations.
�
Ending scan search�
Press
SC soft key orGorH.
The weather band station last
played will be selected and
SC
disappears from the display.
iIf no weather band station is received
after three consecutive scans of the
complete frequency range, then the
scan stops at the channel with which it
began and
NO WB FOUND
appears in the
display.
If this happens, switch back to
standard radio mode.


 and the
function buttons (left side of radio panel)
are re")