Page 114 of 464

114 Controls in detailLightingManual control
Interior lighting�
Press interior lighting switch1.
The interior lighting switches on.
�
Press interior lighting switch1 again.
The interior lighting switches off.Reading lamps
The standard reading lamps are located to
the left and right of the overhead control
panel. Reading lamps as part of the interior
lighting package* are located on the lower
edge of the interior rear view mirror.
�
Press reading lamp switch3or4 to
switch on the respective reading lamp.
�
Press reading lamp switch3or4
again to switch off the respective
reading lamp.
Door entry lamps
For better orientation in the dark, the cor-
responding door entry lamps will switch on
in darkness when you open a door and the
automatic control is activated.
The door entry lamps switch off when the
corresponding door is closed.
iThe footwell lighting* is switched on
and off simultaneously with the manual
control.
iIf you turn the SmartKey in the starter
switch to position0 and switch off the
exterior headlamps, the door entry
lamps will remain lit for approximately
five minutes.
Page 117 of 464

117 Controls in detail
Control system
�Control system
The control system is activated as soon as
the SmartKey in the starter switch is
turned to position1. The control system
enables you to�
call up information about your vehicle
�
change vehicle settings
For example, you can use the control sys-
tem to find out when your vehicle is next
due for service, to set the language for
messages in the instrument cluster dis-
play, and much more.
The control system relays information to
the multifunction display.
Multifunction display
1Main odometer
2Trip odometer
3Current program mode
(automatic transmission* only)
4Status indicator (outside tempera-
ture/digital speedometer)
5Current gear selector lever posi-
tion/gear range
iThe displays for the audio systems
(radio, CD player) will appear in English,
regardless of the language selected.
Warning!
G
A driver’s attention to the road and traffic
conditions must always be his/her primary
focus when driving.
For your safety and the safety of others, se-
lecting features through the multifunction
steering wheel should only be done by the
driver when traffic and road conditions per-
mit it to be done safely.
Bear in mind that at a speed of just 30 mph
(approximately 50 km/h), your vehicle is
covering a distance of 44 feet (approximate-
ly 14 m) every second.
Page 124 of 464
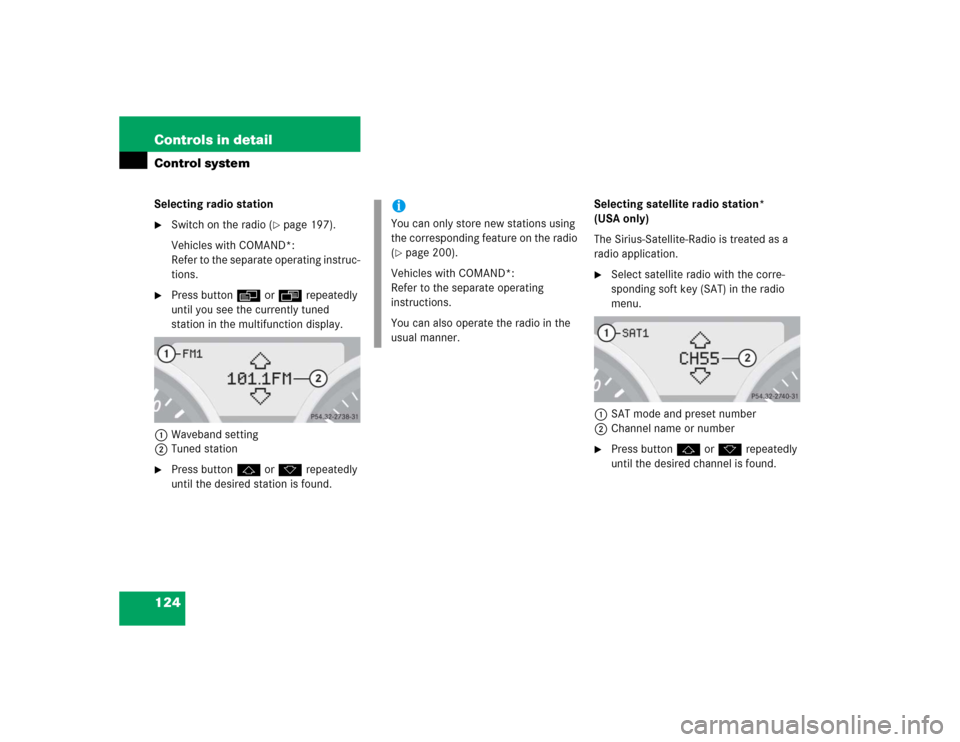
124 Controls in detailControl systemSelecting radio station�
Switch on the radio (
�page 197).
Vehicles with COMAND*:
Refer to the separate operating instruc-
tions.
�
Press buttonèorÿ repeatedly
until you see the currently tuned
station in the multifunction display.
1Waveband setting
2Tuned station
�
Press buttonjork repeatedly
until the desired station is found.Selecting satellite radio station*
(USA only)
The Sirius-Satellite-Radio is treated as a
radio application.
�
Select satellite radio with the corre-
sponding soft key (SAT) in the radio
menu.
1SAT mode and preset number
2Channel name or number
�
Press buttonjork repeatedly
until the desired channel is found.
iYou can only store new stations using
the corresponding feature on the radio
(�page 200).
Vehicles with COMAND*:
Refer to the separate operating
instructions.
You can also operate the radio in the
usual manner.
Page 125 of 464
125 Controls in detail
Control system
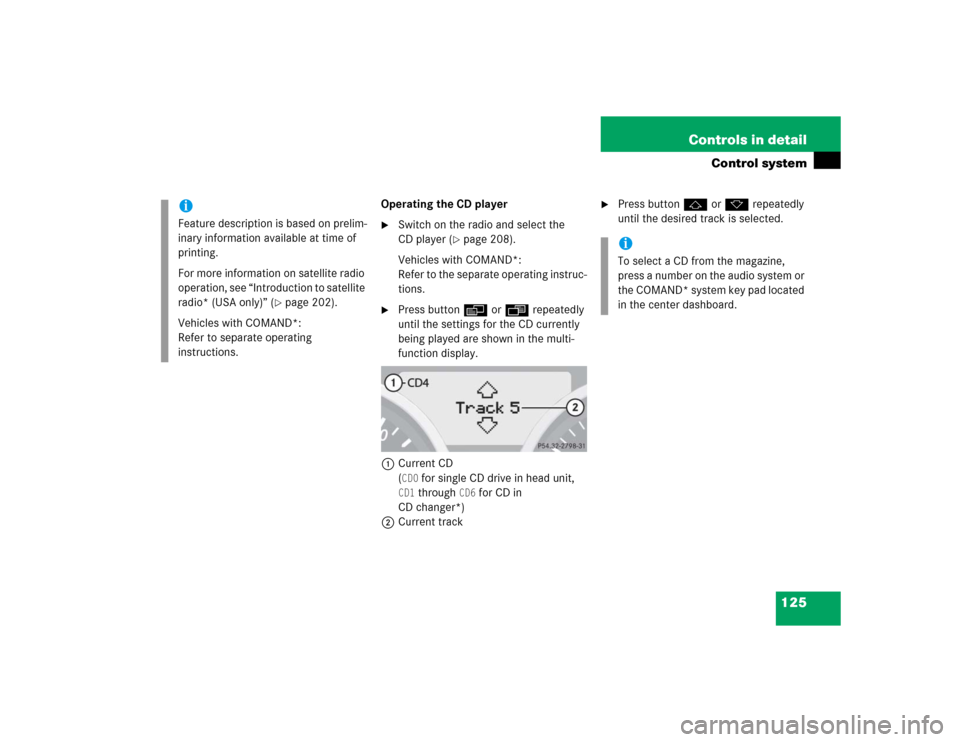
Operating the CD player�
Switch on the radio and select the
CD player (
�page 208).
Vehicles with COMAND*:
Refer to the separate operating instruc-
tions.
�
Press buttonèorÿ repeatedly
until the settings for the CD currently
being played are shown in the multi-
function display.
1Current CD
(CD0
for single CD drive in head unit,
CD1
through
CD6
for CD in
CD changer*)
2Current track
�
Press buttonjork repeatedly
until the desired track is selected.
iFeature description is based on prelim-
inary information available at time of
printing.
For more information on satellite radio
operation, see “Introduction to satellite
radio* (USA only)” (
�page 202).
Vehicles with COMAND*:
Refer to separate operating
instructions.
iTo select a CD from the magazine,
press a number on the audio system or
the COMAND* system key pad located
in the center dashboard.
Page 127 of 464

127 Controls in detail
Control system
�
Press buttonjork.
The stored messages will now be dis-
played in the order in which they have
occurred. For malfunction and warning
messages, see “Vehicle status messag-
es in the multifunction display”
(�page 348).
Should the vehicle’s system record any
conditions while driving, the number of
messages will reappear in the multifunc-
tion display when the SmartKey in the
starter switch is turned to position0 or re-
moved from the starter switch:
�
Press buttonJrepeatedly until you
have seen all occurred messages.
Settings menu
In the
Settings...
menu are two func-
tions:
�
The function
To reset: Press reset
button for 3 seconds
for resetting all
settings to factory standard.
�
A collection of submenus for perform-
ing individual settings for your vehicle.
�
Press buttonèorÿ repeatedly
until the
Settings...
menu appears in
the multifunction display.The following settings and submenus are
available in the
Settings...
menu:
iThe vehicle status message memory
will be cleared when you turn the
SmartKey in the starter switch to
position1or2.
You will then only see high-priority
messages in the multifunction display
(�page 348).
Function
Page
Resetting all settings
128
Submenus in the Settings menu
129
Resetting the functions of a sub-
menu
129
Instrument cluster submenu
131
Time/date submenu
131
Lighting submenu
137
Vehicle submenu
141
Convenience submenu
142
Page 128 of 464
 fo")
128 Controls in detailControl systemResetting all settings
You can reset all the functions of all sub-
menus to the factory settings.�
Press the reset buttonJon the instru-
ment cluster (
�page 24) for approxi-
mately three seconds.
The request to press the reset
buttonJonce more to confirm ap-
pears in the multifunction display.
�
Press the reset buttonJagain.
The functions of all submenus will be
reset to the factory settings.
The message
Reset to factory
settings
appears in the multifunction
display.
iFor safety reasons, the following func-
tions cannot be reset while driving:�
the function
Lamp circuit head-
lamp mode in the
Lighting
sub-
menu
�
the function
Key-dependent
in the
Convenience
submenu
The following message appears in the
multifunction display:
Lighting
(or
Convenience
) Cannot be
completely reset to factory
settings while driving.
iYour individual settings will not be re-
set unless you confirm the action by
pressing the reset buttonJagain.
After five seconds the
Settings...
menu reappears in the multifunction
display.
Page 130 of 464
130 Controls in detailControl systemThe table below shows what settings can
be changed within the various submenus.Detailed instructions on making individual
settings can be found on the following
pages.Instrument cluster
Time/Date
Lighting
Vehicle
Convenience
(�page 131)
(�page 133)
(�page 137)
(�page 141)
(�page 142)
Selecting temperature
display mode
Time synchronization
with head unit*
Setting daytime running
lamp mode (USA only)
Setting automatic locking
Activating
easy-entry/exit feature*
Selecting speedometer
display mode
Setting the time (hours)
Setting locator lighting
(Function surround
lighting)
Setting key-dependency
Selecting language
Setting the time
(minutes)
Setting night security
illumination
Setting parking position
for exterior rear view
mirror*
Selecting display (speed
display or outside
temperature) for status
indicator
Setting the date (month)
Setting interior lighting
delayed shut-off
Setting the date (day)Setting the date (year)
Page 138 of 464
 or daytime
running lamp mode (
constant
) activat-
ed.
With daytime running lamp mode activated
and th")
138 Controls in detailControl system�
Press buttonæorç to select
manual operation (
manual
) or daytime
running lamp mode (
constant
) activat-
ed.
With daytime running lamp mode activated
and the exterior lamp switch in
positionMorU, the low beam
headlamps are switched on when the en-
gine is running.
In low ambient light conditions the follow-
ing lamps will switch on additionally:
�
Parking lamps
�
Tail lamps
�
License plate lamps
�
Side marker lamps
For more information on the daytime run-
ning lamp mode, see “Lighting”
(
�page 106).Setting locator lighting
With the locator lighting feature activated
and the exterior lamp switch in
positionU, the following lamps will
switch on when the vehicle is unlocked
with the SmartKey during darkness:
�
Parking lamps
�
Tail lamps
�
License plate lamps
�
Side marker lamps
�
Front fog lamps
The locator lighting switches off when the
driver’s door is opened.
If you do not open a door after unlocking
with the SmartKey, the lamps will switch
off automatically after approximately
40 seconds.
iFor safety reasons, resetting the Lighting
submenu to factory settings
while driving (
�page 129) will not de-
activate the daytime running lamp
mode.
The following message appears in the
multifunction display:
Lighting Cannot be completely
reset to factory settings while
driving
.