Page 98 of 464
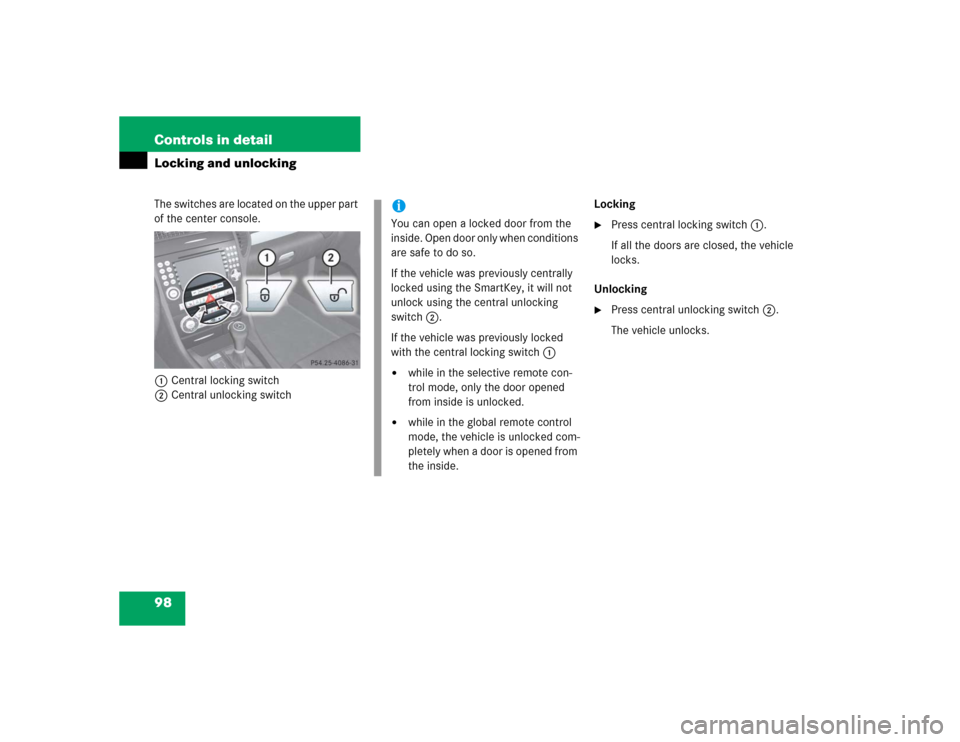
98 Controls in detailLocking and unlockingThe switches are located on the upper part
of the center console.
1Central locking switch
2Central unlocking switchLocking
�
Press central locking switch1.
If all the doors are closed, the vehicle
locks.
Unlocking
�
Press central unlocking switch2.
The vehicle unlocks.
iYou can open a locked door from the
inside. Open door only when conditions
are safe to do so.
If the vehicle was previously centrally
locked using the SmartKey, it will not
unlock using the central unlocking
switch2.
If the vehicle was previously locked
with the central locking switch1�
while in the selective remote con-
trol mode, only the door opened
from inside is unlocked.
�
while in the global remote control
mode, the vehicle is unlocked com-
pletely when a door is opened from
the inside.
Page 99 of 464
.
Easy-entry/exit feature*
This feature allows for easier entry into and
exit from the vehicle.")
99 Controls in detail
Seats
�Seats
For information on seat adjustment, see
“Adjusting” (
�page 37).
Easy-entry/exit feature*
This feature allows for easier entry into and
exit from the vehicle.
The easy-entry/exit feature can be
switched on or off, see “Setting
easy-entry/exit feature*” (
�page 142).When exiting the vehicle with the
easy-entry/exit feature activated and de-
pending on your selection, the steering
wheel tilts upwards and/or the driver’s
seat moves a few inches to the rear when
you:
�
remove the SmartKey from the starter
switch,
or
�
open the driver’s door with the
SmartKey in starter switch position0
or1.
Warning!
G
You must make sure no one can become
trapped or injured by the moving steering
wheel and driver’s seat when the
easy-entry/exit feature is activated.
To cancel seat/steering wheel movement,
do one of the following:�
Press seat adjustment switch*
(�page 39).
�
Move steering column stalk*
(�page 41).
�
Press memory position switch*
(�page 104).
Do not leave children unattended in the ve-
hicle, or with access to an unlocked vehicle.
Children could open the driver’s door an un-
intentionally activate the easy-entry/exit
feature, which could result in an accident
and/or serious personal injury.
Page 100 of 464

100 Controls in detailSeats
When entering the vehicle, with the
easy-entry/exit feature activated, the
steering wheel or, depending on your se-
lection, the steering wheel and driver’s
seat will return to their last set position or
a factory-set maximum forward position
when you�
close the driver’s door with the ignition
switched on.
�
insert the SmartKey into the starter
switch with the driver’s door closed.
iIf the current position for the steering
wheel is in the uppermost tilt position,
the steering wheel will no longer be
able to move upward when the
easy-entry/exit feature is activated.
If the current seat position falls into a
factory-set position range and the sys-
tem recognizes the current seat posi-
tion to be rearward enough for easy
entry and exit, the driver’s seat will not
move to the rear when the
easy-entry/exit feature is activated.
iFor safety reasons, the driver’s seat will
not return to its last set position with
the easy-entry/exit feature activated if
the system recognizes the last set posi-
tion as an extreme forward position.
Instead, the driver’s seat will remain at
or move to a factory-set maximum
forward position. To again fully return
the driver’s seat to your last set or to a
memory position, adjust the driver’s
seat to the desired position or press
and hold the respective memory posi-
tion switch* (
�page 104).
Page 103 of 464

103 Controls in detail
Memory function*
�Memory function*
You can store up to three different settings
for each SmartKey.
The following settings are stored when us-
ing the buttons on the outer side of the
driver’s seat:�
Driver’s seat and backrest position
�
Steering wheel position
�
Exterior rear view mirror positions
These key-dependent memory settings
can be deactivated if desired. For informa-
tion on key-dependent memory settings,
see “Setting key-dependency”
(
�page 143).The following settings are not
key-dependent. They are stored when us-
ing the buttons on the outer side of the
passenger seat:
�
Passenger seat and backrest position.
!Prior to operating the vehicle, the driv-
er should check and adjust the seat
height, seat position fore and aft, and
seat backrest angle if necessary, to en-
sure adequate control, reach and com-
fort. The head restraint should also be
adjusted for proper height. See also the
section on air bags for proper seat po-
sitioning (
�page 63).
In addition, adjust the steering wheel to
ensure adequate control, reach, opera-
tion and comfort. Both the interior and
exterior rear view mirrors should be ad-
justed for adequate rear vision.
Fasten seat belts. Infants and small
children should be seated in a properly
secured restraint system that complies
with U.S. Federal Motor Vehicle Safety
Standards 213 and 255 and Canadian
Motor Vehicle Safety Standards 213
and 210.2.
Warning!
G
Do not activate the memory function while
driving. Activating the memory function
while driving could cause the driver to lose
control of the vehicle.
Page 105 of 464

For easier parking, you can adjust the
passenger-side exterior rear view mirror so
that you c")
105 Controls in detail
Memory function*
Storing exterior rear view mirror parking position (parking aid)
For easier parking, you can adjust the
passenger-side exterior rear view mirror so
that you can see the right rear wheel as
soon as you engage reverse gearR.
You can switch the parking position fea-
ture on and off via the control system
(�page 144).
For information on activating the parking
position feature, see “Activating exterior
rear view mirror parking position (parking
aid)” (
�page 169).The switches are located on the lower part
of the center console.
1Driver’s side exterior rear view mirror
switch
2Adjustment switch
3Passenger-side exterior rear view mir-
ror switch
�
Switch on the ignition (
�page 35).
�
Press switch3 to select the passen-
ger-side exterior rear view mirror.
�
Adjust the passenger-side exterior rear
view mirror with adjustment switch2
so that you see the rear wheel and the
road curb.
�
Press memory buttonM (
�page 104).
�
Within three seconds, press adjust-
ment switch2 forward, backward,
left, or right.
The parking position is stored if the
mirror does not move.
iYou can store one parking position for
the passenger-side exterior rear view
mirror for each SmartKey.
iIf the mirror does move, repeat the
above steps. After the setting is stored,
you can move the mirror again.
Page 107 of 464

107 Controls in detail
Lighting
Manual headlamp mode
The low beam headlamps and the parking
lamps can be switched on and off with the
exterior lamp switch.
Automatic headlamp mode
The following lamps switch on and off au-
tomatically depending on the brightness of
the ambient light:�
Low beam headlamps
�
Tail and parking lamps
�
License plate lamps
�
Side marker lamps
�
Turn the exterior lamp switch to
positionU.
With the SmartKey in starter switch
position1 only the parking lamps will
switch on and off automatically.
When the engine is running, the low
beam headlamps, the tail and parking
lamps, the license plate lamps, and the
side marker lamps will switch on and
off automatically.
iWith the SmartKey removed from the
starter switch and the driver’s door
open, a warning sounds if the parking
lamps or low beam headlamps are
switched on.
The message
Turn off lights
appears
in the multifunction display.
Warning!
G
If the exterior lamp switch is set toU�
the headlamps may switch off unexpect-
edly when the system senses bright am-
bient light, for example light from
oncoming traffic.
�
the headlamps will not be automatically
switched on under foggy conditions.
To minimize risk to you and to others, acti-
vate headlamps by turning exterior lamp
switch to
B
when driving or when traffic
and/or ambient lighting conditions require
you to do so.
In low ambient lighting conditions, only
switch from position
U
toB
with
the vehicle at a standstill. Switching
from
U
toB
will briefly switch off
the headlamps. Doing so while driving in low
ambient lighting conditions may result in an
accident.
The automatic headlamp feature is only an
aid to the driver. The driver is responsible for
the operation of the vehicle's lights at all
times.
Page 112 of 464
112 Controls in detailLightingHazard warning flasher
The hazard warning flasher can be
switched on at all times, even with the
SmartKey removed from the starter
switch.
The hazard warning flasher switches on au-
tomatically when an air bag deploys.
The hazard warning flasher switch is locat-
ed on the upper part of the center console.
1Hazard warning flasher switchSwitching on hazard warning flasher
�
Press hazard warning flasher
switch1.
All turn signal lamps are flashing.Switching off hazard warning flasher
�
Press hazard warning flasher switch1
again.
iWith the hazard warning flasher acti-
vated and the combination switch set
for either left or right turn, only the re-
spective turn signals will operate when
the SmartKey is in the starter switch
position1or2.
iIf the hazard warning flasher has been
activated automatically, press hazard
warning flasher switch1 once to
switch it off.
Page 113 of 464

113 Controls in detail
Lighting
Interior lighting
The controls are located in the overhead
control panel.
1Interior lighting on/off
2Automatic control on/off
3Right reading lamp on/off
4Left reading lamp on/offAutomatic control
Activating
�
Press automatic control switch2 until
it is flush to the other switches.
The interior lighting switches on in
darkness, when you�
unlock the vehicle
�
remove the SmartKey from the
starter switch
�
open a door
The interior lighting switches off automati-
cally following an adjustable time delay.
For more information, see “Setting interior
lighting delayed shut-off” (
�page 140).Deactivating
�
Press automatic control switch2 until
it engages at a deeper position than the
other switches.
The interior lighting remains switched
off in darkness, even when you�
unlock the vehicle
�
remove the SmartKey from the
starter switch
�
open a door
iLeaving an interior light switch in the
ON position for extended periods of
time with the engine turned off could
result in a discharged battery.
iIf the door remains open, the interior
lighting switches off automatically after
approximately five minutes, when the
SmartKey is in starter switch position0
or removed.
iWhen you open the trunk, the trunk
lighting switches on automatically.
If the trunk lid remains open, the trunk
lighting switches off automatically after
approximately ten minutes.