Page 94 of 464

94 Controls in detailLocking and unlockingLoss of SmartKey or mechanical key
If you lose a SmartKey or mechanical key,
you should do the following:�
Have the SmartKey deactivated by an
authorized Mercedes-Benz Center.
�
Report the loss of the SmartKey or the
mechanical key to your car insurance
company immediately.
�
If necessary have the mechanical lock
replaced.
Your authorized Mercedes-Benz Center
will be glad to supply you with a replace-
ment.
Opening the doors from the inside
You can open a locked door from the in-
side. Open door only when conditions are
safe to do so.
1Inside door handle
2Locking knob�
Pull on door handle1 of the desired
door.
If the door was locked, locking knob2
will move up.
iIf the batteries are checked within sig-
nal range of the vehicle, pressing
button‹orŒ will lock or un-
lock the vehicle accordingly.
iIf the vehicle has previously been cen-
trally locked from the outside with the
SmartKey, opening a door from the in-
side will trigger the anti-theft alarm sys-
tem.
To cancel the alarm, do one of the fol-
lowing:�
Press buttonŒor‹ on the
SmartKey.
�
Insert the SmartKey in the starter
switch.
iOpening a door causes the windows on
that side of the car to open slightly.
They will return to the up position when
the door is closed.
Page 95 of 464
 is required to open the trunk lid.
The handle is located above the rear
license plate rec")
95 Controls in detail
Locking and unlocking
Opening the trunk
A minimum height clearance of 5.78 ft
(1.76 m) is required to open the trunk lid.
The handle is located above the rear
license plate recess.�
Pull on the handle.
�
Lift the trunk lid.
The trunk lid can also be opened from its
inside in an emergency, see “Trunk lid
emergency release” (
�page 96).
Closing the trunk
1Handle�
Lower the trunk lid using handle1.
�
Close the trunk lid with hands placed
flat on the trunk lid.
iThe vehicle or trunk lid must be
unlocked before the trunk lid can be
opened.!When the trunk lid is lifted slightly, it
swings open upwards automatically.
Always make sure there is sufficient
overhead clearance.
Warning!
G
To prevent possible personal injury, always
keep hands and fingers away from the trunk
lid opening when closing the trunk lid. Be es-
pecially careful when small children are
around.
Warning!
G
When leaving the vehicle, always remove the
SmartKey from the starter switch, take it
with you, and lock the vehicle. Do not leave
children unattended in the vehicle, or with
access to an unlocked vehicle. It is possible
for children to open a locked door from the
inside, which could result in an accident
and/or serious injury.Warning!
G
Only drive with the trunk lid closed as,
among other dangers such as visibility
blockage, exhaust fumes may enter the ve-
hicle interior.
Page 96 of 464
96 Controls in detailLocking and unlocking
Trunk lid emergency release
The emergency release button is located
on the inside of the trunk lid.
1Emergency release button�
Briefly press emergency release
button1.
The trunk lid unlocks and opens
slightly.
�
Push up the trunk lid to fully open.Illumination of the emergency release but-
ton:
�
The button flashes for 30 minutes after
opening the trunk.
�
The button flashes for 60 minutes after
closing the trunk.
iDo not place the SmartKey in the open
trunk. You may lock yourself out.iIf the vehicle was previously centrally
locked, the trunk lid will lock automati-
cally when closed. The turn signal
lamps will flash three times to confirm
locking.
iThe emergency release button unlocks
the trunk while the vehicle is standing
still or in motion.iThe emergency release button does
not unlock the trunk if the vehicle bat-
tery is discharged or disconnected.
Page 97 of 464

97 Controls in detail
Locking and unlocking
Automatic central locking
The doors and the trunk automatically lock
when the ignition is switched on and the
wheels are turning at vehicle speeds of
approximately 9 mph (15 km/h).
You can open a locked door from the in-
side. Open door only when conditions are
safe to do so.
You can deactivate the automatic locking
using the control system, see “Setting
automatic locking” (
�page 141).
Locking and unlocking from the inside
You can lock or unlock the doors and the
trunk from inside using the central locking
switch. This can be useful, for example, if
you want to lock the vehicle before starting
to drive.
The fuel filler flap will not be locked or un-
locked with the central locking or unlock-
ing switch, respectively.
iIf the vehicle has previously been cen-
trally locked from the outside with the
SmartKey, opening the trunk from the
inside will trigger the anti-theft alarm
system.
To cancel the alarm, do one of the fol-
lowing:�
Press buttonŒor‹ on the
SmartKey.
�
Insert the SmartKey in the starter
switch.
iThe doors unlock automatically after an
accident if the force of the impact ex-
ceeds a preset threshold.
To prevent the vehicle door locks from
locking, deactivate the automatic cen-
tral locking when the vehicle�
is pushed or towed
�
is on a test stand
Warning!
G
When leaving the vehicle, always remove the
SmartKey from the starter switch, take it
with you, and lock the vehicle. Do not leave
children unattended in the vehicle, or with
access to an unlocked vehicle. Unsuper-
vised use of vehicle equipment may cause
an accident and/or serious personal injury.
Page 98 of 464
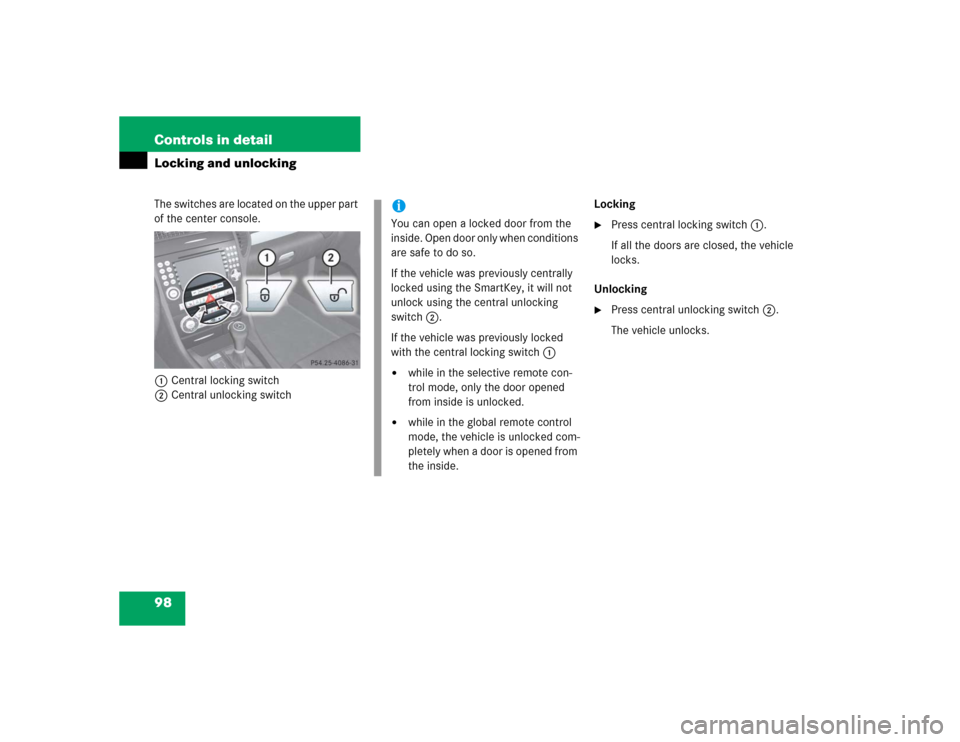
98 Controls in detailLocking and unlockingThe switches are located on the upper part
of the center console.
1Central locking switch
2Central unlocking switchLocking
�
Press central locking switch1.
If all the doors are closed, the vehicle
locks.
Unlocking
�
Press central unlocking switch2.
The vehicle unlocks.
iYou can open a locked door from the
inside. Open door only when conditions
are safe to do so.
If the vehicle was previously centrally
locked using the SmartKey, it will not
unlock using the central unlocking
switch2.
If the vehicle was previously locked
with the central locking switch1�
while in the selective remote con-
trol mode, only the door opened
from inside is unlocked.
�
while in the global remote control
mode, the vehicle is unlocked com-
pletely when a door is opened from
the inside.
Page 99 of 464
.
Easy-entry/exit feature*
This feature allows for easier entry into and
exit from the vehicle.")
99 Controls in detail
Seats
�Seats
For information on seat adjustment, see
“Adjusting” (
�page 37).
Easy-entry/exit feature*
This feature allows for easier entry into and
exit from the vehicle.
The easy-entry/exit feature can be
switched on or off, see “Setting
easy-entry/exit feature*” (
�page 142).When exiting the vehicle with the
easy-entry/exit feature activated and de-
pending on your selection, the steering
wheel tilts upwards and/or the driver’s
seat moves a few inches to the rear when
you:
�
remove the SmartKey from the starter
switch,
or
�
open the driver’s door with the
SmartKey in starter switch position0
or1.
Warning!
G
You must make sure no one can become
trapped or injured by the moving steering
wheel and driver’s seat when the
easy-entry/exit feature is activated.
To cancel seat/steering wheel movement,
do one of the following:�
Press seat adjustment switch*
(�page 39).
�
Move steering column stalk*
(�page 41).
�
Press memory position switch*
(�page 104).
Do not leave children unattended in the ve-
hicle, or with access to an unlocked vehicle.
Children could open the driver’s door an un-
intentionally activate the easy-entry/exit
feature, which could result in an accident
and/or serious personal injury.
Page 113 of 464

113 Controls in detail
Lighting
Interior lighting
The controls are located in the overhead
control panel.
1Interior lighting on/off
2Automatic control on/off
3Right reading lamp on/off
4Left reading lamp on/offAutomatic control
Activating
�
Press automatic control switch2 until
it is flush to the other switches.
The interior lighting switches on in
darkness, when you�
unlock the vehicle
�
remove the SmartKey from the
starter switch
�
open a door
The interior lighting switches off automati-
cally following an adjustable time delay.
For more information, see “Setting interior
lighting delayed shut-off” (
�page 140).Deactivating
�
Press automatic control switch2 until
it engages at a deeper position than the
other switches.
The interior lighting remains switched
off in darkness, even when you�
unlock the vehicle
�
remove the SmartKey from the
starter switch
�
open a door
iLeaving an interior light switch in the
ON position for extended periods of
time with the engine turned off could
result in a discharged battery.
iIf the door remains open, the interior
lighting switches off automatically after
approximately five minutes, when the
SmartKey is in starter switch position0
or removed.
iWhen you open the trunk, the trunk
lighting switches on automatically.
If the trunk lid remains open, the trunk
lighting switches off automatically after
approximately ten minutes.
Page 116 of 464
.
For information on selecting the tempera-
ture d")
116 Controls in detailInstrument clusterOutside temperature indicator
The outside temperature is displayed in
the multifunction display (
�page 123).
For information on selecting the tempera-
ture display unit, i.e. degrees Celsius (°C)
or degrees Fahrenheit (°F), see “Selecting
temperature display mode” (�page 131).The temperature sensor is located in the
front bumper area. Due to its location, the
sensor can be affected by road or engine
heat during idling or slow driving. There-
fore, the accuracy of the displayed temper-
ature can only be verified by comparison to
a thermometer placed next the sensor, not
by comparison to external displays, e.g.
bank signs, etc.
When moving the vehicle into colder ambi-
ent temperatures (e.g. when leaving your
garage), you will notice a delay before the
lower temperature is displayed.
A delay also occurs when ambient temper-
atures rise. This prevents inaccurate tem-
perature displays caused by heat radiated
from the engine during idling or slow driv-
ing.
Trip odometer�
Make sure you are viewing the stan-
dard display menu (
�page 122).
�
Press and hold reset buttonJuntil
the trip odometer is reset.
Clock
Vehicles with COMAND*:
The clock in the instrument cluster can be
synchronized with the time set in
COMAND using the time synchronization
with head unit feature (
�page 133), or set
independently from COMAND using the
control system (
�page 134) with the time
synchronization with head unit feature set
to
Off
.
For setting the time in COMAND, see sep-
arate COMAND operating instructions.
For setting the time with audio system,
(
�page 134).
Warning!
G
The outside temperature indicator is not de-
signed to serve as an ice-warning device and
is therefore unsuitable for that purpose.
Indicated temperatures just above the freez-
ing point do not guarantee that the road sur-
face is free of ice. The road may still be icy,
especially in wooded areas or on bridges.