Page 35 of 464

35 Getting started
Unlocking
Starter switch positions SmartKey
Starter switch0For removing the SmartKey
The steering is locked when the
SmartKey is removed from the starter
switch. If necessary, move steering
wheel slightly to allow the locking
mechanism to engage.
1Power supply to some electrical con-
sumers, such as seat adjustment2Ignition (power supply for all electrical
consumers) and driving position.
All lamps (except high beam headlamp
indicator lamp and turn signal indicator
lamps unless activated) in the instru-
ment cluster come on. If a lamp in the
instrument cluster fails to come on
when the ignition is switched on, have
it checked and replaced if necessary. If
a lamp in the instrument cluster re-
mains on after starting the engine or
comes on while driving, refer to see
“Lamps in instrument cluster”
(
�page 342).
3Starting position
Warning!
G
When leaving the vehicle, always remove the
SmartKey from the starter switch, take it
with you, and lock the vehicle. Do not leave
children unattended in the vehicle, or with
access to an unlocked vehicle. Unsuper-
vised use of vehicle equipment may cause
an accident and/or serious personal injury.
Page 36 of 464
.
iWhen you switch on ignition, the indi-
cator and warning lamps (except high
beam headlamp indicator lamp and
tur")
36 Getting startedUnlocking
For information on starting the engine, see
(�page 47).
iWhen you switch on ignition, the indi-
cator and warning lamps (except high
beam headlamp indicator lamp and
turn signal indicator lamps unless acti-
vated) in the instrument cluster come
on. This indicates that the respective
system is operational. The indicator
and warning lamps (except high beam
headlamp indicator lamp and turn sig-
nal indicator lamps if activated) should
go out when the engine is running.iVehicles with automatic transmission*:
The SmartKey can only be removed
from the starter switch with the gear
selector lever in positionP.
!If the SmartKey cannot be turned in the
starter switch, the vehicle battery may
not be sufficiently charged.�
Check the vehicle battery and
charge it if necessary (
�page 396).
�
Get a jump start (
�page 399).
To prevent accelerated vehicle battery
discharge or a completely discharged
vehicle battery, always remove the
SmartKey from the starter switch when
the engine is not in operation.
Page 37 of 464

37 Getting started
Adjusting
�Adjusting
Seats
The seats can be adjusted either manually
or electrically, depending on the vehicle’s
equipment.
For more information on seats, see “Seats”
(�page 99).Warning!
G
All seat, head restraint, steering wheel, and
rear view mirror adjustments, as well as fas-
tening of seat belts, must be done before
the vehicle is put into motion.iThe memory function* (
�page 103)
lets you store the setting for power
seats*, steering wheel adjustment
(electrical)*, and exterior rear view mir-
rors.
Warning!
G
Do not adjust the driver seat while driving.
Adjusting the seat while driving could cause
the driver to lose control of the vehicle.
Never ride in a moving vehicle with the seat
back in an excessively reclined position as
this can be dangerous. You could slide un-
der the seat belt in a collision. If you slide
under it, the belt would apply force at the ab-
domen or neck. That could cause serious or
fatal injuries. The seat back and seat belts
provide the best restraint when the wearer
is in a nearly upright position and belts are
properly positioned on the body. Your seat
must be adjusted so that you can correctly
fasten your seat belt (
�page 44).
Never place hands under the seat or near
moving parts while the seat is being
adjusted.
Warning!
G
When leaving the vehicle, always remove the
SmartKey from the starter switch, take it
with you, and lock the vehicle.
Even with the SmartKey removed from the
starter switch, the power seats* can be op-
erated when the respective door is open.
Therefore, do not leave children unattended
in the vehicle, or with access to an unlocked
vehicle. Unsupervised use of vehicle equip-
ment may cause an accident and/or serious
personal injury.
Page 40 of 464

40 Getting startedAdjustingSeat cushion tilt�
Press the horizontal switch up or down
in direction of arrow4 until your up-
per legs are lightly supported.
Head restraint height
Head restraint�
Adjust the height of head restraints
manually by pulling them upwards or
pushing them downwards.
Steering wheel
Warning!
G
For your protection, drive only with properly
positioned head restraints.
Adjust head restraint so that the head re-
straint supports the back of the head at eye
level. This will reduce the potential for injury
to the head and neck in the event of an ac-
cident or similar situation.
Do not drive the vehicle without the seat
head restraints. Head restraints are intend-
ed to help reduce injuries during an acci-
dent.
iAdjust the head restraint in such a way
that it is as close to the head as
possible.
Warning!
G
Do not adjust the steering wheel while driv-
ing. Adjusting the steering wheel while driv-
ing, or driving without the steering wheel
adjustment feature locked could cause the
driver to lose control of the vehicle.
When leaving the vehicle, always remove the
SmartKey from the starter switch, take it
with you, and lock the vehicle.
Even with the SmartKey removed from the
starter switch, the electrical steering wheel
adjustment feature* can be operated when
the driver’s door is open. Therefore, do not
leave children unattended in the vehicle, or
with access to an unlocked vehicle. Unsu-
pervised use of vehicle equipment may
cause an accident and/or serious personal
injury.
Page 41 of 464

41 Getting started
Adjusting
Steering wheel adjustment, manual
1Adjustment handle�
To unlock the steering column, pull
handle1 out to its stop limit.
�
Move the steering wheel to the desired
position.
�
Push handle1 back to its original po-
sition to relock the steering column.
When you hear an audible click, the
steering column is again fixed into
place.
�
Make sure the steering column is se-
curely locked by trying to move the
steering wheel up and down, in and out
before driving off.Steering wheel adjustment, electrical*
The lever for the electrical steering wheel
adjustment is located on the steering col-
umn (lower left).
1Adjusting steering column, in or out
2Adjusting steering column, up or down
�
Switch on the ignition (
�page 35).
or
�
Open the driver’s door.
!Do not drive the vehicle until you have
properly locked the steering column.Warning!
G
Only adjust the steering wheel with the vehi-
cle at a standstill and make sure the steer-
ing column is securely locked in place
before driving off.
Driving without the steering column locked
may cause an unexpected steering wheel
movement which could cause the driver to
lose control of the vehicle. Make sure the
steering column is securely locked by trying
to move it up and down, and in and out be-
fore driving off.
Page 48 of 464
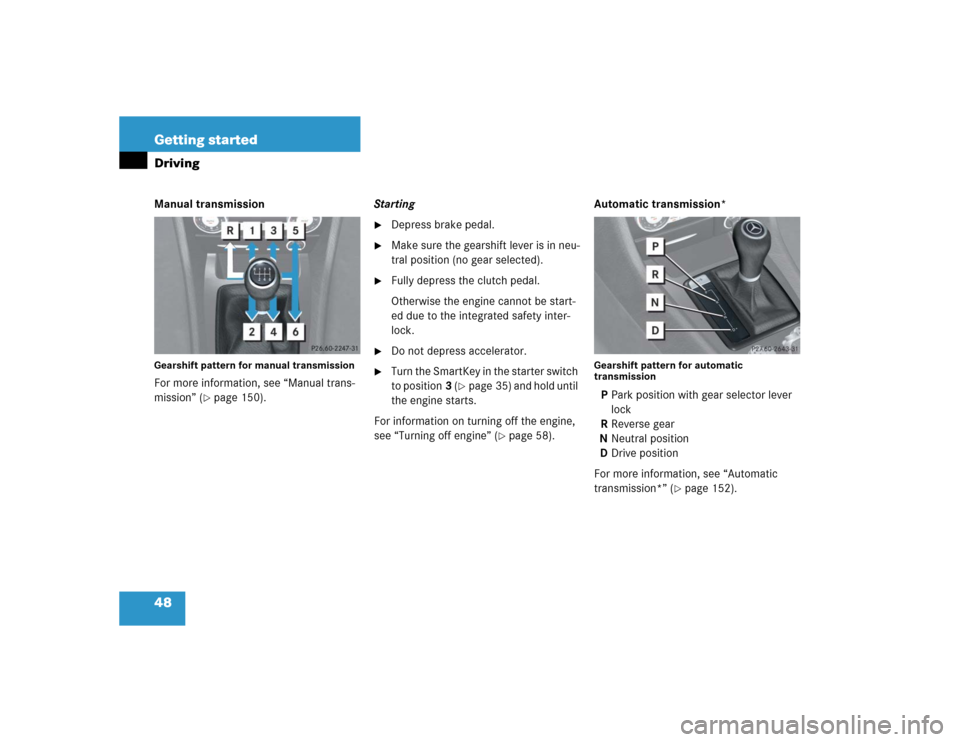
48 Getting startedDrivingManual transmissionGearshift pattern for manual transmissionFor more information, see “Manual trans-
mission” (
�page 150).Starting
�
Depress brake pedal.
�
Make sure the gearshift lever is in neu-
tral position (no gear selected).
�
Fully depress the clutch pedal.
Otherwise the engine cannot be start-
ed due to the integrated safety inter-
lock.
�
Do not depress accelerator.
�
Turn the SmartKey in the starter switch
to position3 (
�page 35) and hold until
the engine starts.
For information on turning off the engine,
see “Turning off engine” (
�page 58).Automatic transmission*
Gearshift pattern for automatic
transmissionPPark position with gear selector lever
lock
RReverse gear
NNeutral position
DDrive position
For more information, see “Automatic
transmission*” (
�page 152).
Page 49 of 464
 and release it")
49 Getting started
Driving
Starting�
Place the gear selector lever in
positionP.
�
Do not depress the accelerator.
�
Turn the SmartKey in the starter switch
to position3 (
�page 35) and release it
again immediately. The engine starts
automatically.
�
Depress the brake pedal.
The gear selector lever lock is released.
For information on turning off the engine,
see “Turning off engine” (
�page 58).Starting difficulties
If the engine does not start as described,
carry out the following steps:
�
Turn the SmartKey in the starter switch
to position0 and repeat the starting
procedure.
Remember that extended starting at-
tempts can drain the vehicle battery.
�
Get a jump start (
�page 399).
If the engine does not start after several
starting attempts, there could be a mal-
function in the engine electronics or in the
fuel supply system.
�
Notify an authorized Mercedes-Benz
Center.Parking brake
Warning!
G
When leaving the vehicle, always remove the
SmartKey from the starter switch, take it
with you, and lock the vehicle. Do not leave
children unattended in the vehicle, or with
access to an unlocked vehicle. Children
could release the parking brake, which
could result in an accident and/or serious
injury.
Page 50 of 464
50 Getting startedDriving1Parking brake lever
2Release button�
Pull up slightly on parking brake
lever1 and press release button2.
�
Push parking brake lever1 down to
its original position.
The brake warning lamp; (USA
only) or3 (Canada only) in the
speedometer dial goes out.Driving
Warning!
G
On slippery road surfaces, never downshift
in order to obtain braking action. This could
result in drive wheel slip and reduced vehi-
cle control. Your vehicle’s ABS will not pre-
vent this type of loss of control.
!If you hear a warning signal when driv-
ing off, you have forgotten to release
the parking brake.!Simultaneously depressing the acceler-
ator pedal and the brake pedal reduces
engine performance and causes pre-
mature brake and drivetrain wear.iOnce the vehicle is in motion, the auto-
matic central locking system engages
and the locking knobs drop down.
For more information, see “Opening
the doors from the inside” (
�page 94).