Page 254 of 464
.
�
Push in cigarette lighter1.
Cigarette lighter1 will pop out auto-
matically when hot.")
254 Controls in detailUseful featuresCigarette lighter
1Cigarette lighter
�
Switch on the ignition (
�page 35).
�
Push in cigarette lighter1.
Cigarette lighter1 will pop out auto-
matically when hot.
�
Reinsert cigarette lighter1 in its
socket after use.
Electrical outlet
An electrical outlet1 is located in the
passenger footwell on the side panel of the
center console.�
Switch on the ignition (
�page 35).
�
Flip up cover of electrical outlet1 and
insert electrical plug (cigarette lighter
type).
Warning!
G
Never touch the heating element or sides of
the cigarette lighter; they are extremely hot.
Hold the knob only.
When leaving the vehicle, always remove the
SmartKey from the starter switch, take it
with you, and lock the vehicle. Do not leave
children unattended in the vehicle, or with
access to an unlocked vehicle. Unsuper-
vised use of vehicle equipment may cause
an accident and/or serious personal injury.iThe lighter socket can be used to ac-
commodate electrical accessories up
to a maximum of 85 W.
iThe electrical outlet can be used to ac-
commodate electrical consumers
(e.g. air pump, auxiliary lamps) up to a
maximum of 180 W.
Page 280 of 464

280 OperationDriving instructionsRoad salts and chemicals can adversely af-
fect braking efficiency. Increased pedal
force may become necessary to produce
the normal brake effect.
Depressing the brake pedal periodically
when traveling at length on salt-strewn
roads can bring road-salt-impaired braking
efficiency back to normal.
If the vehicle is parked after being driven
on salt-treated roads, the braking efficien-
cy should be tested as soon as possible af-
ter driving is resumed.
For more information, see “Winter driving”
(
�page 327).
Standing water
Warning
G
Make sure not to endanger any other road
users when carrying out these braking ma-
neuvers.
Warning!
G
If the vehicle becomes stuck in snow, make
sure snow is kept clear of the exhaust pipe
and from around the vehicle with the engine
running. Otherwise, deadly carbon monox-
ide (CO) gases may enter the vehicle interi-
or, resulting in unconsciousness and death.
To assure sufficient fresh air ventilation,
open a window slightly on the side of the ve-
hicle not facing the wind.Warning!
G
The outside temperature indicator is not de-
signed to serve as an ice-warning device and
is therefore unsuitable for that purpose. In-
dicated temperatures just above the freez-
ing point do not guarantee that the road
surface is free of ice.
!Do not drive through flooded areas or
water of unknown depth. Before driving
through water, determine its depth.
Never accelerate before driving into
water. The bow wave could force water
into the engine and auxiliary equip-
ment, thus damaging them.
If you must drive through standing wa-
ter, drive slowly to prevent water from
entering the passenger compartment
or the engine compartment. Water in
these areas could cause damage to
electrical components or wiring of the
engine or transmission, or could result
in water being ingested by the engine
through the air intake, causing severe
internal engine damage. Any such dam-
age is not covered by the
Mercedes-Benz Limited Warranty.
Page 299 of 464
.
Treadwear indicat")
299 Operation
Tires and wheels
Tread depth
Do not allow your tires to wear down too
far. Adhesion properties on wet roads are
sharply reduced at tread depths under 1⁄8in (3 mm).
Treadwear indicators (TWI) are required by
law. These indicators are located in six
places on the tread circumference and
become visible at a tread depth of approx-
imately
1/16
in (1.6 mm), at which point
the tire is considered worn and should be
replaced.
Recommended minimum tire tread depth:
�
Summer tires
1/8in (3 mm)
�
Winter tires
1/6in (4 mm)
1TWI (T
read W
ear I
ndicator)
The treadwear indicator appears as a solid
band across the tread.Storing tires
Cleaning tires
Warning!
G
Although the applicable federal motor safety
laws consider a tire to be worn when the
treadwear indicators (TWI) become visible at
approximately
1/16in (1.6 mm), we recom-
mend that you do not allow your tires
to wear down to that level. As tread depth
approaches
1/8in (3 mm), the adhesion
properties on a wet road are sharply re-
duced.
Depending upon the weather and/or road
surface (conditions), the tire traction varies
widely.
!Keep unmounted tires in a cool, dry
place with as little exposure to light as
possible. Protect tires from contact
with oil, grease and gasoline.!Never use a round nozzle to power
wash tires. The intense jet of water can
result in damage to the tire.
Always replace a damaged tire.
Page 339 of 464

339 Operation
Vehicle care
Rear window cleaning
Clean the rear window with the hardtop
fully raised and closed.�
Use a window cleaning solution on all
glass surfaces.
An automotive glass cleaner is recom-
mended.Light alloy wheels
Mercedes-Benz approved Wheel Care
should be used for regular cleaning of the
light alloy wheels.
If possible, clean wheels once a week with
Mercedes-Benz approved Wheel Care, us-
ing a soft bristle brush and a strong spray
of water.
Follow instructions on container.Instrument cluster
Use a gentle dishwashing detergent or
mild detergent for delicate fabrics as a
washing solution. Wipe with a cloth moist-
ened in lukewarm solution. Do not use
scouring agents.
Steering wheel and gearshift/gear se-
lector lever
Wipe with a damp cloth and dry thoroughly
or clean with Mercedes-Benz approved
Leather Care.
Cup holder
Use a gentle dishwashing detergent or
mild detergent for delicate fabrics as a
washing solution. Wipe with a cloth moist-
ened in lukewarm solution. Do not use
scouring agents.Warning!
G
Do not clean the rear window with the hard-
top in a position other than the fully raised
and closed position. Otherwise, the hardtop
may move unexpectedly which may result in
personal injury to you or others.
iOnly use acid-free cleaning materials.
Acid may cause corrosion or damage
the clear coat.
Page 340 of 464

340 OperationVehicle careHard plastic trim items
Pour Mercedes-Benz approved Interior
Care onto a soft lint-free cloth and apply
with light pressure.
Headliner
Clean with soft bristle brush, or use a
dry-shampoo cleaner in case of excessive
dirt.
Seat belts
The webbing must not be treated with
chemical cleaning agents. Use only clear,
lukewarm water and soap. Do not dry the
webbing at temperatures above 176°F
(80°C) or in direct sunlight.Upholstery
Using aftermarket seat covers or wearing
clothing that have the tendency to give off
coloring (e.g. when wet, etc.) may cause
the upholstery to become permanently dis-
colored. By lining the seats with a proper
intermediate cover, contact-discoloration
will be prevented.
Leather upholstery
Wipe leather upholstery with a damp cloth
and dry thoroughly or clean with
Mercedes-Benz approved Leather Care.
Exercise particular care when cleaning per-
forated leather as its underside should not
become wet.Plastic and rubber parts
Do not use oil or wax on these parts.
Wood trims
Dampen cloth using water and use damp
cloth to clean wood trims in your vehicle.
Do not use solvents like tar remover or
wheel cleaner nor polishes or waxes as
these may be abrasive. Warning!
G
Do not bleach or dye seat belts as this may
severely weaken them. In a crash they may
not be able to provide adequate protection.
Page 373 of 464
373 Practical hints
Where will I find...?
In the case of a flat tire, you may
temporarily use the spare wheel with col-
lapsible tire when observing the following
restrictions:�
Do not exceed a vehicle speed of
50 mph (80 km/h).
�
Drive to the nearest tire repair facility
to have the flat tire repaired or
replaced as appropriate.
�
Do not operate vehicle with more than
one spare wheel with collapsible tire
mounted.
For more information, see “Rims and tires”
(
�page 413).
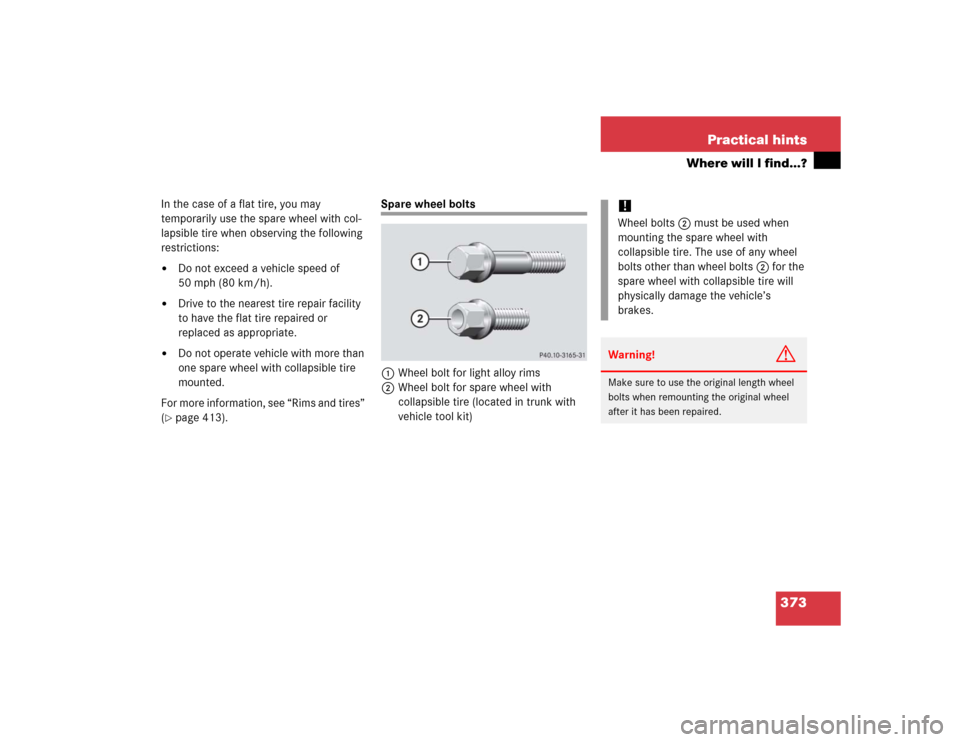
Spare wheel bolts
1Wheel bolt for light alloy rims
2Wheel bolt for spare wheel with
collapsible tire (located in trunk with
vehicle tool kit)
!Wheel bolts2 must be used when
mounting the spare wheel with
collapsible tire. The use of any wheel
bolts other than wheel bolts2 for the
spare wheel with collapsible tire will
physically damage the vehicle’s
brakes. Warning!
G
Make sure to use the original length wheel
bolts when remounting the original wheel
after it has been repaired.
Page 383 of 464
383 Practical hints
Replacing bulbs
1Housing cover for low beam (halogen
headlamps only)
Housing cover for Bi-Xenon* head-
lamps. Do not remove.
2Bulb socket for turn signal lamp
3Bulb socket for high beam/high beam
flasher lamp
4Bulb socket for parking and standing
light lamp
5Bulb socket for low beam bulb (Halo-
gen headlamps only)Low beam bulb (Halogen headlamps
only)
�
Turn housing cover1 counterclock-
wise and remove.
�
Turn bulb socket5 with the bulb
counterclockwise and remove.
�
Pull the bulb out of bulb socket5.
�
Press the new bulb into bulb socket5.
�
Place bulb socket5 back into the
lamp and turn it clockwise.
�
Reinstall housing cover1.
Warning!
G
Do not remove the cover1 for the Bi-Xe-
non* headlamp. Because of high voltage in
Bi-Xenon lamps, it is dangerous to replace
the bulb or repair the lamp and its compo-
nents. We recommend that you have such
work done by a qualified technician.
Page 392 of 464
392 Practical hintsFlat tire
�
Guide the spare wheel onto the align-
ment bolt and push it on.
�
Insert the wheel bolts and tighten them
slightly.
�
Unscrew the alignment bolt, install last
wheel bolt and tighten slightly.
Warning!
G
Always replace wheel bolts that are dam-
aged or rusted.
Never apply oil or grease to wheel bolts.
Damaged wheel hub threads should be re-
paired immediately. Do not continue to drive
under these circumstances! Contact an au-
thorized Mercedes-Benz Center or call
Roadside Assistance.
Incorrect wheel bolts or improperly tight-
ened wheel bolts can cause the wheel to
come off. This could cause an accident. Be
sure to use the correct wheel bolts.
Warning!
G
Use only genuine equipment
Mercedes-Benz wheel bolts. Other wheel
bolts may come loose.
Do not tighten the wheel bolts when the
vehicle is raised. Otherwise the vehicle
could fall off the jack.

Housing cover for Bi-Xenon* head-
lamps. Do not remove.
2Bulb socket for turn signal lamp
3Bulb socket for hig")
