Page 128 of 464
 fo")
128 Controls in detailControl systemResetting all settings
You can reset all the functions of all sub-
menus to the factory settings.�
Press the reset buttonJon the instru-
ment cluster (
�page 24) for approxi-
mately three seconds.
The request to press the reset
buttonJonce more to confirm ap-
pears in the multifunction display.
�
Press the reset buttonJagain.
The functions of all submenus will be
reset to the factory settings.
The message
Reset to factory
settings
appears in the multifunction
display.
iFor safety reasons, the following func-
tions cannot be reset while driving:�
the function
Lamp circuit head-
lamp mode in the
Lighting
sub-
menu
�
the function
Key-dependent
in the
Convenience
submenu
The following message appears in the
multifunction display:
Lighting
(or
Convenience
) Cannot be
completely reset to factory
settings while driving.
iYour individual settings will not be re-
set unless you confirm the action by
pressing the reset buttonJagain.
After five seconds the
Settings...
menu reappears in the multifunction
display.
Page 129 of 464

129 Controls in detail
Control system
Submenus in the Settings menu�
Press buttonjork.
In the multifunction display you will see
the collection of submenus.
�
Press buttonç.
The selection marker moves to the next
submenu.
The submenus are arranged by hierarchy.
Scroll up with buttonæ, and scroll
down with buttonç.
Move within the submenus with
buttonjork to the individual
functions.
The settings themselves are made with
buttonæorç.Resetting the functions of a submenu
For each submenu you can reset the
functions to factory settings.
�
Move to a function in the submenu.
�
Press the reset buttonJ (
�page 24)
for approximately three seconds.
The request to press the reset
buttonJonce more to confirm ap-
pears in the multifunction display.
�
Press the reset buttonJagain.
All functions of the submenu will be
reset to the factory settings.
The message
Reset to factory
settings
appears in the multifunction
display.
iYour individual settings will not be re-
set unless you confirm the action by
pressing the reset buttonJagain.
After five seconds the
Settings...
menu reappears in the multifunction
display.
Page 131 of 464

131 Controls in detail
Control system
Instrument cluster submenu
Access the
Instr. cluster
submenu via
the
Settings...
menu. Use the
Instr.
cluster
submenu to change the instru-
ment cluster display settings. The follow-
ing functions are available:Selecting temperature display mode
�
Move the selection marker with
buttonæorç to the
Instr.
cluster
submenu.
�
Press buttonjork repeatedly
until you see
Temp. display
in the mul-
tifunction display.
The selection marker is on the current
setting.
�
Press buttonæorç to set the
temperature display unit to degrees
Celsius (
°C) or degrees Fahrenheit (
°F).Selecting speedometer display mode
�
Move the selection marker with
buttonæorç to the
Instr.
cluster
submenu.
�
Press buttonjork repeatedly
until you see
Display unit
Speed-/odometer
in the multifunction
display.
The selection marker is on the current
setting.
�
Press buttonæorç to set the
speedometer unit to
km or
miles
.
Function
Page
Selecting temperature display
mode
131
Selecting speedometer display
mode
131
Selecting language
132
Selecting display (speed display
or outside temperature) for
status indicator
132
Page 132 of 464
132 Controls in detailControl systemSelecting language�
Move the selection marker with
buttonæorç to the
Instr.
cluster
submenu.
�
Press buttonjork repeatedly
until you see
Language
in the multifunc-
tion display.
The selection marker is on the current
setting.
�
Press buttonæorç to select
the desired language to be used for the
multifunction display messages.Available languages:
�
German
�
English
�
Italian
�
French
�
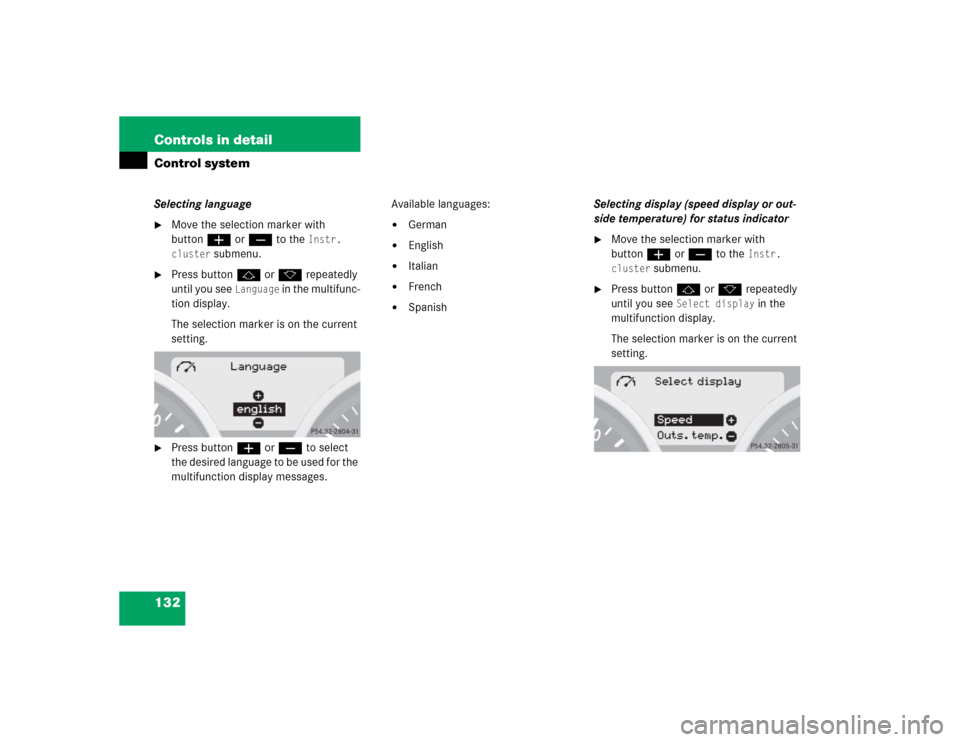
SpanishSelecting display (speed display or out-
side temperature) for status indicator
�
Move the selection marker with
buttonæorç to the
Instr.
cluster
submenu.
�
Press buttonjork repeatedly
until you see
Select display
in the
multifunction display.
The selection marker is on the current
setting.
Page 133 of 464

133 Controls in detail
Control system
�
Press buttonæorç to select
the desired setting.
The selected display is then shown
continuously in the lower display.
The other display now appears in the
menu of the standard display:�
Digital speedometer
or
�
Outside temperatureTime/Date submenu
Access the
Time/Date
submenu via the
Settings...
menu. Use the
Time/Date
submenu to change the instrument cluster
display settings.
The following functions are available:Time and date synchronization with
head unit*
This function can only be seen on vehicles
with COMAND* and navigation module*.
�
Move the selection marker with
buttonæorç to the
Time/Date
submenu.
�
Press buttonjork repeatedly
until you see
Synchronization with
main unit
in the multifunction display.
The selection marker is on the current
setting.
�
Press buttonæorç to select
the desired setting.
Function
Page
Time synchronization with head
unit*
133
Setting the time (hours)
134
Setting the time (minutes)
134
Setting the date (month)
135
Setting the date (day)
136
Setting the date (year)
136
Page 135 of 464
135 Controls in detail
Control system
�
Move the selection marker with
buttonæorç to the
Time/Date
submenu.
�
Press buttonjork repeatedly
until you see
Clock, minutes
in the
multifunction display.
The selection marker is on the minutes.
�
Press buttonæorç to set the
correct minutes displayed in the multi-
function display.
�
Press reset buttonJto confirm the
set minutes.Setting the date (month)
This function can be seen in vehicles with
audio system, or in vehicles with
COMAND* and navigation module*, if the
time and date synchronization with head
unit* feature was set to
Off
(�page 133).
�
Move the selection marker with
buttonæorç to the
Time/Date
submenu.
�
Press buttonjork repeatedly
until you see
Set date month
in the
multifunction display.
The selection marker is on the month.
�
Press buttonæorç to set the
month.
iVehicles with COMAND*:
For information on setting the time in
COMAND, refer to the separate
COMAND operating instructions.
Page 137 of 464

137 Controls in detail
Control system
�
Move the selection marker with
buttonæorç to the
Time/Date
submenu.
�
Press buttonjork repeatedly
until you see
Set date year
in the mul-
tifunction display.
The selection marker is on the year.
�
Press buttonæorç to set the
year.Lighting submenu
Access the
Lighting
submenu via the
Settings...
menu. Use the
Lighting
sub-
menu to change the lamp and lighting set-
tings on your vehicle.
The following functions are available:Setting daytime running lamp mode
(USA only)
�
Move the selection marker with
buttonæorç to the
Lighting
submenu.
�
Press buttonjork repeatedly
until you see
Lamp circuit headlamp
mode
in the multifunction display.
The selection marker is on the current
setting.
Function
Page
Setting daytime running lamp
mode (USA only)
137
Setting locator lighting
138
Setting night security illumina-
tion
139
Setting interior lighting delayed
shut-off
140
iThis function is not available in coun-
tries where the daytime running lamp
mode is mandatory and therefore in a
constant mode.
Page 138 of 464
 or daytime
running lamp mode (
constant
) activat-
ed.
With daytime running lamp mode activated
and th")
138 Controls in detailControl system�
Press buttonæorç to select
manual operation (
manual
) or daytime
running lamp mode (
constant
) activat-
ed.
With daytime running lamp mode activated
and the exterior lamp switch in
positionMorU, the low beam
headlamps are switched on when the en-
gine is running.
In low ambient light conditions the follow-
ing lamps will switch on additionally:
�
Parking lamps
�
Tail lamps
�
License plate lamps
�
Side marker lamps
For more information on the daytime run-
ning lamp mode, see “Lighting”
(
�page 106).Setting locator lighting
With the locator lighting feature activated
and the exterior lamp switch in
positionU, the following lamps will
switch on when the vehicle is unlocked
with the SmartKey during darkness:
�
Parking lamps
�
Tail lamps
�
License plate lamps
�
Side marker lamps
�
Front fog lamps
The locator lighting switches off when the
driver’s door is opened.
If you do not open a door after unlocking
with the SmartKey, the lamps will switch
off automatically after approximately
40 seconds.
iFor safety reasons, resetting the Lighting
submenu to factory settings
while driving (
�page 129) will not de-
activate the daytime running lamp
mode.
The following message appears in the
multifunction display:
Lighting Cannot be completely
reset to factory settings while
driving
.