Page 53 of 464
53 Getting started
Driving
The combination switch resets auto-
matically after major directional chang-
es.
Windshield wipers
The combination switch is located on the
left of the steering column.Combination switch1Single wipe
2Switching on windshield wipersSwitching on windshield wipers
�
Turn the combination switch to the de-
sired position depending on the inten-
sity of the rain.
0Windshield wipers off
IIntermittent wiping
IINormal wiper speed
IIIFast wiper speed
iTo signal minor directional changes,
press combination switch only to point
of resistance and release. The corre-
sponding turn signals will flash three
times.
iVehicles without rain sensor:
When the vehicle is standing still, the
wiper speed returns to the next lower
setting.
Vehicles with rain sensor*:
Intermittent wiping interval is depen-
dent on wetness of windshield. After
the initial wipe, pauses between wipes
are automatically controlled by the rain
sensor.
��
Page 125 of 464
125 Controls in detail
Control system
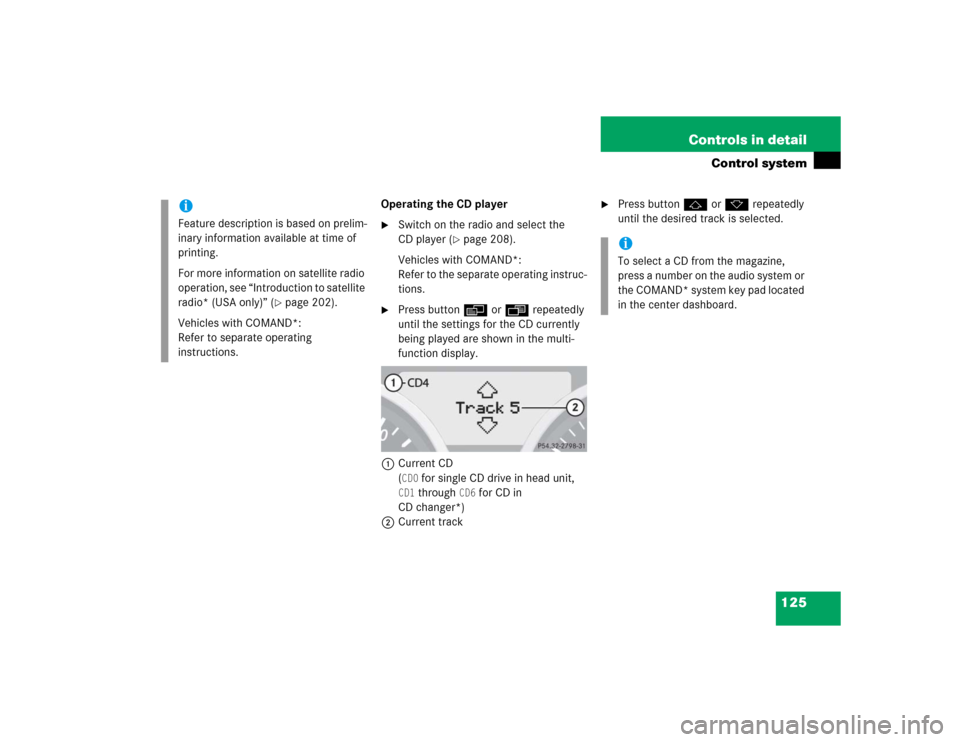
Operating the CD player�
Switch on the radio and select the
CD player (
�page 208).
Vehicles with COMAND*:
Refer to the separate operating instruc-
tions.
�
Press buttonèorÿ repeatedly
until the settings for the CD currently
being played are shown in the multi-
function display.
1Current CD
(CD0
for single CD drive in head unit,
CD1
through
CD6
for CD in
CD changer*)
2Current track
�
Press buttonjork repeatedly
until the desired track is selected.
iFeature description is based on prelim-
inary information available at time of
printing.
For more information on satellite radio
operation, see “Introduction to satellite
radio* (USA only)” (
�page 202).
Vehicles with COMAND*:
Refer to separate operating
instructions.
iTo select a CD from the magazine,
press a number on the audio system or
the COMAND* system key pad located
in the center dashboard.
Page 130 of 464
130 Controls in detailControl systemThe table below shows what settings can
be changed within the various submenus.Detailed instructions on making individual
settings can be found on the following
pages.Instrument cluster
Time/Date
Lighting
Vehicle
Convenience
(�page 131)
(�page 133)
(�page 137)
(�page 141)
(�page 142)
Selecting temperature
display mode
Time synchronization
with head unit*
Setting daytime running
lamp mode (USA only)
Setting automatic locking
Activating
easy-entry/exit feature*
Selecting speedometer
display mode
Setting the time (hours)
Setting locator lighting
(Function surround
lighting)
Setting key-dependency
Selecting language
Setting the time
(minutes)
Setting night security
illumination
Setting parking position
for exterior rear view
mirror*
Selecting display (speed
display or outside
temperature) for status
indicator
Setting the date (month)
Setting interior lighting
delayed shut-off
Setting the date (day)Setting the date (year)
Page 133 of 464

133 Controls in detail
Control system
�
Press buttonæorç to select
the desired setting.
The selected display is then shown
continuously in the lower display.
The other display now appears in the
menu of the standard display:�
Digital speedometer
or
�
Outside temperatureTime/Date submenu
Access the
Time/Date
submenu via the
Settings...
menu. Use the
Time/Date
submenu to change the instrument cluster
display settings.
The following functions are available:Time and date synchronization with
head unit*
This function can only be seen on vehicles
with COMAND* and navigation module*.
�
Move the selection marker with
buttonæorç to the
Time/Date
submenu.
�
Press buttonjork repeatedly
until you see
Synchronization with
main unit
in the multifunction display.
The selection marker is on the current
setting.
�
Press buttonæorç to select
the desired setting.
Function
Page
Time synchronization with head
unit*
133
Setting the time (hours)
134
Setting the time (minutes)
134
Setting the date (month)
135
Setting the date (day)
136
Setting the date (year)
136
Page 137 of 464

137 Controls in detail
Control system
�
Move the selection marker with
buttonæorç to the
Time/Date
submenu.
�
Press buttonjork repeatedly
until you see
Set date year
in the mul-
tifunction display.
The selection marker is on the year.
�
Press buttonæorç to set the
year.Lighting submenu
Access the
Lighting
submenu via the
Settings...
menu. Use the
Lighting
sub-
menu to change the lamp and lighting set-
tings on your vehicle.
The following functions are available:Setting daytime running lamp mode
(USA only)
�
Move the selection marker with
buttonæorç to the
Lighting
submenu.
�
Press buttonjork repeatedly
until you see
Lamp circuit headlamp
mode
in the multifunction display.
The selection marker is on the current
setting.
Function
Page
Setting daytime running lamp
mode (USA only)
137
Setting locator lighting
138
Setting night security illumina-
tion
139
Setting interior lighting delayed
shut-off
140
iThis function is not available in coun-
tries where the daytime running lamp
mode is mandatory and therefore in a
constant mode.
Page 202 of 464

SIRIUS satellite radio provides 100 chan-
nels of digital-quality radio, among others
music, sports, news, and entertainm")
202 Controls in detailAudio systemIntroduction to satellite radio* (USA only)
SIRIUS satellite radio provides 100 chan-
nels of digital-quality radio, among others
music, sports, news, and entertainment,
free of commercials. SIRIUS satellite radio
uses a fleet of high-power satellites to
broadcast 24 hours per day, coast to
coast, in contiguous U.S.
This diverse, satellite-delivered program-
ming is available for a monthly subscrip-
tion fee.
For more information and service
availability, call the SIRIUS Service Center
(�page 206), or contact
www.siriusradio.comProgram categories
The channels are categorized. Categories
allow you to tune to stations broadcasting
a certain type of program (category mode)
(
�page 204).
iAdditional satellite radio equipment
and a subscription to a satellite radio
service provider are required for the
satellite radio operation described
here.
Contact an authorized Mercedes-Benz
Center for details and availability for
your vehicle.
Note that categories and channels
shown in illustrations are dependent on
programming content delivered by the
service provider. Programming content
is subject to change. Therefore,
channels and categories shown in
illustrations and descriptions
contained in this manual may differ
from the channels and categories
delivered by the service provider.
iSatellite radio service may be unavail-
able or interrupted from time to time
for a variety of reasons, such as envi-
ronmental or topographic conditions
and other things beyond the service
provider’s or our control. Service might
also not be available in certain places
(e.g., in tunnels, parking garages, or
within or next to buildings) or near
other technologies.
Page 208 of 464

208 Controls in detailAudio systemDo not use CDs with an eight cm diameter,
not even with a CD adapter. Attempting to
play CDs with an eight cm diameter or
playing such CDs with an adapter may
cause damage to the CD drive. Such
damage is not covered by the
Mercedes-Benz Limited Warranty.
Should excessively high or low tempera-
tures occur while in CD changer mode*, CD TEMP
will appear in the display, and the
CD will be muted until the temperature has
reached an acceptable level for the system
to continue operation.
The single CD player and the CD changer*
play audio CDs.Tips on handling CDs
�
Handle CDs carefully to prevent
interference during playback.
�
Avoid scratches, fingerprints and dust
on the CDs.
�
Do not write on CDs or apply any labels
or other material to them.
�
Clean CDs from time to time with a
commercially available cleaning cloth.
Never wipe the CD in a circular motion;
instead, wipe it in a straight line start-
ing in the center and moving outward.
Do not use solvents, anti-static sprays,
etc. for cleaning.
�
Replace the CD in its case after use.
�
Protect CDs from heat and direct
sunlight.Operating the single CD player in the
audio system unit
Loading a CD
The single CD player in the audio system
unit has capacity for one CD. The CD slot
for loading the drive is located underneath
the soft keys.
�
Make sure the system is switched on.
�
Insert CD into CD slot. The label side of
the CD must face upwards.
The system automatically pulls the CD
into the CD slot. The audio CD begins
to play.!If a CD is already loaded, it must be
ejected before inserting a new CD.
Inserting a second CD in the slot with
another CD still loaded will cause dam-
age to the CD drive not covered by the
Mercedes-Benz Limited Warranty.
Page 210 of 464

210 Controls in detailAudio systemLoading single CDs�
Open the glove box.
1CD loading slot
2Magazine slot button
�
Briefly press button2 for the empty
magazine slot that you would like to
use.
The light-emitting diode in the maga-
zine slot button flashes in green. INSERT CD
appears in the display along
with the slot number.
The flashing light indicates that the CD
changer is ready to receive a CD.
�
Insert an audio CD into CD loading
slot1 within five seconds, label side
up.
The CD is pulled in and played.
�
Close the glove box.
Loading several CDs
�
Open the glove box.
�
Press button2 of an empty magazine
slot for more than two seconds.
The light-emitting diodes in all the mag-
azine slot buttons light up several
times in green, and
ALL LOAD
appears
in the display.
�
Wait until the light-emitting diode for
the first magazine slot flashes in green.
The flashing light indicates that the CD
changer is ready to receive a CD.
�
Insert an audio CD into CD loading
slot1 within five seconds, label side
up.
The CD is pulled in and the light-emit-
ting diode in the magazine slot button
lights up in red. The magazine slot is
loaded.
The light-emitting diode in the next
available magazine slot button flashes
in green. The CD changer is ready to re-
ceive the next CD.