Page 378 of 474

376 Practical hintsLocking/unlocking in an emergency1Separately unlock storage compart-
ments
2Centrally lock/unlock storage com-
partments
3Separately lock storage compartments�
Slide mechanical key out of SmartKey
housing (
�page 374).
�
Insert the mechanical key into the
glove box lock and turn it to
position2.
All storage compartments are now un-
locked.
Locking the vehicle
If you are unable to lock the vehicle with
the SmartKey, lock it with the mechanical
key as follows:�
Close the passenger door and the trunk
lid.
�
Press the central locking switch in the
center console (
�page 110).
�
Check to see whether the locking knob
on the passenger door is still visible. If
necessary push it down manually.
�
Slide the mechanical key out of the
SmartKey.
�
Lock the driver’s door with the me-
chanical key.
Lowering the load assist manually
If the load assist feature does not fully low-
er the retractable hardtop into the trunk
compartment and you are unable to close
the trunk lid, follow the instructions below.
1Hex-socket wrench
2Locking screw�
Remove the trunk floor from the trunk.
�
Lift up the lid located at the lower left
side of the trunk.
�
Have a second person lift and hold the
retracted hardtop.
Page 379 of 474

377 Practical hints
Locking/unlocking in an emergency
�
Using the hex-socket wrench provided
in the vehicle tool kit, carefully turn the
locking screw 2 approximately one
quarter turn.
�
Hook luggage cover into holders
(�page 197).
�
Let go of the hardtop.
It should gradually lower into the trunk.
�
When top is completely lowered, return
locking screw 2 to its original posi-
tion.
�
Close the lid.
�
Replace the trunk floor.
�
Visit an authorized Mercedes-Benz
Center as soon as possible.Replacing batteries in the SmartKey/
SmartKey with KEYLESS-GO*
If the batteries in the SmartKey or the
SmartKey with KEYLESS-GO* are dis-
charged, the vehicle can no longer be
locked or unlocked. It is recommended to
have the batteries replaced at an autho-
rized Mercedes-Benz Center.
Batteries contain materials that can harm
the environment if disposed of improperly.
Recycling of batteries is the preferred
method of disposal. Many states require
sellers of batteries to accept old batteries
for recycling.SmartKey
1Mechanical key
2Battery compartment
Replacement batteries: Lithium, type
CR 2025 or equivalent.
!Do not overtighten the screw.
Warning!
G
Keep the batteries out of reach of children.
If a battery is swallowed, seek medical help
immediately.
iWhen replacing batteries, always re-
place both batteries. The required re-
placement batteries are available at
any Mercedes-Benz Center.
Page 387 of 474
385 Practical hints
Replacing bulbs
Replacing bulbs for rear lamps
Before you start to replace a bulb for a rear
lamp, do the following first:�
Turn the exterior lamp switch to posi-
tion M (
�page 123).
�
Open the trunk (
�page 107).
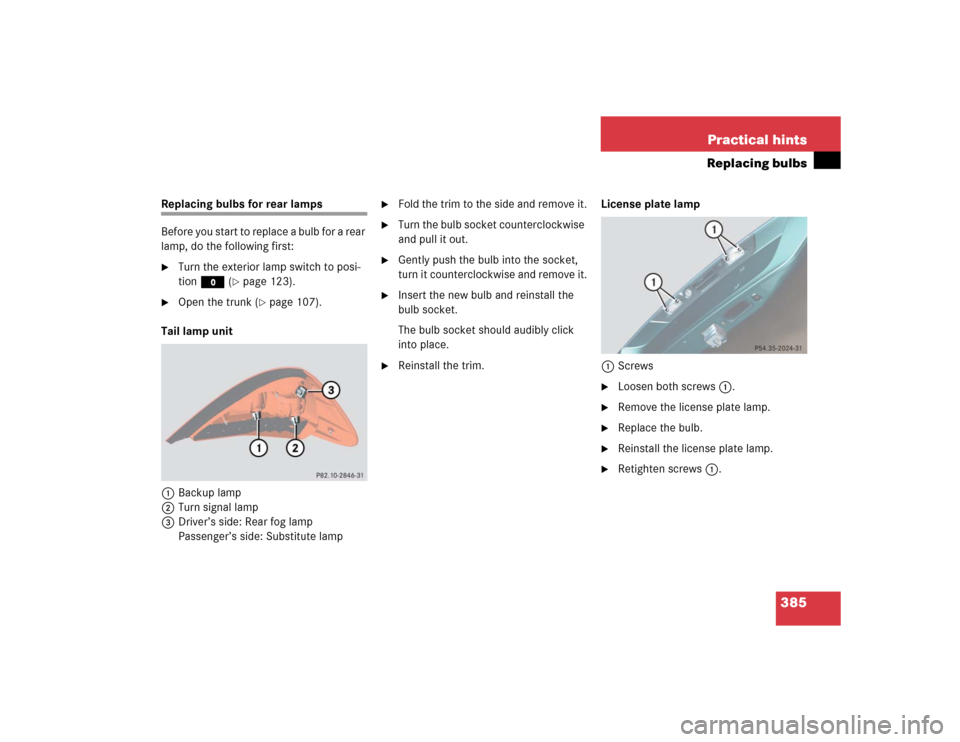
Tail lamp unit
1Backup lamp
2Turn signal lamp
3Driver’s side: Rear fog lamp
Passenger’s side: Substitute lamp
�
Fold the trim to the side and remove it.
�
Turn the bulb socket counterclockwise
and pull it out.
�
Gently push the bulb into the socket,
turn it counterclockwise and remove it.
�
Insert the new bulb and reinstall the
bulb socket.
The bulb socket should audibly click
into place.
�
Reinstall the trim.License plate lamp
1Screws
�
Loosen both screws 1.
�
Remove the license plate lamp.
�
Replace the bulb.
�
Reinstall the license plate lamp.
�
Retighten screws 1.
Page 391 of 474

should not be removed from the tire.
�
Take TIREFIT, the sticker, and the elec-
tric air pump out of the trunk.
�
Attach the sti")
389 Practical hints
Flat tire
�
Foreign objects (e.g. screws or nails)
should not be removed from the tire.
�
Take TIREFIT, the sticker, and the elec-
tric air pump out of the trunk.
�
Attach the sticker where it will be easily
seen by the driver on the instrument
cluster.1TIREFIT container
2Flap
3Notch
4Electrical plug
5Air hose
6Flange
�
Open flap2 on the electric air pump.
�
Pull plug4 and air hose5 out of the
pump housing.
Warning!
G
TIREFIT is a limited repair device. TIREFIT
cannot be used for cuts or punctures larger
than approx. 0.16 in (4 mm) and tire dam-
age caused by driving with extremely low
tire inflation pressure, or on a flat tire, or a
damaged wheel.
Do not drive the vehicle under such circum-
stances.
Contact your nearest Mercedes-Benz
Center for assistance or call Roadside
Assistance.
Warning!
G
Take care not to allow the contents of
T I R E F I T t o c o m e i n c o n t a c t w i t h h a i r , e y e s o r
clothing. TIREFIT is harmful if inhaled, swal-
lowed or absorbed through the skin - causes
skin, eye and respiratory irritation.
Any contact with eyes or skin should be
flushed immediately with plenty of water.
If clothing comes in contact with TIREFIT,
change clothing as soon as possible.
In case of allergic reaction or rash, consult a
physician immediately.Warning!
G
Keep TIREFIT out of reach of children.
If swallowed, rinse mouth immediately with
plenty of water and drink plenty of water.
Do not induce vomiting!
Consult a physician immediately.
Keep away from open flame or heat source.
iIf sealant has leaked out, let it dry. You
can then peel it off.
��
Page 393 of 474
, press 0 on electric
air pump switch8.
The electric air pump should now be
switched off.
�
Turn the Sma")
391 Practical hints
Flat tire
�
After attaining a tire inflation pressure
of 26 psi (1.8 bar), press 0 on electric
air pump switch8.
The electric air pump should now be
switched off.
�
Turn the SmartKey in the ignition to
position0 (
�page 36).
or
�
Press the KEYLESS-GO* start/stop
button (
�page 37) on the gear selec-
tor lever twice. Do not depress brake
pedal.
�
Detach the electric air pump.
The air hose may still be hot. Please ex-
ercise appropriate caution.
�
Store the electrical plug and the air
hose behind the flap and place the air
pump back in the trunk.
�
Close the trunk lid.
�
Drive away immediately.
The TIREFIT sealant will distribute itself
evenly inside the tire.
Warning!
G
If a tire inflation pressure of 26 psi (1.8 bar)
is not attained, tire is too severely damaged
for TIREFIT to provide a reliable tire repair.
In this case, TIREFIT cannot properly seal
the tire.
Do not drive the vehicle.
Contact the nearest Mercedes-Benz Center
or call Roadside Assistance.
Warning!
G
Do not exceed vehicle speed of
50 mph (80 km / h). A TIREFIT repair is not
designed to operate at higher speeds.
The sticker must be attached on the instru-
ment cluster where it will be easily seen by
the driver.
Vehicle handling characteristics may
change. Adapt your driving accordingly.
��
Page 395 of 474
.
�
Turn spare wheel bracket counter-
clockwise to loosen.
�
Take the spare w")
393 Practical hints
Flat tire
Mounting the spare wheel Preparing the vehicle
Prepare the vehicle as described
(
�page 388).
�
Turn spare wheel bracket counter-
clockwise to loosen.
�
Take the spare wheel out of the trunk.
Lifting the vehicle
�
Prevent the vehicle from rolling away
by blocking wheels with wheel chocks
(not included) or other sizable objects.
When changing wheel on a level sur-
face:�
Place one chock in front of and one
behind the wheel that is diagonally
opposite to the wheel being
changed.
When changing wheel on a hill:
�
Place chocks on the downhill side
blocking both wheels of the other
axle.
�
Take the vehicle tool kit and the jack
out of the storage compartment under
the trunk floor (
�page 372).
Warning!
G
The dimensions of the spare wheel are dif-
ferent from those of the road wheels. As a
result, the vehicle handling characteristics
change when driving with a mounted spare
wheel. Adapt your driving style accordingly.
The spare wheel is for temporary use only.
When driving with spare wheel mounted, en-
sure proper tire inflation pressure and do
not exceed vehicle speed of 50 mph
(80 km/h).
Drive to the nearest Mercedes-Benz Center
as soon as possible to have the spare wheel
replaced with a regular road wheel.
Never operate the vehicle with more than
one spare wheel mounted.
Warning!
G
The jack is designed exclusively for jacking
up the vehicle at the jack tubes built into
both sides of the vehicle. To help avoid per-
sonal injury, use the jack only to lift the ve-
hicle during a wheel change. Never get
beneath the vehicle while it is supported by
the jack. Keep hands and feet away from the
area under the lifted vehicle. Always firmly
set parking brake and block wheels before
raising vehicle with jack.
Do not disengage parking brake while the
vehicle is raised. Be certain that the jack is
always vertical (plumb line) when in use, es-
pecially on hills. Always try to use the jack
on level surface. Be sure that the jack arm is
fully inserted in the jack tube. Always lower
the vehicle onto sufficient capacity jack-
stands before working under the vehicle.
��
Page 399 of 474
397 Practical hints
Flat tire
�
Unscrew the alignment bolt, install last
wheel bolt and tighten slightly.Inflating the spare tire
�
Take the electric air pump out of the
trunk (
�page 372).
1Flap
2Air hose with pressure gauge and vent
screw
3Union nut
4Electrical plug
�
Open flap 1 on air pump.
�
Pull out electrical plug 4 and air hose
with the pressure gauge 2.
�
Remove the valve cap from the tire
valve.
�
Screw air hose 2 onto the tire valve.
�
Insert electrical plug 4 into vehicle ci-
gar lighter socket.
Warning!
G
Only use genuine equipment
Mercedes-Benz wheel bolts. They are identi-
fied by the Mercedes star. Other wheel bolts
may come loose.
Do not tighten the wheel bolts when the ve-
hicle is raised. Otherwise the vehicle could
tip over.
!Do not lower the vehicle before inflat-
ing the spare wheel tire. Otherwise the
rim may be damaged.Warning!
G
Observe instructions on air pump label.
��
Page 401 of 474

399 Practical hints
Flat tire
�
Detach the electric air pump.
�
Stow the electrical plug and the air
hose behind the flap and place the air
pump back in the trunk.Lowering the vehicle
�
Lower vehicle by turning crank coun-
terclockwise until the full weight of the
vehicle is resting on the ground.
�
Pull the jack out of the jack support
tube.
1 - 5 Wheel bolts
�
Tighten the five wheel bolts evenly, fol-
lowing the diagonal sequence illustrat-
ed (1 to 5), until all bolts are tight.
Observe a tightening torque of 96 lb-ft
(130 Nm).
�
Before storing the jack in the trunk,
crank back to storage position and fold
in the arm.
iThe flat tire may be transported in the
trunk when the retractable hardtop is
raised. Use the protective sheet provid-
ed with the spare wheel. Do not acti-
vate the tire inflation pressure monitor
until the deflated tire has been re-
moved from the vehicle.
Warning!
G
Have the tightening torque checked after
changing a wheel. The wheels could come
loose if they are not tightened to a torque of
96 lb-ft (130 Nm).Warning
G
When turning the wheel wrench to tighten
the wheel bolts, make sure you position
hands on the wrench in such a way that you
avoid injury to yourself, such as scraping
your hands against the wheel. Make sure
turning the wheel wrench will not scratch or
damage the wheel rim.