Page 115 of 474
.
Easy-entry / exit feature
This feature allows for easier entry into and
exit from t")
113 Controls in detailSeats
�Seats
For more information on seat adjustment,
see “Seat adjustment” (
�page 40).
Easy-entry / exit feature
This feature allows for easier entry into and
exit from the vehicle.
The easy-entry/exit feature can be activat-
ed or deactivated in the
Convenience
sub-
menu of the
SETTINGS
menu of the control
system (
�page 157).When exiting the vehicle, with the
easy-entry/exit feature activated and
depending on your selection, the steering
wheel tilts upwards and/or the driver’s
seat moves a few inches to the rear when
you
�
remove the SmartKey from the starter
switch
or
�
open the driver’s door with the
SmartKey in starter switch position 0
or 1 or the KEYLESS-GO* start/stop
button in position 1 (
�page 37)
Warning!
G
You must make sure no one can become
trapped or injured by the moving steering
wheel and driver’s seat when the easy-en-
try/exit feature is activated.
To cancel seat/steering wheel movement,
do one of the following:�
Press seat adjustment switch
(�page 40).
�
Move steering column stalk
(�page 42).
�
Press the memory button (
�page 120).
Do not leave children unattended in the ve-
hicle, or with access to an unlocked vehicle.
Children could open the driver’s door and
unintentionally activate the easy-entry/exit
feature, which could result in an accident
and/or serious personal injury.
Page 116 of 474

114 Controls in detailSeats
When entering the vehicle, with the
easy-entry/exit feature activated, the
steering wheel or, depending on your se-
lection, the steering wheel and driver’s
seat will return to their last set memory po-
sition or a factory-set maximum forward
position when you�
close the driver’s door with the ignition
switched on
�
insert the SmartKey into the starter
switch or press the KEYLESS-GO* start
stop button once with the driver’s door
closed
iIf the current position for the steering
wheel is in the uppermost tilt position,
the steering wheel will no longer be
able to move upward when the
easy-entry/exit feature is activated.
If the current seat position falls into a
factory-set position range and the sys-
tem recognizes the current seat posi-
tion to be rearward enough for easy
entry and exit, the driver’s seat will not
move to the rear when the
easy-entry/exit feature is activated.
iFor safety reasons, the driver’s seat will
not return to its last set position with
the easy-entry/exit feature activated if
the system recognizes the last set posi-
tion as an extreme forward position. In-
stead, the driver’s seat will remain at or
move to a factory-set maximum for-
ward position. To again fully return the
driver’s seat to your last set position or
to memory position, adjust the seat to
the desired position or press and hold
the respective memory position button
(�page 120).
Page 117 of 474

115 Controls in detailSeats
Moving the seats forward and backward
You can move the seats forward and back
to facilitate loading and unloading.The switch is located on the top side of the
seat.
1Seat forward
2Seat backward
Moving the seat forward
�
Press switch at1.
Moving the seat backward
�
Press switch at2.
Lumbar support
You can adjust the contour of the seat’s
lumbar support to best support your spine.
The thumbwheel is located on the lower
side of the seat.
1Thumb wheel�
Switch on the ignition (
�page 36).
�
Set the lumbar support between 0
and 5.
Warning!
G
When moving the seats, be sure that no one
can be caught by them. Never place hands
under seat or near any moving parts during
a seat adjustment procedure. To stop the
seat from moving when potential danger ex-
ists:�
press the switch again
�
move the seat adjustment switch on the
door (
�page 39)
!When moving the seats, make sure that
there are no items in the footwell or be-
hind the seats. Otherwise you could
damage the seats.
Page 122 of 474

120 Controls in detailMemory function
With the memory switch you can store up
to three different settings per SmartKey or
SmartKey with KEYLESS-GO*.
The following settings are saved for each
stored position:�
Driver’s seat and backrest position
�
Steering wheel position
�
Driver’s side exterior rear view mirror
position
�
Passenger side exterior rear view mir-
ror position
These key-dependent memory settings
can be deactivated if desired
(
�page 158).The memory switch is located on the door.
M Memory button
1, 2, 3 Stored positions
�
Switch on the ignition (
�page 36).
or
�
Open the respective door.
!Prior to operating the vehicle, the driv-
er should check and adjust the seat
height, seat position fore and aft, and
seat backrest angle if necessary, to en-
sure adequate control, reach and com-
fort. The head restraint should also be
adjusted for proper height. See also the
section on airbags (
�page 63) for
proper seat positioning.
In addition, adjust the steering wheel to
ensure adequate control, reach, opera-
tion and comfort. Both the interior and
exterior rear view mirrors should be
adjusted for adequate rear vision.
Fasten seat belts. Infants and small
children should be seated in a properly
secured restraint system that complies
with U.S. Federal Motor Vehicle Safety
Standard 213 and Canadian Motor Ve-
hicle Safety Standard 213.
Warning!
G
Do not activate the memory function while
driving. Activating the memory function
while driving could cause the driver to lose
control of the vehicle.
Page 123 of 474
.
�
Press memory buttonM.
�")
121 Controls in detail
Memory function
Storing positions into memory�
Adjust the seats, steering wheel and
exterior rear view mirrors to the de-
sired position (
�page 39).
�
Press memory buttonM.
�
Release memory button and press a
stored position button1, 2, or3 within
three seconds.
All the settings are stored at the select-
ed position.
Recalling positions from memory�
On memory switch, press and hold
stored position button1, 2 or3 until
the seat, steering wheel and exterior
rear view mirrors have fully moved to
the stored positions.Storing exterior rear view mirror
parking position
For easier parking, you can adjust the
passenger-side exterior rear view mirror so
that you can see the right rear wheel as
soon as you engage reverse gearR.
For information on activating the parking
position feature, see “Setting parking posi-
tion for exterior rear view mirror”
(�page 158).
iReleasing the button immediately
stops movement to the stored posi-
tions.
iYou can store a parking position for the
passenger-side exterior rear view mir-
ror for each SmartKey or SmartKey
with KEYLESS-GO*.
Page 124 of 474
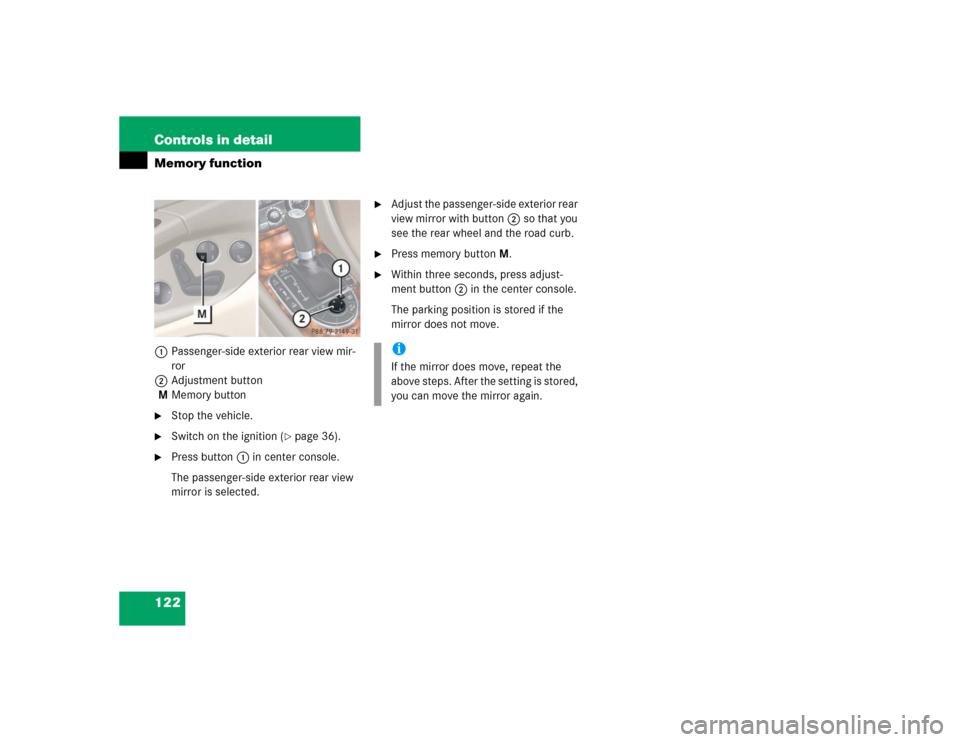
122 Controls in detailMemory function1Passenger-side exterior rear view mir-
ror
2Adjustment button
MMemory button�
Stop the vehicle.
�
Switch on the ignition (
�page 36).
�
Press button1 in center console.
The passenger-side exterior rear view
mirror is selected.
�
Adjust the passenger-side exterior rear
view mirror with button2 so that you
see the rear wheel and the road curb.
�
Press memory buttonM.
�
Within three seconds, press adjust-
ment button2 in the center console.
The parking position is stored if the
mirror does not move.iIf the mirror does move, repeat the
above steps. After the setting is stored,
you can move the mirror again.
Page 125 of 474

and “Turn signals” (
�page 52")
123 Controls in detail
Lighting
� Lighting
For information on how to switch on the
headlamps and use the turn signals, see
“Switching on headlamps” (
�page 51)
and “Turn signals” (
�page 52).
Exterior lamp switch
The exterior lamp switch is located on the
dashboard to the left of the steering wheel.
MOff
Daytime running lamp mode
(
�page 125)
UAutomatic headlamp mode
Daytime running lamp mode
(�page 125)CParking lamps (also tail lamps, li-
cense plate lamps, side marker
lamps, instrument panel lamps)
Canada only: When the engine is
running, the low beam headlamps
are also switched on.
BLow beam headlamps (or high
beam headlamps when the combi-
nation switch is pushed forward)
and parking lamps
ˆStanding lamps, right (turn left one
stop)
‚Standing lamps, left (turn left two
stops)
CIndicator lamp for parking lamps
‡Indicator lamp for front fog lamps
†Indicator lamp for rear fog lamp
iIf you drive in countries where vehicles
drive on the other side of the road than
the country in which the vehicle is reg-
istered, you must have the headlamps
modified for symmetrical low beams.
Relevant information can be obtained
at any authorized Mercedes-Benz
Center.
Page 134 of 474
.
The engine should not be operated wi")
132 Controls in detailInstrument clusterDuring severe operating conditions, e.g.
stop-and-go traffic, the coolant tempera-
ture may rise close to 248°F (120°C).
The engine should not be operated with
the coolant temperature above 248°F
(120°C). Doing so may cause serious en-
gine damage which is not covered by the
Mercedes-Benz Limited Warranty.
Trip odometer�
Make sure you are viewing the trip
odometer display (
�page 134).
�
If it is not displayed, press the j or
k button on the multifunction
steering wheel repeatedly until the trip
odometer appears.
�
Press and hold reset button4
(�page 24) until the trip odometer is
reset.
Tachometer
The red marking on the tachometer de-
notes excessive engine speed.
To help protect the engine, the fuel supply
is interrupted if the engine is operated
within the red marking.
!Excessive coolant temperature triggers
the coolant temperature warning lamp
(�page 352) and a warning in the
multifunction display (
�page 328).
!Avoid driving at excessive engine
speeds, as it may result in serious en-
gine damage that is not covered by the
Mercedes-Benz Limited Warranty.