Page 154 of 474

152 Controls in detailControl systemLighting submenu
Access the
Lighting
submenu via the
Settings
menu. Use the
Lighting
sub-
menu to change the lamp and lighting set-
tings on your vehicle. The following
functions are available:Setting daytime running lamp mode
(USA only)
�
Move the selection marker with button
æ or ç to the
Lighting
sub-
menu.
�
Press button j or k repeatedly
until you see
Light circuit Headlamp
mode
in the multifunction display.The selection marker is on the current
setting.
�
Press button æ or ç to select
manual operation (
Manual
) or daytime
running lamp mode (
Constant
).
With daytime running lamp mode activated
and the exterior lamp switch at
positionM or U the low beam head-
lamps are switched on when the engine is
running.
Function
Page
Setting daytime running lamp
mode (USA only)
152
Setting locator lighting
153
Setting night security illumina-
tion
154
Setting interior lighting delayed
switch-off
155
iThis function is not available in coun-
tries where the daytime running lamp
mode is mandatory and therefore in a
constant mode.
Page 155 of 474

153 Controls in detail
Control system
In low ambient light conditions the follow-
ing lamps will switch on additionally:�
Parking lamps
�
Tail lamps
�
License plate lamps
�
Side marker lampsSetting locator lighting
With the locator lighting feature activated
and the exterior lamp switch in position
U, the following lamps will switch on
when the vehicle is unlocked with the
SmartKey during darkness:
�
Parking lamps
�
Tail lamps
�
License plate lamps
�
Front fog lamps
The locator lighting switches off when the
driver’s door is opened.
If you do not open a door after unlocking
the vehicle with the SmartKey, the lamps
will switch off automatically after approxi-
mately 40 seconds.
�
Move the selection marker with button
æ or ç to the
Lighting
sub-
menu
�
Press button j or k repeatedly
until you see
Locator lighting
in the
multifunction display.
The selection marker is on the current
setting.
�
Press button æ or ç to switch
the locator lighting feature to
On.
�
Turn the exterior lamp switch to posi-
tion U when exeting the vehicle.
The locator lighting feature is
activated.
iFor safety reasons, resetting the Lighting
submenu to factory settings
while driving (
�page 146) will not de-
activate the daytime running lamp
mode.
The message following message ap-
pears in the multifunction display:
Cannot be fully reset to factory
settings when driving
.
Page 156 of 474

Use this function to set whether and for
how long you would like the exterior lamps
to il")
154 Controls in detailControl systemSetting night security illumination
(Exterior lamps delayed switch-off)
Use this function to set whether and for
how long you would like the exterior lamps
to illuminate during darkness after exiting
the vehicle and the doors closed. With the
delayed switch-off feature activated and
the exterior lamp switch in position U
before the engine is turned off, the follow-
ing lamps will switch on after you have
removed the SmartKey from the starter
switch: �
Parking lamps
�
Tail lamps
�
License plate lamps
�
Side marker lamps
�
Front fog lampsIf you do not open a door after removing
the SmartKey from the starter switch, the
lamps will switch off automatically after
approximately 60 seconds.
�
Move the selection marker with button
æ or ç to the
Lighting
sub-
menu.
�
Press button j or k repeatedly
until you see
Headlamps delayed
switch-off in the multifunction dis-
play.
The selection marker is on the current
setting.
�
Press button æ or ç to select
the desired lamp-on period. �
0 s
, the delayed switch-off feature
is deactivated.
�
15 s
, 30 s
, 45 s
or
60 s
, select the
desired lamp-on period.
�
Turn the exterior lamp switch to posi-
tion U before turning off the engine
(�page 48).
iYou can reactivate this function within
ten minutes by opening a door.
Page 157 of 474

155 Controls in detail
Control system
You can temporarily deactivate the de-
layed switch-off feature:�
Before exiting the vehicle turn the
SmartKey in the starter switch to
position0.
�
Then turn it to position2 and back
to0.
The delayed switch-off feature is deac-
tivated. It will reactivate as soon as you
reinsert the SmartKey in the starter
switch.Interior lighting delayed switch-off
Use this function to set whether and for
how long you would like the interior light-
ing to remain lit during darkness after you
have removed the SmartKey from the
starter switch.
�
Move the selection marker with button
æ or ç to the
Lighting
sub-
menu.
�
Press button j or k repeatedly
until you see
Int. lighting delayed
switch-off in the multifunction dis-
play.
The selection marker is on the current
setting.
�
Press æ or ç to select the de-
sired lamp-on time period.
You can select:�
0 s
, the interior lighting delayed
switch-off feature is deactivated.
�
5 s
, 10 s
, 15 s
or
20 s
, the interior
lighting delayed switch-off feature
is activated with the desired
lamp-on period.
Page 173 of 474

171 Controls in detail
Automatic transmission
Driving tips
Accelerator position
Your driving style influences the
transmission’s shifting behavior:
Less throttle Earlier upshifting
More throttle Later upshifting
Kickdown
Use kickdown when you want maximum
acceleration.�
Press the accelerator past the point of
resistance.
The transmission shifts into a lower
gear.
�
Ease on the accelerator when you have
reached the desired speed.
The transmission shifts up again.Stopping
When you stop briefly, e.g. at traffic lights:
�
Leave the transmission in gear.
�
Hold the vehicle with the brake.
When you stop longer with the engine
idling or on an uphill gradient:
�
Move the gear selector lever to
positionP.
�
Set the parking brake.Maneuvering
When you maneuver in tight areas,
e.g. when pulling into a parking space:
�
Control the vehicle speed by gradually
releasing the brakes.
�
Accelerate gently.
�
Never abruptly step on the accelerator.
Working on the vehicleWarning!
G
When working on the vehicle, set the
parking brake and move gear selector lever
to positionP. Otherwise the vehicle could
roll away.
Page 180 of 474
.
Headlamp cleaning system
The switch is located on the left side of the
d")
178 Controls in detailGood visibilityFor information on windshield wiper opera-
tion, see “Windshield wipers” (
�page 53).
Headlamp cleaning system
The switch is located on the left side of the
dashboard.
1Headlamp washer button�
Switch on the ignition (
�page 36).
�
Press button1.
The headlamps are cleaned with a
high-pressure water jet.
For information on filling up the washer flu-
id reservoir, see “Windshield washer sys-
tem and headlamp cleaning system”
(
�page 278).
Rear window defroster
For information, see “Rear window defrost-
er” (
�page 189).
Rear view mirrors
For information on setting the rear view
mirrors, see “Mirrors” (
�page 43).
Auto-dimming rear view mirror
The reflection brightness of the exterior
rear view mirror on the driver’s side and
the interior rear view mirror will respond
automatically to glare when
�
the ignition is switched on
and
�
incoming light from headlamps falls on
the sensor in the interior rear view mir-
ror.
The interior rear view mirror will not react if
�
reverse gear is engaged
�
the interior lighting is switched on
Page 181 of 474

179 Controls in detail
Good visibility
Activating exterior rear view mirror
parking position
Follow these steps to activate the mirror
parking position so that the passen-
ger-side exterior rear view mirror will be
turned downward to the stored position.�
Make sure you have stored a parking
position for the passenger-side exterior
rear view mirror (
�page 121).
�
Make sure the
Mirror setting when
parking
function in the
Convenience
submenu of the control system is
switched to
ON (�page 158).
�
Switch on the ignition (
�page 36).
�
Press button2 for the passenger-side
exterior rear view mirror.
Warning!
G
The auto-dimming function does not react if
incoming light is not aimed directly at sen-
sors in the interior rear view mirror.
The interior rear view mirror and the exterior
rear view mirror on the driver’s side do not
react, for example, if the wind screen is in-
stalled.
Glare can endanger you and others.Warning!
G
In the case of an accident liquid electrolyte
may escape from the mirror housing if the
mirror glass breaks.
Electrolyte has an irritating effect. Do not al-
low the liquid to come into contact with
eyes, skin, clothing, or respiratory system.
In case it does, immediately flush affected
area with water, and seek medical help if
necessary.
!Electrolyte drops coming into contact
with the vehicle paint finish can be
completely removed only while in the
liquid state by applying plenty of water.Warning!
G
Exercise care when using the passen-
ger-side exterior rear view mirror. The mirror
surface is convex (outwardly curved surface
for a wider field of view). Objects in mirror
are closer than they appear. Check your in-
terior rear view mirror or glance over your
shoulder before changing lanes.
��
Page 183 of 474
181 Controls in detail
Good visibility
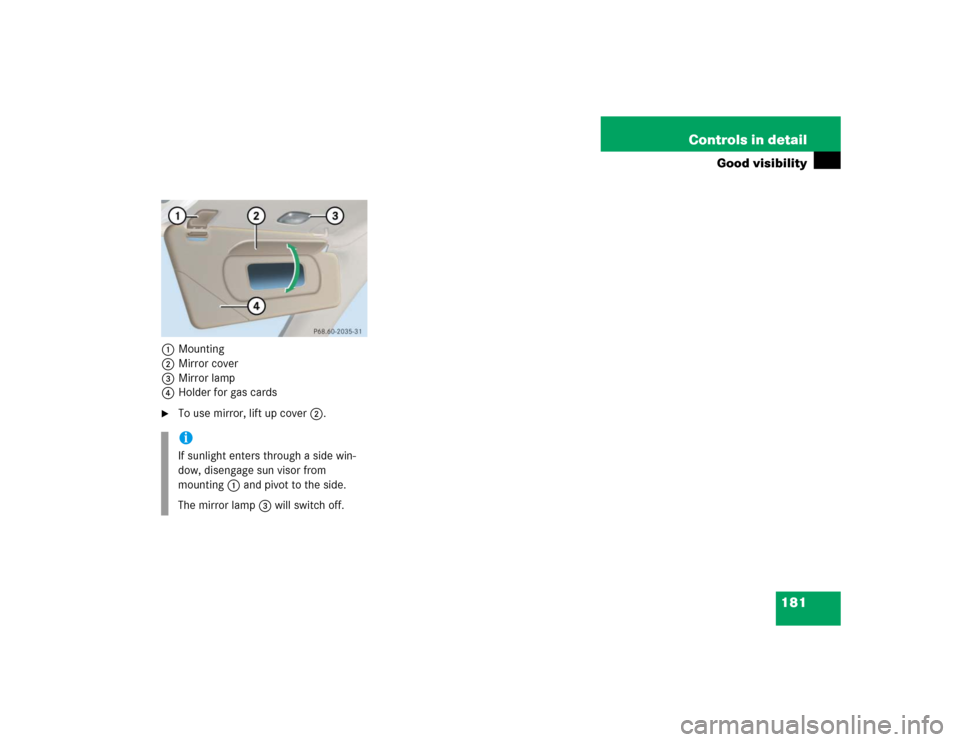
1Mounting
2Mirror cover
3Mirror lamp
4Holder for gas cards�
To use mirror, lift up cover2.iIf sunlight enters through a side win-
dow, disengage sun visor from
mounting1 and pivot to the side.
The mirror lamp3 will switch off.