Page 91 of 474

89 Safety and Security
Anti-theft systems
The alarm system will also be triggered
when �
someone attempts to raise the vehicle
�
unlocking and opening the driver’s
door with the mechanical key
�
someone opens a door from the inside
if the vehicle was locked from the out-
side with the SmartKey
�
someone opens the trunk lid with the
emergency release buttonArming the alarm system
The alarm system is armed after locking
the vehicle with the SmartKey or
KEYLESS-GO*. The turn signal lamps flash
three times to indicate that the alarm sys-
tem is activated. The ‹indicator lamp
in the central locking switch (
�page 29)
begins to flash after arming the alarm sys-
tem.Disarming the alarm system
The alarm system is disarmed when you
unlock your vehicle with the SmartKey or
KEYLESS-GO*. The turn signal lamps flash
once to indicate that the alarm system is
deactivated.
iIf the alarm stays on for more than
30 seconds, a call to the Response
Center is initiated automatically by the
Tele Aid system (
�page 239) provided
Tele Aid service was subscribed to and
properly activated, and that necessary
cellular service and GPS coverage are
available.
iIf the turn signal lamps do not flash
three times, a door or the trunk lid may
not be properly closed.
Close the respective element and lock
the vehicle again.
iThe alarm system will rearm automati-
cally again after approximately 40 sec-
onds if no door was opened.
Page 92 of 474

90 Safety and SecurityAnti-theft systemsCanceling the alarm
To cancel the alarm:
With the SmartKey�
Insert the SmartKey in the starter
switch.
or
�
Press theŒor‹button on the
SmartKey.
With KEYLESS-GO*
�
Grasp the outside door handle.
The SmartKey with KEYLESS-GO must
be within 3 ft. (1 m) of the vehicle.
or
�
Press the KEYLESS-GO start/stop but-
ton.
The SmartKey with KEYLESS-GO must
be inside the vehicle.
Tow-away alarm
Once the tow-away alarm is armed, a visual
and audible alarm will be triggered when
someone attempts to raise the vehicle. Arming tow-away alarm
When you lock your vehicle, the tow-away
alarm is automatically armed after about
30 seconds.
When you unlock your vehicle, the
tow-away protection disarms automatical-
ly.
Disabling tow-away alarm
To prevent triggering the tow-away alarm,
disable off the tow-away alarm feature be-
fore towing the vehicle, or when parking on
a surface subject to movement, such as a
ferry or auto train.
The button is located on the center con-
sole between the driver’s seat and the pas-
senger seat.
iThe tow-away protection alarm is trig-
gered, for example, if the vehicle is lift-
ed on one side.
If the alarm stays on for more than
30 seconds, a call to the Response
Center is initiated automatically by the
Tele Aid system (
�page 239) provided
Tele Aid service was subscribed to and
properly activated, and that necessary
cellular service and GPS coverage are
available.
Page 93 of 474
91 Safety and Security
Anti-theft systems
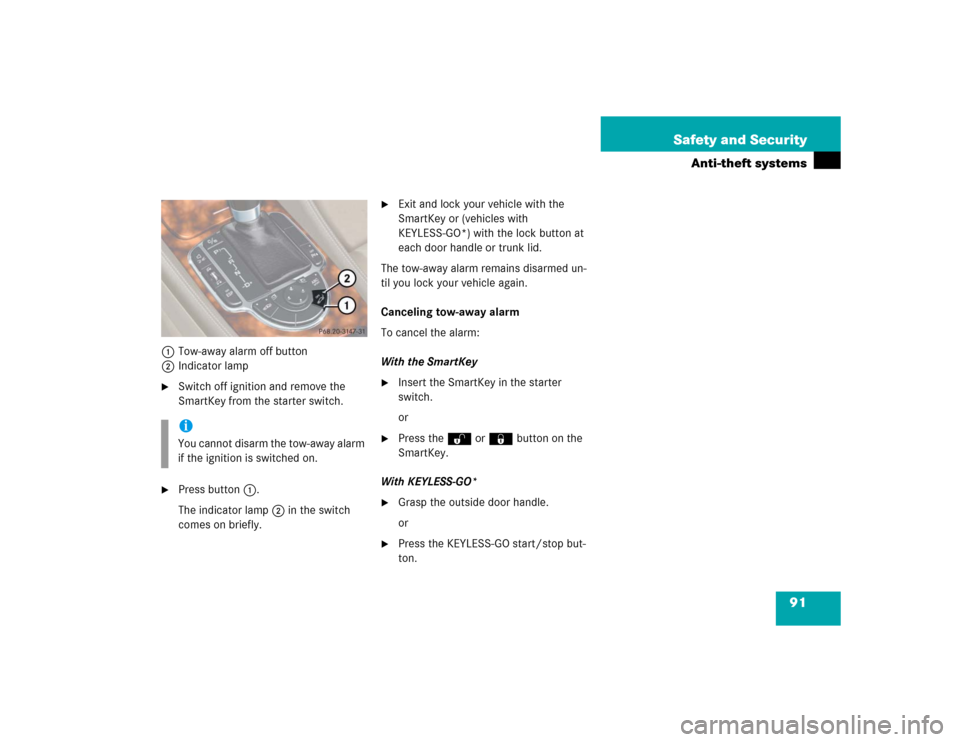
1Tow-away alarm off button
2Indicator lamp�
Switch off ignition and remove the
SmartKey from the starter switch.
�
Press button1.
The indicator lamp2 in the switch
comes on briefly.
�
Exit and lock your vehicle with the
SmartKey or (vehicles with
KEYLESS-GO*) with the lock button at
each door handle or trunk lid.
The tow-away alarm remains disarmed un-
til you lock your vehicle again.
Canceling tow-away alarm
To cancel the alarm:
With the SmartKey
�
Insert the SmartKey in the starter
switch.
or
�
Press the Œ or ‹button on the
SmartKey.
With KEYLESS-GO*
�
Grasp the outside door handle.
or
�
Press the KEYLESS-GO start/stop but-
ton.
iYou cannot disarm the tow-away alarm
if the ignition is switched on.
Page 109 of 474
 is required to open the
trunk lid.Opening the trunk from the outside
The handle is locate")
107 Controls in detail
Locking and unlocking
Opening the trunk
A minimum height clearance of
6.2 ft (1.88 m) is required to open the
trunk lid.Opening the trunk from the outside
The handle is located above the rear li-
cense plate recess.
1Handle
�
Pull on handle 1 and lift the trunk lid.
iIf you open a door, the side windows on
that side of the vehicle will lower slight-
ly. The windows close again when you
close the door.!Always make sure that there is suffi-
cient overhead clearance.
iVehicles without KEYLESS-GO*:
The vehicle must be unlocked.
iTo facilitate trunk loading and unload-
ing when the hardtop is retracted, you
can raise the hardtop from its storage
position in the trunk using the load as-
sist feature (
�page 235). You may also
unhook the luggage cover.
Remember to resecure the luggage
cover after loading/unloading the
trunk. Otherwise you will not be able to
lower the retractable hardtop.
Vehicles without KEYLESS-GO*:
If the trunk lid does not open, the en-
tire vehicle is still locked globally
(
�page 94).
Page 110 of 474

�
the remote trunk lid release switch, see
“Opening the tr")
108 Controls in detailLocking and unlockingThe trunk can also be opened using�
the SmartKey, see “Locking and un-
locking” (
�page 94)
�
the remote trunk lid release switch, see
“Opening the trunk from the inside”
(�page 108)
�
the trunk lid emergency release button,
see “Trunk lid emergency release”
(�page 109)Opening the trunk from the inside
You can open the trunk from the inside if
the vehicle is stationary and the retract-
able hardtop is fully opened or closed.
The switch is located on the driver’s door.
1Remote trunk lid release switch
2Indicator lamp
�
Pull remote trunk lid release switch1.
The trunk lid unlocks. Indicator
lamp2 comes on and remains lit until
the trunk is closed again.
�
Lift the trunk lid.The trunk can also be opened using
�
the SmartKey, see “Locking and un-
locking” (
�page 94)
�
the remote trunk lid release switch, see
“Opening the trunk from the inside”
(�page 108)
�
the trunk lid emergency release button,
see “Trunk lid emergency release”
(�page 109)
iTo facilitate trunk loading and unload-
ing when the hardtop is retracted, you
can raise the hardtop from its storage
position in the trunk using the loading
aid feature (
�page 235). You may also
unhook the luggage cover.
Remember to resecure the luggage
cover after loading/unloading the
trunk. Otherwise you will not be able to
lower the retractable hardtop.
Page 122 of 474

120 Controls in detailMemory function
With the memory switch you can store up
to three different settings per SmartKey or
SmartKey with KEYLESS-GO*.
The following settings are saved for each
stored position:�
Driver’s seat and backrest position
�
Steering wheel position
�
Driver’s side exterior rear view mirror
position
�
Passenger side exterior rear view mir-
ror position
These key-dependent memory settings
can be deactivated if desired
(
�page 158).The memory switch is located on the door.
M Memory button
1, 2, 3 Stored positions
�
Switch on the ignition (
�page 36).
or
�
Open the respective door.
!Prior to operating the vehicle, the driv-
er should check and adjust the seat
height, seat position fore and aft, and
seat backrest angle if necessary, to en-
sure adequate control, reach and com-
fort. The head restraint should also be
adjusted for proper height. See also the
section on airbags (
�page 63) for
proper seat positioning.
In addition, adjust the steering wheel to
ensure adequate control, reach, opera-
tion and comfort. Both the interior and
exterior rear view mirrors should be
adjusted for adequate rear vision.
Fasten seat belts. Infants and small
children should be seated in a properly
secured restraint system that complies
with U.S. Federal Motor Vehicle Safety
Standard 213 and Canadian Motor Ve-
hicle Safety Standard 213.
Warning!
G
Do not activate the memory function while
driving. Activating the memory function
while driving could cause the driver to lose
control of the vehicle.
Page 128 of 474

126 Controls in detailLightingCanada only:
The daytime running lamp mode is manda-
tory and therefore in a constant mode.
When the engine is running and you shift
from a driving position to positionN orP,
the low beam headlamps will switch off
with a three-minute delay.
When the engine is running and you�
turn the exterior lamp switch to posi-
tion C, the parking lamps switch on
additionally
�
turn the exterior lamp switch to posi-
tion B, the manual headlamp mode
has priority over the daytime running
lamp mode
The corresponding exterior lamps
switch on (
�page 123).USA only:
By default, the daytime running lamp mode
is deactivated. Activate the daytime run-
ning lamp mode using the control system,
see “Setting daytime running lamp mode
(USA only)” (
�page 152).
The high beam headlamps can also be ac-
tivated when driving with the daytime run-
ning lamp mode activated and the exterior
lamp switch in positionM.
When the engine is running and you turn
the exterior lamp switch to positionC
or B, the manual headlamp mode has
priority over the daytime running lamp
mode.
The corresponding exterior lamps switch
on (
�page 123).Locator lighting and night security
illumination
Locator lighting and night security illumi-
nation are described in the control system
section, see “Setting locator lighting”
(
�page 153) and “Setting night security il-
lumination” (
�page 154).
Page 149 of 474
147 Controls in detail
Control system
The table below shows what settings can
be changed within the various menus. De-
tailed instructions on making individual
settings can be found on the following pag-
es.Instrument cluster
Time
Lighting
Vehicle
Convenience
Selecting temperature
display mode
Synchronizing time with
head unit
Setting daytime running
lamp mode (USA only)
Setting station selection
mode (radio)
Activating
easy-entry/exit feature
Selecting speedometer
display mode
Setting the time (hours)
Setting locator lighting
Setting automatic locking
Setting key-dependency
Selecting language
Setting the time
(minutes)
Setting night security
illumination
Tire inflation pressure
display
Setting parking position
for exterior rear view
mirror
Selecting time display
mode
Setting interior lighting
delayed switch-off