Page 43 of 474

41 Getting started
Adjusting
Seat height�
Press the switch up or down in direc-
tion of arrow2.
Seat cushion tilt
�
Press the switch up or down in
direction of arrow3 until your upper
legs are lightly supported.
Seat cushion depth
�
Press the switch forward or backward
in direction of arrow4 until your legs
are supported comfortably.
Seat backrest tilt
�
Press the switch forward or backward
in direction of arrow6 until your arms
are slightly angled when holding the
steering wheel.Head restraint height
�
Press the switch up or down in direc-
tion of arrow1.Head restraint tilt
Manually adjust the angle of the head re-
straint.
�
Push or pull on the lower edge of the
head restraint cushion.
For more information on seats, see “Seats”
(
�page 113).
Warning!
G
For your protection, drive only with properly
positioned head restraints.
Adjust head restraint so that the center of
the head restraint supports the back of the
head at eye level. This will reduce the poten-
tial for injury to the head and neck in the
event of an accident or similar situation.
Do not drive the vehicle without the seat
head restraints. Head restraints are intend-
ed to help reduce injuries during an acci-
dent.
Page 44 of 474

42 Getting startedAdjustingSteering wheel Steering wheel adjustment
The stalk for steering wheel adjustment is
located on the lower left of the steering
column.
1Adjusting steering column, in or out
2Adjusting steering column, up or down
�
Switch on the ignition (
�page 36).
or
�
Open the driver’s door.Adjusting steering column in or out
�
Move stalk forward or back in direction
of arrow1 until a comfortable steer-
ing wheel position is reached with your
arms slightly bent at the elbow.
Adjusting steering column up or down
�
Move stalk up or down in direction of
arrow2.
Make sure your legs can move freely
and that you have a good view on all
the displays (including malfunction and
indicator lamps) on the instrument
cluster.
For more information, see “Heated steer-
ing wheel* (SL 500, SL 600)”
(
�page 234).
Warning!
G
Do not adjust the steering wheel while driv-
ing. Adjusting the steering wheel while driv-
ing could cause the driver to lose control of
the vehicle.
When leaving the vehicle, always remove the
SmartKey or the SmartKey with
KEYLESS-GO* from the starter switch, take
it with you, and lock the vehicle.
Even with the SmartKey or the SmartKey
with KEYLESS-GO* removed from the
starter switch or the SmartKey with
KEYLESS-GO* removed from the vehicle,
the steering wheel adjustment feature can
be operated when the driver’s door is open.
Therefore, do not leave children unattended
in the vehicle, or with access to an unlocked
vehicle. Unsupervised use of vehicle equip-
ment may cause an accident and/or serious
personal injury.
iThe memory function (
�page 120) lets
you store the setting for the steering
wheel together with the settings for the
seat position and the exterior rear view
mirrors.
Page 46 of 474
44 Getting startedAdjustingFor more information, see “Good visibility”
(�page 178).!If an exterior rear view mirror was forc-
ibly pushed forward (hit from the rear)
or forcibly pushed rearward (hit from
the front), reposition it by applying firm
pressure until it snaps into place. The
mirror housing is then properly posi-
tioned and you can adjust the mirror in
the usual manner.iThe memory function (
�page 120) lets
you store the setting for the exterior
rear view mirrors together with the set-
tings for the steering wheel and the
seat position.
Page 53 of 474

51 Getting started
Driving
Once the vehicle is in motion, the automat-
ic central locking system engages and the
locking knobs drop down.
After a cold start, the transmission engag-
es at a higher revolution. This allows the
catalytic converter to reach its operating
temperature earlier.
Switching on headlamps
Low beam headlamps
The exterior lamp switch is located on the
dashboard to the left of the steering wheel.Exterior lamp switch1Off
2Low beam headlamps on�
Turn the exterior lamp switch to
position B.
The low beam headlamps come on.
!If you hear a warning signal when driv-
ing off, you have forgotten to release
the parking brake.
Release the parking brake.!Do not run cold engine at high engine
speed. Running a cold engine at high
engine speed may shorten the service
life of the engine.
!Simultaneously depressing the acceler-
ator pedal and applying the brake re-
duces engine performance and causes
premature brake and drivetrain wear.iYou can open a locked door from the
inside. Open door only when conditions
are safe to do so.
You can deactivate the automatic lock-
ing using the control system
(�page 156).
Page 54 of 474
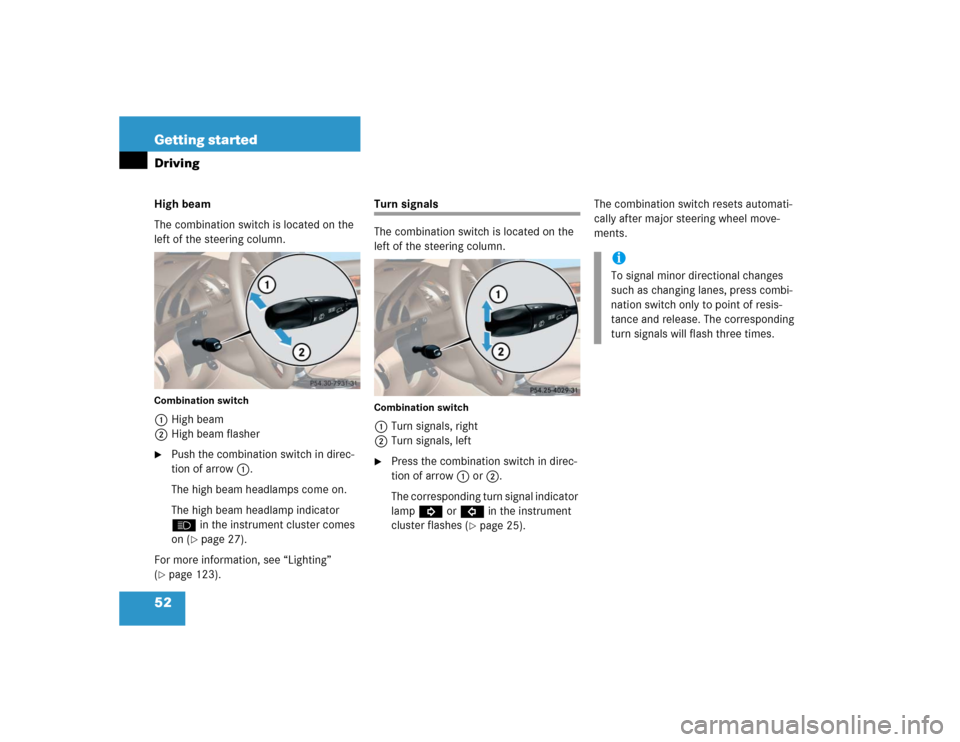
52 Getting startedDrivingHigh beam
The combination switch is located on the
left of the steering column.Combination switch1High beam
2High beam flasher�
Push the combination switch in direc-
tion of arrow 1.
The high beam headlamps come on.
The high beam headlamp indicator
A in the instrument cluster comes
on (
�page 27).
For more information, see “Lighting”
(
�page 123).
Turn signals
The combination switch is located on the
left of the steering column.Combination switch1Turn signals, right
2Turn signals, left�
Press the combination switch in direc-
tion of arrow1 or2.
The corresponding turn signal indicator
lampKorLin the instrument
cluster flashes (
�page 25).The combination switch resets automati-
cally after major steering wheel move-
ments.
iTo signal minor directional changes
such as changing lanes, press combi-
nation switch only to point of resis-
tance and release. The corresponding
turn signals will flash three times.
Page 58 of 474

56 Getting startedParking and lockingYou have now completed your first drive.
You have properly stopped and parked
your vehicle. End your drive as follows.Warning!
G
With the engine not running, there is no
power assistance for the brake and steering
systems. In this case, it is important to keep
in mind that a considerably higher degree of
effort is necessary to brake and steer the ve-
hicle.
Warning!
G
Do not park this vehicle in areas where com-
bustible materials such as grass, hay or
leaves can come into contact with the hot
exhaust system, as these materials could be
ignited and cause a vehicle fire.
To reduce the risk of personal injury as a re-
sult of vehicle movement, before
turning off
the engine and leaving the vehicle always:
�
Keep right foot on brake pedal.
�
Firmly depress parking brake pedal.
�
Move the gear selector lever to
positionP.
�
Slowly release brake pedal.
�
When parked on an incline, turn front
wheels towards the road curb.
�
Turn the SmartKey in the starter switch
to position0 and remove the SmartKey
from the starter switch, or press the
start / stop button (vehicles with
KEYLESS-GO*).
�
Take the SmartKey or the SmartKey with
KEYLESS-GO* and lock vehicle when
leaving.
Page 65 of 474

63 Safety and Security
Occupant safety
Airbags
Warning!
G
In the event that the 1 indicator lamp
comes on during driving or does not come
on at all, the SRS self-check has detected a
malfunction. For your safety, we strongly
recommend that you visit an authorized
Mercedes-Benz Center immediately to have
the system checked; otherwise the SRS may
not be activated when needed in an acci-
dent, which could result in serious or fatal
injury, or it might deploy unexpectedly and
unnecessarily which could also result in
injury.
In addition, improper work on the SRS cre-
ates a risk of rendering the SRS inoperative
or causing unintended airbag deployment.
Work on the SRS must therefore only be per-
formed by qualified technicians. Contact an
authorized Mercedes-Benz Center.
Warning!
G
Airbags are designed to reduce the potential
of injury and fatality in certain frontal im-
pacts (front airbags, driver-side kneebag) or
side impacts (head-thorax airbags). Howev-
er, no system available today can totally
eliminate injuries and fatalities.
The activation of the airbags temporarily re-
leases a small amount of dust from the air-
bags. This dust, however, is neither injurious
to your health, nor does it indicate a fire in
the vehicle. The dust might cause some tem-
porary breathing difficulty for people with
asthma or other breathing trouble. To avoid
this, you may wish to get out of the vehicle
as soon as it is safe to do so. If you have any
breathing difficulty but cannot get out of the
vehicle after the airbag inflates, then get
fresh air by opening a window or door.
Warning!
G
To reduce the risk of injury when the front
airbags inflate, it is very important for the
driver and passenger to always be in a prop-
erly seated position and to wear your seat
belts.
For maximum protection in the event of a
collision always be in normal seated position
with your back against the backrest. Fasten
your seat belt and ensure that it is properly
positioned on your body (
�page 45).
Since the airbag inflates with considerable
speed and force, a proper seating and hands
on steering wheel position will help to keep
you at a safe distance from the airbag. Oc-
cupants who are unbelted, out of position or
too close to the airbag can be seriously in-
jured by an airbag as it inflates with great
force in the blink of an eye:
�
Sit properly belted in a nearly upright
position with your back against the seat
backrest.
��
Page 66 of 474

64 Safety and SecurityOccupant safety�
Adjust the driver seat as far as possible
rearward, still permitting proper opera-
tion of vehicle controls. The distance
from the center of the driver’s breast-
bone to the center of the airbag cover on
the steering wheel must be at least ten
inches (25 cm) or more. You should be
able to accomplish this by a combina-
tion of adjustments to the seat and
steering wheel. If you have any prob-
lems, please see an authorized
Mercedes-Benz Center.
�
Do not lean with your head or chest
close to the steering wheel or dash-
board.
�
Keep hands on the outside of steering
wheel rim. Placing hands and arms in-
side the rim can increase the risk and
potential severity of hand / arm injury
when driver front airbag inflates.
�
Adjust the passenger seat as far as pos-
sible rearward from the dashboard when
the seat is occupied.
�
Occupants, especially children, should
never lean their heads in the area of the
door where the head-thorax airbag in-
flates. This could result in serious inju-
ries or death should the airbag be
triggered. Always sit nearly upright,
properly use the seat belts and appropri-
ate size infant or child restraint system.
�
Children 12 years old and under must
never ride in this vehicle, except in a
Mercedes-Benz authorized
BabySmart
TM1
compatible child seat,
which operates with the BabySmart
TM
system installed in the vehicle to deacti-
vate the passenger front airbag when it
is properly installed. Otherwise they will
be struck by the airbag when it inflates
in a crash. If this happens, serious or fa-
tal injury will result.
1BabySmart
TM
is a trademark of Siemens
Automotive Corp.
Failure to follow these instructions can re-
sult in severe injuries to you or other occu-
pants.
If you sell your vehicle, it is important that
you make the buyer aware of this safety in-
formation. Be sure to give the buyer this
Operator’s Manual.
��