Page 128 of 474

126 Controls in detailLightingCanada only:
The daytime running lamp mode is manda-
tory and therefore in a constant mode.
When the engine is running and you shift
from a driving position to positionN orP,
the low beam headlamps will switch off
with a three-minute delay.
When the engine is running and you�
turn the exterior lamp switch to posi-
tion C, the parking lamps switch on
additionally
�
turn the exterior lamp switch to posi-
tion B, the manual headlamp mode
has priority over the daytime running
lamp mode
The corresponding exterior lamps
switch on (
�page 123).USA only:
By default, the daytime running lamp mode
is deactivated. Activate the daytime run-
ning lamp mode using the control system,
see “Setting daytime running lamp mode
(USA only)” (
�page 152).
The high beam headlamps can also be ac-
tivated when driving with the daytime run-
ning lamp mode activated and the exterior
lamp switch in positionM.
When the engine is running and you turn
the exterior lamp switch to positionC
or B, the manual headlamp mode has
priority over the daytime running lamp
mode.
The corresponding exterior lamps switch
on (
�page 123).Locator lighting and night security
illumination
Locator lighting and night security illumi-
nation are described in the control system
section, see “Setting locator lighting”
(
�page 153) and “Setting night security il-
lumination” (
�page 154).
Page 130 of 474

128 Controls in detailLightingCombination switch
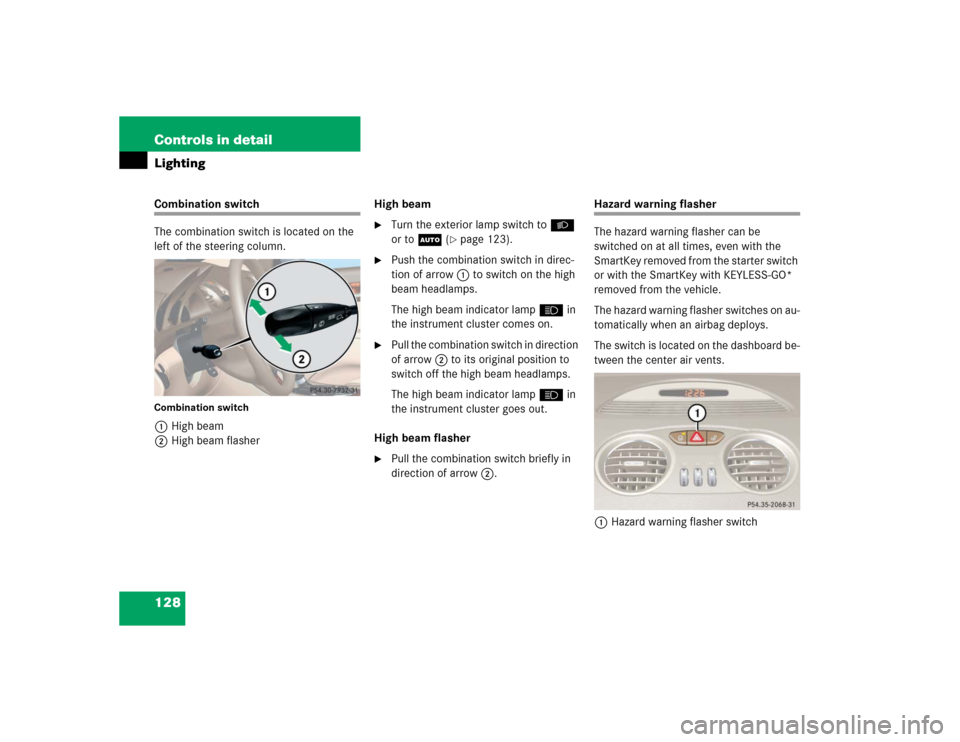
The combination switch is located on the
left of the steering column.Combination switch1High beam
2High beam flasherHigh beam
�
Turn the exterior lamp switch toB
or toU (
�page 123).
�
Push the combination switch in direc-
tion of arrow1 to switch on the high
beam headlamps.
The high beam indicator lamp A in
the instrument cluster comes on.
�
Pull the combination switch in direction
of arrow 2 to its original position to
switch off the high beam headlamps.
The high beam indicator lamp A in
the instrument cluster goes out.
High beam flasher
�
Pull the combination switch briefly in
direction of arrow2.
Hazard warning flasher
The hazard warning flasher can be
switched on at all times, even with the
SmartKey removed from the starter switch
or with the SmartKey with KEYLESS-GO*
removed from the vehicle.
The hazard warning flasher switches on au-
tomatically when an airbag deploys.
The switch is located on the dashboard be-
tween the center air vents.
1Hazard warning flasher switch
Page 338 of 474
336 Practical hintsWhat to do if …On the pages that follow, you will find a
compilation of the most important warning
and malfunction messages that may ap-
pear in the multifunction display.
For your convenience the messages are di-
vided into two sections:�
Text messages (
�page 337)
�
Symbol messages (
�page 345)
iSwitching on the ignition causes all in-
strument cluster lamps (except high
beam headlamp indicator lamp and
turn signal indicator lamps unless acti-
vated) as well as the multifunction dis-
play to come on. Make sure the lamps
and the multifunction display are in
working order before starting your jour-
ney.
Page 362 of 474

360 Practical hintsWhat to do if …Left display
Right display
Possible cause
Possible solution
.
Brake lamp
Right
Auxiliary
lamp on!
The right brake lamp is malfunction-
ing. An auxiliary lamp has been
brought into use.
�
Visit an authorized Mercedes-Benz Center as
soon as possible.
Brake lamp
!
Drive to
workshop!
Brake lamp illumination is delayed
or lamp is permanently on.
�
Visit an authorized Mercedes-Benz Center as
soon as possible.
Front foglamp
Left
The left front fog lamp is malfunc-
tioning.
�
Replace the bulb as soon as possible.
Front foglamp
Right
The right front fog lamp is malfunc-
tioning.
�
Replace the bulb as soon as possible.
Rear foglamp
Left
The left rear fog lamp is malfunc-
tioning.
�
Replace the bulb as soon as possible.
High beam
Left
The left high beam lamp is malfunc-
tioning.
�
Replace the bulb as soon as possible.
High beam
Right
The right high beam lamp is mal-
functioning.
�
Replace the bulb as soon as possible.
Left turn signal
Mirror
T h e l e f t t u r n s i g n a l i n t h e s i d e m i r r o r
is malfunctioning. This message will
only appear if all light emitting di-
odes have stopped working.
�
Have the LEDs replaced as soon as possible.
Page 383 of 474
381 Practical hints
Replacing bulbs
Front lamps Rear lamps
Lamp
Type
1
Additional turn signal
LED
2
Turn signal lamp
1156 NA
3
Low beam
1
1Vehicles with Bi-Xenon* headlamps: Low beam
and high beam use the same D2S-35W lamp. Do
not replace the Xenon and Bi-Xenon* bulbs your-
self. See an authorized Mercedes-Benz Center.
D2S-35 W
4
Xenon headlamps:
High beam, high beam
flasher
H7 (55 W)
Bi-Xenon* head-
lamps:
High beam flasher
H7 (55 W)
Parking and standing
lamps
W 5 W
5
Fog lamp
HB4 (51 W)
6
Side marker lamp
W 5 W
Lamp
Type
7
Rear fog lamp
(driver’s side only);
replacement
P 21 W
1156/32 cp
8
High mounted brake
lamp
LED
9
Backup lamp;
replacement
P 21 W
1156/32 cp
a
Tail, parking and
standing lamp, side
marker lamp
LED
b
Tail, parking and
standing lamp, brake
lamp
LED
c
License plate lamps
C 5 W
d
Turn signal lamp;
replacement
P 21 W
1156/32 cp
Page 384 of 474

382 Practical hintsReplacing bulbs
Notes on bulb replacement�
Only use 12-volt bulbs of the same type
and with the specified watt rating.
�
Switch the lights off before changing a
bulb to prevent short circuits.
�
Always use a clean lint-free cloth when
handling bulbs.
�
Your hands should be dry and free of oil
and grease.
�
If the newly installed bulb does not
come on, visit an authorized
Mercedes-Benz Center.Have the LEDs and bulbs for the following
lamps replaced by an authorized
Mercedes-Benz Center:
�
the additional turn signals in the exteri-
or rear view mirrors
�
the high mounted brake lamp
�
the brake lamps
�
the parking lamps and the side marker
lamps in the tail lamp unit
�
the rear fog lamps
�
the low beam (Xenon or Bi-Xenon*)
lamps
�
the front fog lamps
Warning!
G
Bulbs and bulb sockets can be very hot. Al-
low the lamp to cool down before changing
a bulb.
Keep bulbs out of reach of children.
Halogen lamps contain pressurized gas. A
bulb can explode if you:�
touch or move it when hot
�
drop the bulb
�
scratch the bulb
Wear eye and hand protection.
Because of high voltage in Xenon lamps, it is
dangerous to replace the bulb or repair the
lamp and its components. We recommend
that you have such work done by a qualified
technician.
iHave the headlamp adjustment
checked regularly.
Page 385 of 474

383 Practical hints
Replacing bulbs
Replacing bulbs for front lamps
Before you start to replace a bulb for a
front lamp, do the following first:�
Turn the exterior lamp switch to posi-
tion M (
�page 123).
�
Open the hood (
�page 270)
(except for side marker lamps).
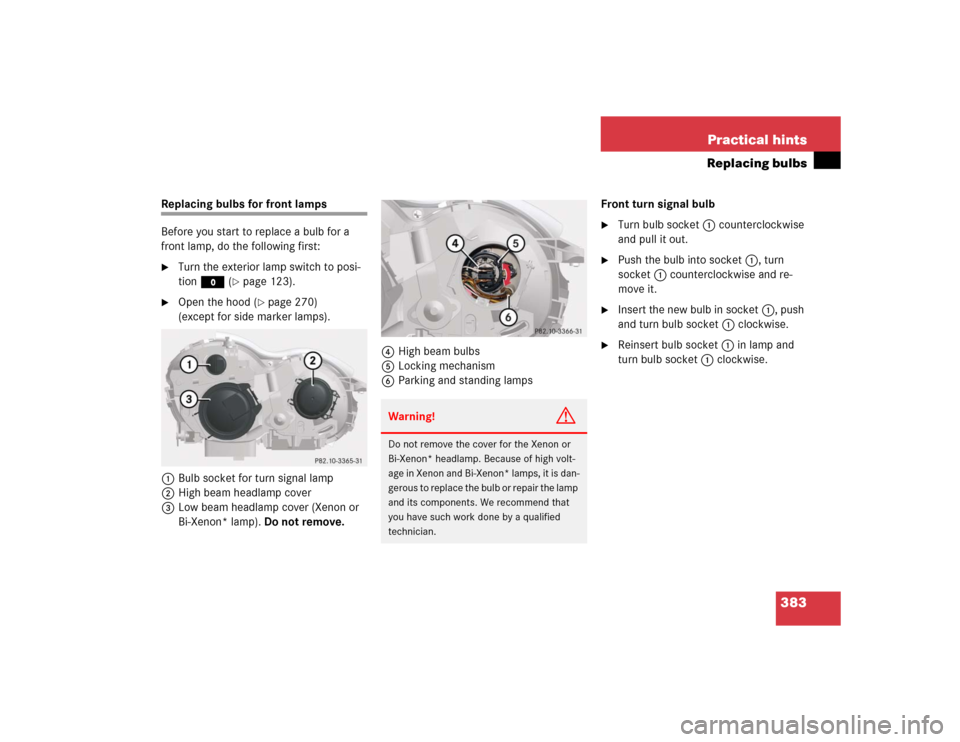
1Bulb socket for turn signal lamp
2High beam headlamp cover
3Low beam headlamp cover (Xenon or
Bi-Xenon* lamp). Do not remove.4High beam bulbs
5Locking mechanism
6Parking and standing lampsFront turn signal bulb
�
Turn bulb socket 1 counterclockwise
and pull it out.
�
Push the bulb into socket 1, turn
socket 1 counterclockwise and re-
move it.
�
Insert the new bulb in socket 1, push
and turn bulb socket 1 clockwise.
�
Reinsert bulb socket 1 in lamp and
turn bulb socket 1 clockwise.
Warning!
G
Do not remove the cover for the Xenon or
Bi-Xenon* headlamp. Because of high volt-
age in Xenon and Bi-Xenon* lamps, it is dan-
gerous to replace the bulb or repair the lamp
and its components. We recommend that
you have such work done by a qualified
technician.
Page 386 of 474

384 Practical hintsReplacing bulbsHigh beam/ high beam flasher bulbs�
Press ends of headlamp cover tab to-
gether and remove high beam head-
lamp cover 2.
�
Pull the electrical connector off.
�
Turn locking mechanism 5 counter-
clockwise and take out the bulb.
�
Insert the new bulb so that the base lo-
cates in the recess on the holder.
�
Turn locking mechanism 5 clockwise.
�
Plug the connector onto the bulb.
�
Align high beam headlamp cover 2
and click it into place.Parking and standing lamp bulbs
�
Press ends of cover tab together and
remove high beam headlamp cover 2.
�
Pull out bulb socket 6 with the bulb.
�
Pull the bulb out of bulb socket 6.
�
Insert a new bulb in bulb socket 6.
�
Reinstall bulb socket 6.
�
Align high beam headlamp cover 2
and click it into place.Side marker bulbs
�
Carefully slide the side marker lamp to-
wards rear.
�
Remove the front end first.
�
Turn the bulb socket counterclockwise
and pull it out.
�
Pull the bulb out of the bulb socket.
�
Insert the new bulb in socket.
�
Reinstall the bulb socket, push it in,
and turn it clockwise.
�
To reinstall the side marker lamp, set
the rear end in bumper and let the front
end snap into place.