Page 85 of 474
.Switching off the ESP
To improve the vehicle’s traction, turn off
the ESP in")
83 Safety and Security
Driving safety systems
For more information, see the
“Practical hints” section (
�page 324).Switching off the ESP
To improve the vehicle’s traction, turn off
the ESP in driving situations where it would
be advantageous to have the drive wheels
spin and thus cut into surfaces for better
grip such as:
�
starting out on slippery surfaces and in
deep snow in conjunction with snow
chains
�
in sand or gravelWhen you switch off the ESP
�
the ESP does not stabilize the vehicle
�
the engine output is not limited, which
allows the drive wheels to spin and
thus cut into surfaces for better grip
�
the traction control will still brake a
spinning wheel
�
the ESP continues to operate when you
are braking
�
you cannot activate Distronic*
!Because of the ESP’s automatic opera-
tion, the engine must be shut off
(SmartKey in starter switch position 0
or 1 or KEYLESS-GO* start/stop but-
ton in position 0 or 1) when�
the parking brake is being tested on
a brake test dynamometer
�
the vehicle is being towed with the
front/rear axle raised
Active braking action through the ESP
may otherwise seriously damage the
brake system.
The ESP will only function properly if
you use wheels of the recommended
tire size (
�page 422).
Warning!
G
ESP should not be switched off during nor-
mal driving other than in the circumstances
described below. Disabling of the system
will reduce vehicle stability in standard driv-
ing maneuvers.!Turn on the ESP immediately if the
aforementioned circumstances do not
apply anymore.
iWhen the ESP is switched off and one
or more drive wheels are spinning, the
ABS/ESP warning lamp v in the
speedometer flashes. However, the
ESP will then not stabilize the vehicle.
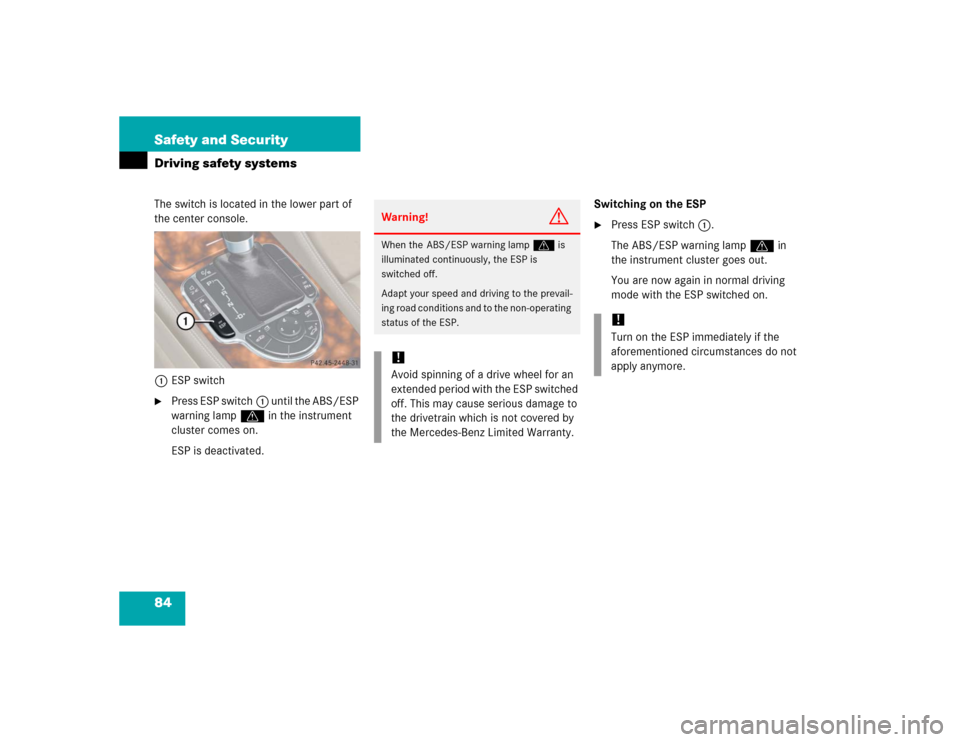
Page 86 of 474
84 Safety and SecurityDriving safety systemsThe switch is located in the lower part of
the center console.
1ESP switch�
Press ESP switch1 until the ABS/ESP
warning lamp v in the instrument
cluster comes on.
ESP is deactivated.Switching on the ESP
�
Press ESP switch1.
The ABS/ESP warning lamp v in
the instrument cluster goes out.
You are now again in normal driving
mode with the ESP switched on.
Warning!
G
When the ABS/ESP warning lampv is
illuminated continuously, the ESP is
switched off.
Adapt your speed and driving to the prevail-
ing road conditions and to the non-operating
status of the ESP.!Avoid spinning of a drive wheel for an
extended period with the ESP switched
off. This may cause serious damage to
the drivetrain which is not covered by
the Mercedes-Benz Limited Warranty.
!Turn on the ESP immediately if the
aforementioned circumstances do not
apply anymore.
Page 96 of 474

94 Controls in detailIn the “Controls in detail” section you will
find detailed information on how to oper-
ate the equipment installed on your vehi-
cle. If you are already familiar with the
basic functions of your vehicle, this section
will be of particular interest to you.
To quickly familiarize yourself with the ba-
sic functions of the vehicle, refer to the
“Getting started” section of this manual.
The corresponding page numbers are giv-
en at the beginning of each segment.Locking and unlocking
For more information on locking and un-
locking, see the Getting started section
(�page 34).
SmartKey
Your vehicle comes supplied with two
SmartKeys, each with remote control and
a removable mechanical key.
The locking tabs for the mechanical key
portion of the two SmartKeys are a differ-
ent color to help distinguish each Smart-
Key unit.
The SmartKey provides an extended oper-
ating range. To prevent theft, however, it is
advisable to only unlock the vehicle when
you are in close proximity to it.The SmartKey centrally locks and unlocks:
�
the doors
�
the trunk lid
�
the glove box
�
the storage compartment under the
armrest
�
the storage compartment in the rear
�
the fuel filler flap
Page 100 of 474
 is required to open the
trunk lid.�
Press and hold bu")
98 Controls in detailLocking and unlockingUnlocking the trunk
You can unlock the trunk separately.
A minimum height clearance of
6.2 ft (1.88 m) is required to open the
trunk lid.�
Press and hold button Š on the
SmartKey until trunk unlocks.Loss of SmartKey or mechanical key
If you lose a SmartKey or mechanical key,
you should do the following:
�
Have the SmartKey deactivated by an
authorized Mercedes-Benz Center.
�
Report the loss of the SmartKey or the
mechanical key to your car insurance
company immediately.
�
If necessary, have the mechanical lock
replaced.
Your authorized Mercedes-Benz Center
will be glad to supply you with a replace-
ment.
SmartKey with KEYLESS-GO*
Vehicles equipped with KEYLESS-GO come
with two SmartKeys with KEYLESS-GO,
each with remote controls and a remov-
able mechanical key.
The locking tabs for the mechanical key
portion of the two SmartKeys with
KEYLESS-GO are a different color to help
distinguish each SmartKey with
KEYLESS-GO unit.
The function of the SmartKey overrules the
KEYLESS-GO function.
The KEYLESS-GO function is integrated
into the SmartKey. On these vehicles, the
validity of the SmartKey with KEYLESS-GO
is checked every time you grasp a door
handle.
iIf the vehicle was previously centrally
locked, the trunk lid will lock automati-
cally when closed. The turn signals will
flash three times to confirm locking.
Page 168 of 474

166 Controls in detailAutomatic transmissionOne-touch gearshifting
Even with an automatic transmission you
can change the gears manually when the
gear selector lever is in positionD.
Downshifting�
Briefly press the gear selector lever to
the left in theD-direction.
The transmission will shift from the current
gear to the next lower gear as permitted by
the shift program. This action simulta-
neously limits the gear range of the
transmission (
�page 167).Upshifting
�
Briefly press the gear selector lever to
the right in theD+direction.
The transmission will shift from the current
gear to the next higher gear as permitted
by the shift program. This action simul-
taneously extends the gear range of the
transmission.Canceling gear range limit
�
Press and hold the gear selector lever
in theD+direction until
D reappears in
the right multifunction display.
The transmission will shift from the current
gear range directly to gear rangeD.
Shifting into optimal gear range
�
Press and hold the gear selector lever
in theD-direction.
The transmission will automatically select
the gear range suited for optimal
acceleration and deceleration. This will
involve shifting down one or more gears.
Warning!
G
On slippery road surfaces, never downshift
in order to obtain braking action. This could
result in drive wheel slip and reduced
vehicle control. Your vehicle’s ABS will not
prevent this type of loss of control.
iTo avoid overrevving the engine when
the gear selector lever is moved to
theD-direction, the transmission will
not shift to a lower gear if the engine’s
max. speed would be exceeded.
Page 175 of 474
173 Controls in detail
Automatic transmission
Downshifting�
Press the inside 1 of one of the
buttons on the steering wheel.
The transmission will shift to the next
lower gear as permitted by the shift
program. This action simultaneously limits
the gear range of the transmission
(
�page 167).Upshifting
�
Press the outside of one of the
buttons2 on the steering wheel.
The transmission will shift to the next
higher gear as permitted by the shift
program. This action simultaneously
extends the gear range of the transmis-
sion.
iYou cannot shift with the steering
wheel gearshift buttons when the gear
selector lever is in positionP,N orR.
The last selected program
mode (CorS) is switched on when the
engine is restarted.
Warning!
G
On slippery road surfaces, never downshift
in order to obtain braking action. This could
result in drive wheel slip and reduced
vehicle control. Your vehicle’s ABS will not
prevent this type of loss of control.
Page 176 of 474

174 Controls in detailAutomatic transmissionSteering wheel gearshift control
SL 55 AMG and SL 65 AMG
The steering wheel gearshift buttons are
located to the left and right of the steering
wheel.
1Left button: downshift
2Right button: upshiftDownshifting
�
Press button1 on the left side of the
steering wheel.
The transmission will shift to the next
lower gear as permitted by the shift
program. This action simultaneously limits
the gear range of the transmission
(
�page 167) when you are driving in the
automatic program mode (CorS).
iYou cannot shift with the steering
wheel gearshift buttons when the gear
selector lever is in positionP,N orR.
The MANUAL program mode will not
be stored. When the engine is turned
off with the MANUAL program mode
selected, the transmission will go to
the automatic program mode (CorS)
when the engine is restarted.
The last selected program
mode (CorS) is switched on when the
engine is restarted in the automatic
program mode.
Warning!
G
On slippery road surfaces, never downshift
in order to obtain braking action. This could
result in drive wheel slip and reduced
vehicle control. Your vehicle’s ABS will not
prevent this type of loss of control.
Page 178 of 474

176 Controls in detailAutomatic transmissionActivating manual shift program�
Press program mode selector
switch1 repeatedly until the
M for
MANUAL program mode appears in
the right multifunction display.
The transmission switches to the
MANUAL program mode. Automatic
shifting is switched off. The gear range
is not limited.
You can change the gears manually when
the gear selector lever is in positionD. You
can upshift or downshift through the gears
in succession.Downshifting
�
Briefly press the gear selector lever to
the left in theD-direction
(�page 166).
or
�
Press button1 on the left side of the
steering wheel (
�page 174).
The transmission shifts to the next
lower gear.Upshifting
Warning!
G
On slippery road surfaces, never downshift
in order to obtain braking action. This could
result in drive wheel slip and reduced
vehicle control. Your vehicle’s ABS will not
prevent this type of loss of control.iWhen you brake or stop, the transmis-
sion shifts down to a gear from which
you can easily accelerate or take off.
!In the MANUAL program mode, the
transmission will not upshift, even if
the engine has reached its overrevving
range. Shift up to the next gear before
the engine has reached its overrevving
range. Make absolutely certain that the
engine speed does not reach the red
marking on the tachometer
(�page 24). Otherwise the engine
could be damaged which is not covered
by the Mercedes-Benz Limited Warran-
ty