Page 31 of 474
29 At a glance
Center console
�Center console
Upper part
Item
Page
1
Central locking switch
111
2
Hazard warning flasher
on/off switch
128
3
Central unlocking switch
111
4
Center and side air vent ad-
justment
182
5
COMAND system, see sep-
arate operating instruc-
tions
137
6
Automatic climate control
185
7
Right cup holder
228
8
KEYLESS-GO* start/stop
button
37
9
Ashtray
Cigarette lighter
233
233
a
Left cup holder
228
Page 142 of 474
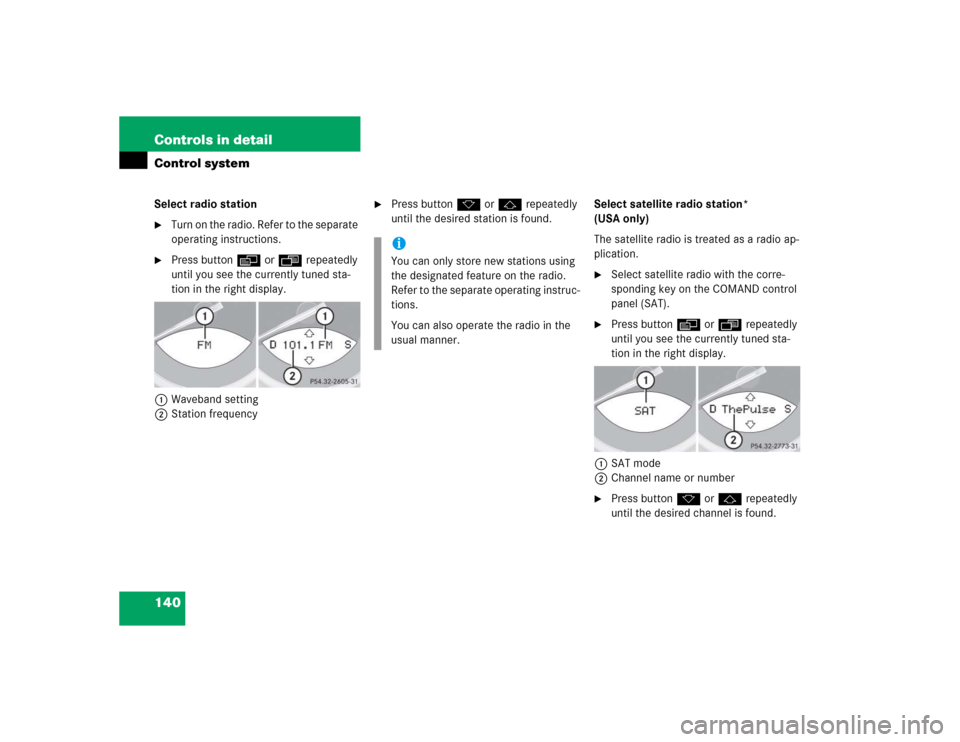
140 Controls in detailControl systemSelect radio station�
Turn on the radio. Refer to the separate
operating instructions.
�
Press button è or ÿ repeatedly
until you see the currently tuned sta-
tion in the right display.
1Waveband setting
2Station frequency
�
Press button k or j repeatedly
until the desired station is found.Select satellite radio station*
(USA only)
The satellite radio is treated as a radio ap-
plication.
�
Select satellite radio with the corre-
sponding key on the COMAND control
panel (SAT).
�
Press button è or ÿ repeatedly
until you see the currently tuned sta-
tion in the right display.
1SAT mode
2Channel name or number
�
Press button k or j repeatedly
until the desired channel is found.
iYou can only store new stations using
the designated feature on the radio.
Refer to the separate operating instruc-
tions.
You can also operate the radio in the
usual manner.
Page 143 of 474

141 Controls in detail
Control system
Operate the CD player
Selecting CD track�
Turn on COMAND and select CD. Refer
to the separate COMAND operating in-
structions.
�
Press button è or ÿ repeatedly
until the settings for the CD currently
being played appear in the right multi-
function display.
1Current CD (for CD changer)
2Current track
�
Press button k or j repeatedly
until the desired track is selected.Selecting MP3-CD track
�
Turn on COMAND and select MP3-CD.
Refer to the separate COMAND operat-
ing instructions.
�
Press button è or ÿ repeatedly
until the settings for the MP3-CD cur-
rently being played appear in the right
multifunction display.
�
Press button k or j repeatedly
until the desired track is selected.
iAdditional optional satellite radio
equipment and a subscription to satel-
lite radio service provider are required
for satellite radio operation. Contact an
authorized Mercedes-Benz Center for
details and availability for your vehicle.
For more information, refer to separate
COMAND operating instructions.
Page 144 of 474

142 Controls in detailControl systemNAV menu
The
NAV
menu contains the functions need-
ed to operate your navigation system.
�
Press button è or ÿ repeatedly
until you see the message
NAV
in the
left multifunction display.
The message shown in the multifunction
display depends on the status of the navi-
gation system:
�
When the navigation system is off, the
message
NAV off
appears in the multi-
function display.
�
When the navigation system is on, the
message
HEADING
appears in the left
multifunction display and the destina-
tion in the right multifunction display.
Please refer to the COMAND manual for in-
structions on how to activate the route
guidance system.
Distronic* menu
Use the Distronic menu to display the cur-
rent settings for your Distronic system.
What information is shown in the left mul-
tifunction display depends on whether the
Distronic system is active or inactive.
Please refer to the “Driving systems” sec-
tion of this manual (
�page 208) for in-
structions on how to activate Distronic.
�
Press button è or ÿ repeatedly
until you see one of the following two
pictures in the display.Distronic deactivated
When Distronic is deactivated you will see
the standard display in the left multifunc-
tion display.
1Vehicle ahead, if detected
2Actual distance to vehicle ahead
3Preset distance threshold to vehicle
ahead
4Your vehicle
5Symbol for activated distance warning
function
Page 152 of 474
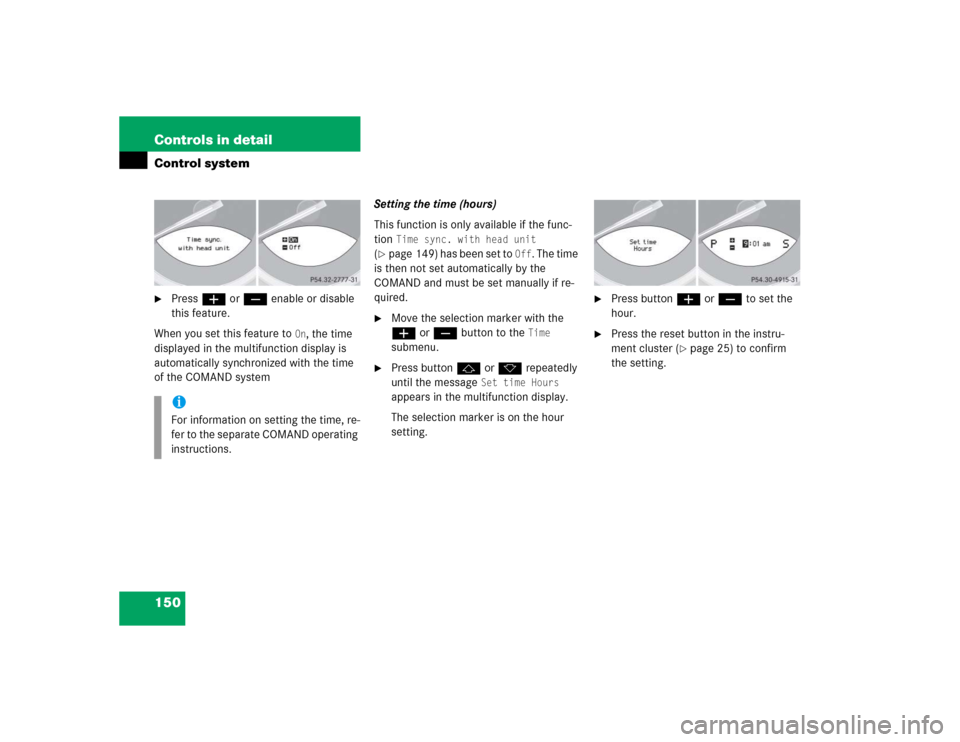
150 Controls in detailControl system�
Press æ or ç enable or disable
this feature.
When you set this feature to
On, the time
displayed in the multifunction display is
automatically synchronized with the time
of the COMAND systemSetting the time (hours)
This function is only available if the func-
tion
Time sync. with head unit
(
�page 149) has been set to
Off
. The time
is then not set automatically by the
COMAND and must be set manually if re-
quired.
�
Move the selection marker with the
æ or ç button to the
Time
submenu.
�
Press button j or k repeatedly
until the message
Set time Hours
appears in the multifunction display.
The selection marker is on the hour
setting.
�
Press button æ or ç to set the
hour.
�
Press the reset button in the instru-
ment cluster (
�page 25) to confirm
the setting.
iFor information on setting the time, re-
fer to the separate COMAND operating
instructions.
Page 153 of 474

This function is only available if the func-
tion
Time sync. with head unit
(
�page 149) has been set to
Off
. The time
is then no")
151 Controls in detail
Control system
Setting the time (minutes)
This function is only available if the func-
tion
Time sync. with head unit
(
�page 149) has been set to
Off
. The time
is then not set automatically by the
COMAND and must be set manually if re-
quired.
�
Move the selection marker with the
æ or ç button to the
Time
submenu.
�
Press button j or k repeatedly
until the message
Set time Minutes
appears in the multifunction display.
The selection marker is on the minute
setting.
�
Press button æ or ç to set the
hour.
�
Press the reset button in the instru-
ment cluster (
�page 25) to confirm
the setting.
Selecting time display mode
�
Move the selection marker with the
æ or ç button to the
Inst.
cluster
submenu.
�
Press button j or k repeatedly
until the message
Clock
appears in the
multifunction display.
The selection marker is on the current
setting.
�
Press æ or ç to set the
12-hour
or
24-hour
time display mode.
iFor information on setting the time, re-
fer to the separate COMAND operating
instructions.
Page 163 of 474
�
Press button ÿ or è repeatedly
until you see the first function of the
Trip computer menu.
�
Press button j or k repeatedly")
161 Controls in detail
Control system
Call up range (distance to empty)�
Press button ÿ or è repeatedly
until you see the first function of the
Trip computer menu.
�
Press button j or k repeatedly
until you see this message in the left
display:
Range
.
In the right display you will see the cal-
culated range based on the current fuel
tank level.
TEL menu*
You can use the functions in the
TEL
menu
to operate your telephone, provided it is
connected to a hands-free system and
switched on.
�
Switch on the telephone and COMAND.
�
Press button ÿ or è on the
steering wheel repeatedly until you see
the
TEL
menu in the left display.
Warning!
G
A driver’s attention to the road must always
be his/her primary focus when driving. For
your safety and the safety of others, we rec-
ommend that you pull over to a safe location
and stop before placing or taking a tele-
phone call. If you choose to use the tele-
phone while driving, please use the
hands-free device and only use the tele-
phone when weather, road, and traffic con-
ditions permit.
Some jurisdictions prohibit the driver from
using a cellular telephone while driving a ve-
hicle.
Bear in mind that at a speed of just 30 mph
(approximately 50 km/h), your vehicle is
covering a distance of 44 feet (approximate-
ly 14 m) every second.
Never operate radio transmitters equipped
with a built-in or attached antenna (i.e. with-
out being connected to an external antenna)
from inside the vehicle while the engine is
running. Doing so could lead to a malfunc-
tion of the vehicle’s electronic system, pos-
sibly resulting in an accident and/or
personal injury.
Page 232 of 474
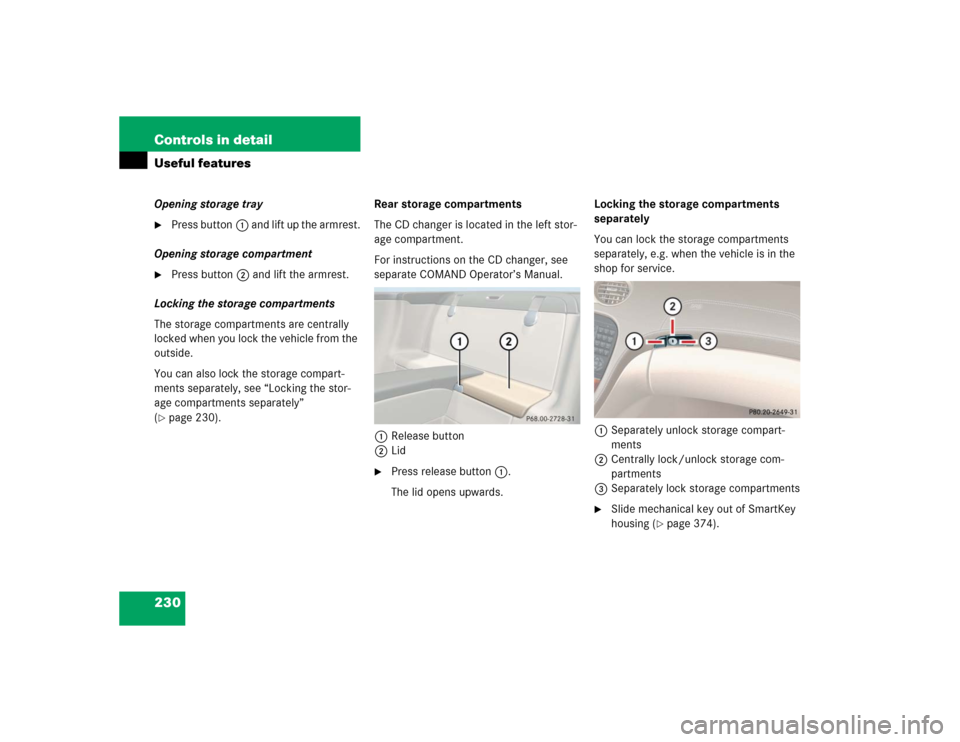
230 Controls in detailUseful featuresOpening storage tray�
Press button1 and lift up the armrest.
Opening storage compartment
�
Press button2 and lift the armrest.
Locking the storage compartments
The storage compartments are centrally
locked when you lock the vehicle from the
outside.
You can also lock the storage compart-
ments separately, see “Locking the stor-
age compartments separately”
(
�page 230).Rear storage compartments
The CD changer is located in the left stor-
age compartment.
For instructions on the CD changer, see
separate COMAND Operator’s Manual.
1Release button
2Lid
�
Press release button 1.
The lid opens upwards.Locking the storage compartments
separately
You can lock the storage compartments
separately, e.g. when the vehicle is in the
shop for service.
1Separately unlock storage compart-
ments
2Centrally lock/unlock storage com-
partments
3Separately lock storage compartments
�
Slide mechanical key out of SmartKey
housing (
�page 374).