Page 283 of 474
281 Operation
Tires and wheels
Tread depth
Do not allow your tires to wear down too
far. Adhesion properties on wet roads are
sharply reduced at tread depths under 1⁄8in (3 mm).
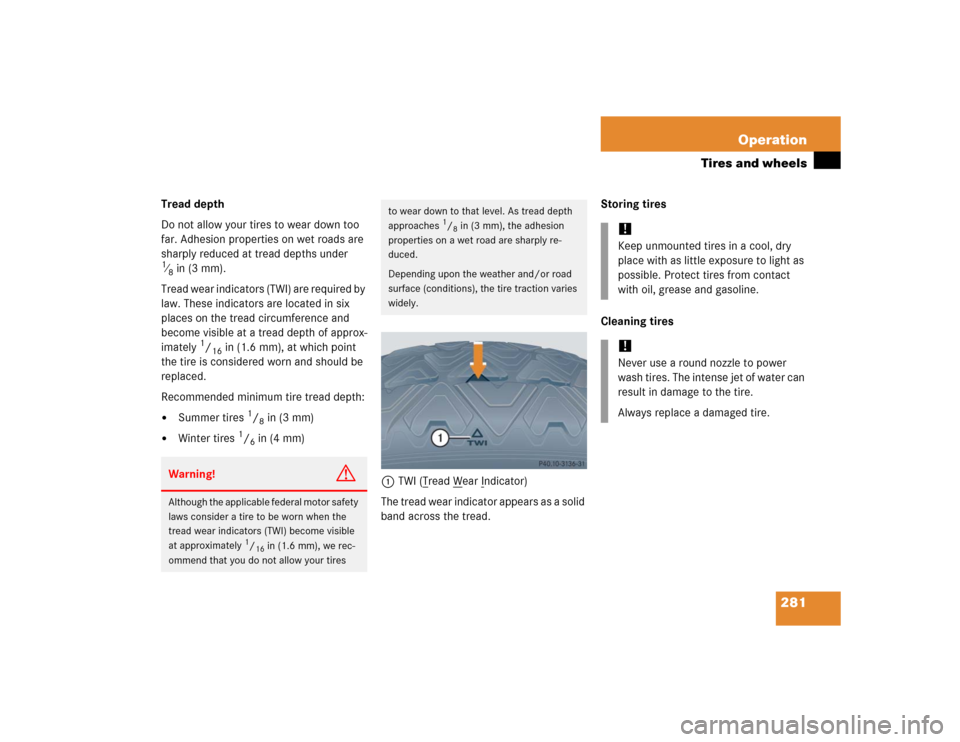
Tread wear indicators (TWI) are required by
law. These indicators are located in six
places on the tread circumference and
become visible at a tread depth of approx-
imately
1/16
in (1.6 mm), at which point
the tire is considered worn and should be
replaced.
Recommended minimum tire tread depth:
�
Summer tires
1/8in (3 mm)
�
Winter tires
1/6in (4 mm)
1TWI (T
read W
ear I
ndicator)
The tread wear indicator appears as a solid
band across the tread.Storing tires
Cleaning tires
Warning!
G
Although the applicable federal motor safety
laws consider a tire to be worn when the
tread wear indicators (TWI) become visible
at approximately
1/16in (1.6 mm), we rec-
ommend that you do not allow your tires
to wear down to that level. As tread depth
approaches
1/8in (3 mm), the adhesion
properties on a wet road are sharply re-
duced.
Depending upon the weather and/or road
surface (conditions), the tire traction varies
widely.
!Keep unmounted tires in a cool, dry
place with as little exposure to light as
possible. Protect tires from contact
with oil, grease and gasoline.!Never use a round nozzle to power
wash tires. The intense jet of water can
result in damage to the tire.
Always replace a damaged tire.
Page 293 of 474
291 Operation
Tires and wheels
�
Switch on the ignition (
�page 36).
�
Press buttonè orÿ on the mul-
tifunction steering wheel repeatedly
until the standard display menu
appears in the multifunction display
(�page 134).
�
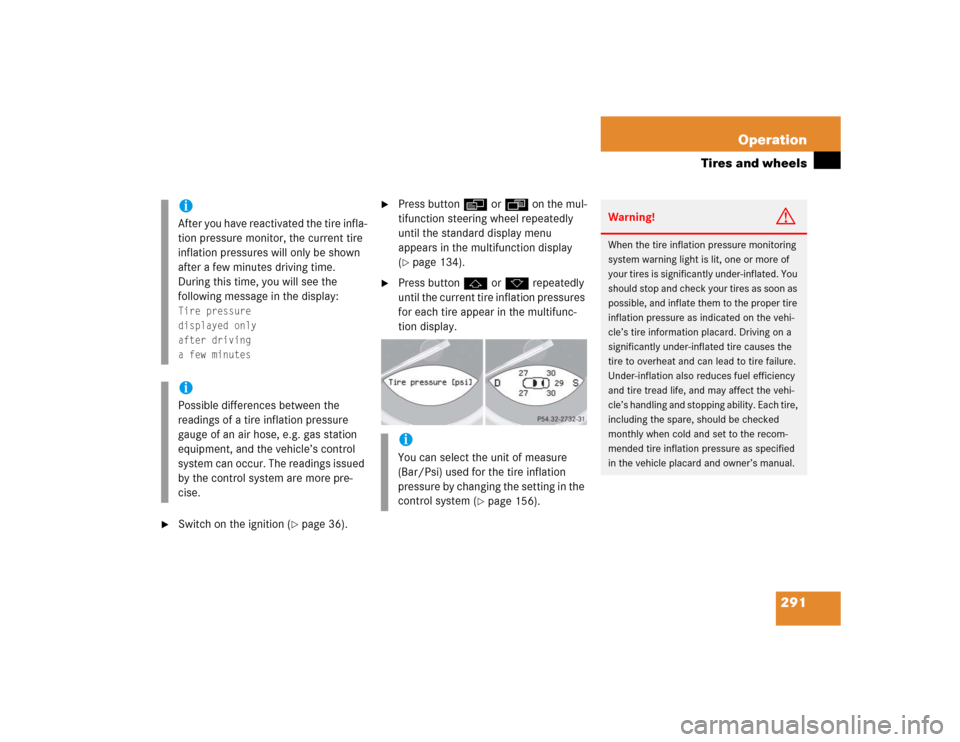
Press buttonj ork repeatedly
until the current tire inflation pressures
for each tire appear in the multifunc-
tion display.
iAfter you have reactivated the tire infla-
tion pressure monitor, the current tire
inflation pressures will only be shown
after a few minutes driving time.
During this time, you will see the
following message in the display:Tire pressure
displayed only
after driving
a few minutesiPossible differences between the
readings of a tire inflation pressure
gauge of an air hose, e.g. gas station
equipment, and the vehicle’s control
system can occur. The readings issued
by the control system are more pre-
cise.
iYou can select the unit of measure
(Bar/Psi) used for the tire inflation
pressure by changing the setting in the
control system (
�page 156).
Warning!
G
When the tire inflation pressure monitoring
system warning light is lit, one or more of
your tires is significantly under-inflated. You
should stop and check your tires as soon as
possible, and inflate them to the proper tire
inflation pressure as indicated on the vehi-
cle’s tire information placard. Driving on a
significantly under-inflated tire causes the
tire to overheat and can lead to tire failure.
Under-inflation also reduces fuel efficiency
and tire tread life, and may affect the vehi-
cle’s handling and stopping ability. Each tire,
including the spare, should be checked
monthly when cold and set to the recom-
mended tire inflation pressure as specified
in the vehicle placard and owner’s manual.
Page 322 of 474
320 OperationVehicle careLight alloy wheels
Mercedes-Benz approved Wheel Care
should be used for regular cleaning of the
light alloy wheels.
If possible, clean wheels once a week with
Mercedes-Benz approved Wheel Care, us-
ing a soft bristle brush and a strong spray
of water.
Follow the instructions on container.
Instrument cluster
Use a gentle dishwashing detergent or
mild detergent for delicate fabrics as a
washing solution. Wipe with a cloth moist-
ened in lukewarm solution. Do not use
scouring agents.Steering wheel and gear selector lever
Wipe with a damp cloth and dry thoroughly
or clean with Mercedes-Benz approved
Leather Care.
Cup holder
Use a gentle dishwashing detergent or
mild detergent for delicate fabrics as a
washing solution. Wipe with a cloth moist-
ened in lukewarm solution. Do not use
scouring agents.
Hard plastic trim items
Pour Mercedes-Benz approved Interior
Care onto soft lint-free cloth and apply
with light pressure.
Headliner
Clean with soft bristle brush, or use a
dry-shampoo cleaner in case of excessive
dirt.Seat belts
The webbing must not be treated with
chemical cleaning agents. Use only clear,
lukewarm water and soap. Do not dry the
webbing at temperatures above 176°F
(80°C) or in direct sunlight.
iOnly use acid-free cleaning materials.
Acid may cause corrosion or damage to
the clear coat.
Warning!
G
Do not bleach or dye seat belts as this may
severely weaken them. In a crash they may
not be able to provide adequate protection.
Page 332 of 474
330 Practical hintsWhat to do if …Problem
Possible cause
Suggested solution
E
The red DTR indicator lamp
comes on while driving and you
hear a warning sound.
�
You are gaining too rapidly on the vehicle
ahead of you.
�
The distance warning system has recog-
nized a stationary obstacle on your prob-
able line of travel.
�
Apply the brakes immediately.
�
Carefully observe the traffic situation.
You may need to brake or maneuver
to avoid hitting an obstacle.
E
The white DTR indicator lamp
comes on while driving.
The Distronic* distance sensor has recog-
nized a vehicle in front of you.
A
The yellow fuel tank reserve
warning lamp lights while driv-
ing.
The fuel level has dropped below the reserve
mark.
�
Refuel at the next gas station
(�page 267).
The fuel cap is not closed tightly.
�
Check the fuel cap (
�page 267).
Page 335 of 474
333 Practical hints
What to do if …
Problem
Possible cause
Suggested solution
H
The yellow warning lamp for the
tire pressure monitoring system
comes on.
The tire pressure monitoring system de-
tects a loss of pressure in at least one tire.
�
Bring the vehicle to a halt, avoiding
abrupt steering and braking maneuvers.
Observe the traffic situation around you.
�
Take note of the messages in the multi-
function display.
The warning lamp goes out once the tire in-
flation pressure monitor has been reactivat-
ed after the tire inflation pressure has been
corrected.
Warning!
G
When the tire pressure monitoring system
warning light is lit, one or more of your tires
is significantly under-inflated. You should
stop and check your tires as soon as possi-
ble, and inflate them to the proper pressure
as indicated on the vehicle’s tire information
placard. Driving on a significantly under-in-
flated tire causes the tire to overheat and
can lead to tire failure.
Under-inflation also reduces fuel efficiency
and tire tread life, and may affect the vehi-
cle’s handling and stopping ability. Each tire,
including the spare, should be checked
monthly when cold and set to the recom-
mended inflation pressure as specified in
the vehicle placard and owner’s manual.
iThe recommended tire inflation pres-
sures for your vehicle can be found on
the tire placard on the driver’s door
B-pillar, not in the owner’s manual.
Page 384 of 474
382 Practical hintsReplacing bulbs
Notes on bulb replacement�
Only use 12-volt bulbs of the same type
and with the specified watt rating.
�
Switch the lights off before changing a
bulb to prevent short circuits.
�
Always use a clean lint-free cloth when
handling bulbs.
�
Your hands should be dry and free of oil
and grease.
�
If the newly installed bulb does not
come on, visit an authorized
Mercedes-Benz Center.Have the LEDs and bulbs for the following
lamps replaced by an authorized
Mercedes-Benz Center:
�
the additional turn signals in the exteri-
or rear view mirrors
�
the high mounted brake lamp
�
the brake lamps
�
the parking lamps and the side marker
lamps in the tail lamp unit
�
the rear fog lamps
�
the low beam (Xenon or Bi-Xenon*)
lamps
�
the front fog lamps
Warning!
G
Bulbs and bulb sockets can be very hot. Al-
low the lamp to cool down before changing
a bulb.
Keep bulbs out of reach of children.
Halogen lamps contain pressurized gas. A
bulb can explode if you:�
touch or move it when hot
�
drop the bulb
�
scratch the bulb
Wear eye and hand protection.
Because of high voltage in Xenon lamps, it is
dangerous to replace the bulb or repair the
lamp and its components. We recommend
that you have such work done by a qualified
technician.
iHave the headlamp adjustment
checked regularly.
Page 392 of 474
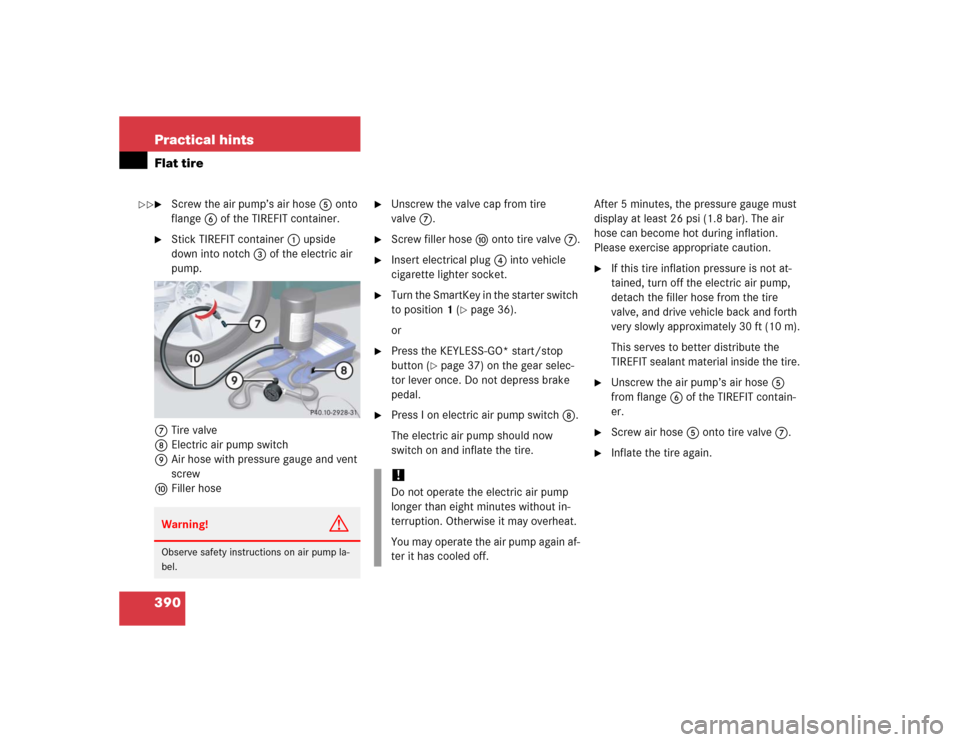
390 Practical hintsFlat tire�
Screw the air pump’s air hose5 onto
flange6 of the TIREFIT container.
�
Stick TIREFIT container1 upside
down into notch3 of the electric air
pump.
7Tire valve
8Electric air pump switch
9Air hose with pressure gauge and vent
screw
aFiller hose
�
Unscrew the valve cap from tire
valve7.
�
Screw filler hosea onto tire valve7.
�
Insert electrical plug4 into vehicle
cigarette lighter socket.
�
Turn the SmartKey in the starter switch
to position1 (
�page 36).
or
�
Press the KEYLESS-GO* start/stop
button (
�page 37) on the gear selec-
tor lever once. Do not depress brake
pedal.
�
Press I on electric air pump switch8.
The electric air pump should now
switch on and inflate the tire.After 5 minutes, the pressure gauge must
display at least 26 psi (1.8 bar). The air
hose can become hot during inflation.
Please exercise appropriate caution.
�
If this tire inflation pressure is not at-
tained, turn off the electric air pump,
detach the filler hose from the tire
valve, and drive vehicle back and forth
very slowly approximately 30 ft (10 m).
This serves to better distribute the
TIREFIT sealant material inside the tire.
�
Unscrew the air pump’s air hose5
from flange6 of the TIREFIT contain-
er.
�
Screw air hose5onto tire valve7.
�
Inflate the tire again.
Warning!
G
Observe safety instructions on air pump la-
bel.
!Do not operate the electric air pump
longer than eight minutes without in-
terruption. Otherwise it may overheat.
You may operate the air pump again af-
ter it has cooled off.
��
Page 398 of 474
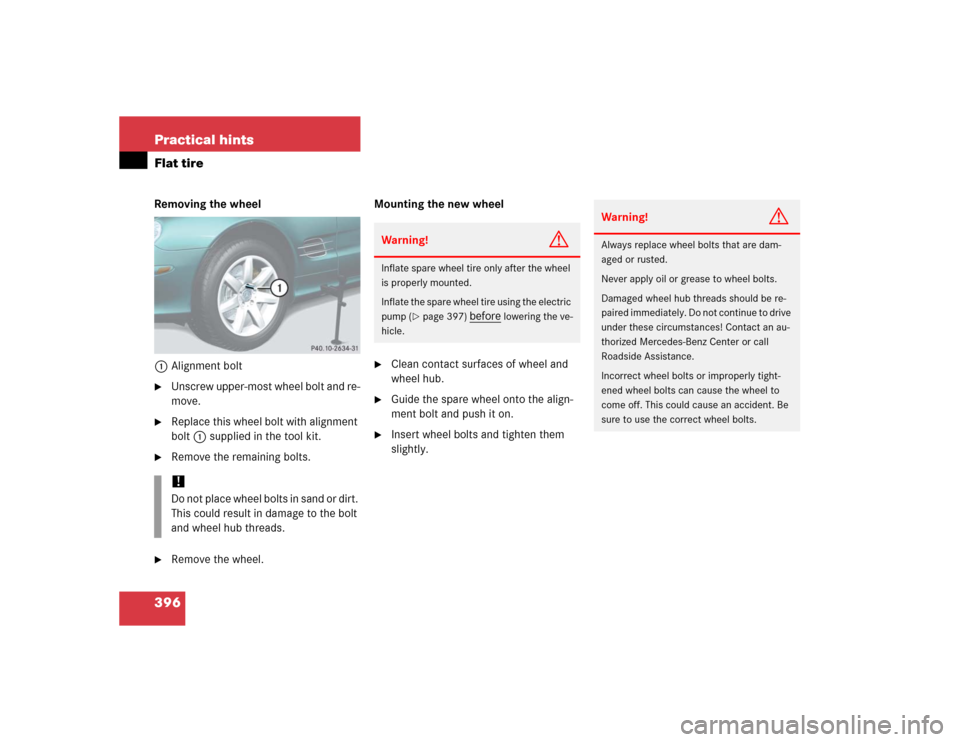
396 Practical hintsFlat tireRemoving the wheel
1Alignment bolt�
Unscrew upper-most wheel bolt and re-
move.
�
Replace this wheel bolt with alignment
bolt1 supplied in the tool kit.
�
Remove the remaining bolts.
�
Remove the wheel.Mounting the new wheel
�
Clean contact surfaces of wheel and
wheel hub.
�
Guide the spare wheel onto the align-
ment bolt and push it on.
�
Insert wheel bolts and tighten them
slightly.
!Do not place wheel bolts in sand or dirt.
This could result in damage to the bolt
and wheel hub threads.
Warning!
G
Inflate spare wheel tire only after the wheel
is properly mounted.
Inflate the spare wheel tire using the electric
pump (
�page 397)
before
lowering the ve-
hicle.
Warning!
G
Always replace wheel bolts that are dam-
aged or rusted.
Never apply oil or grease to wheel bolts.
Damaged wheel hub threads should be re-
paired immediately. Do not continue to drive
under these circumstances! Contact an au-
thorized Mercedes-Benz Center or call
Roadside Assistance.
Incorrect wheel bolts or improperly tight-
ened wheel bolts can cause the wheel to
come off. This could cause an accident. Be
sure to use the correct wheel bolts.