Page 201 of 474

199 Controls in detail
Retractable hardtop
Locking the retractable hardtop after
raising/lowering
If the retractable hardtop is not properly
locked, lock it as described below.Unlocked status noticed when stopped
�
Switch on ignition.
�
To lock the hardtop in its fully closed
position, press hardtop switch forward.
The message
+
Retractable roof Closed
ap-
pears in the multifunction display.
or:
�
To lock the hardtop in its fully opened
position, pull up on the hardtop switch.
The message K
Retractable roof
Open
appears in the multifunction dis-
play.Unlocked status noticed while driving
�
Stop the vehicle.
�
Leave the ignition switched on.
�
To lock the hardtop in its fully closed
position, press hardtop switch forward.
The message
+
Retractable roof Closed
ap-
pears in the multifunction display.
or:
�
To lock the hardtop in its fully opened
position, pull up on the hardtop switch.
The message K
Retractable roof
Open
appears in the multifunction dis-
play.
Warning!
G
The hardtop is not fully closed and locked or
not fully opened and locked if:�
the indicator light in the hardtop switch
remains lit
�
the message K
in operation
is
shown in the multifunction display and
the indicator lamp in the hardtop switch
does not go out
�
the indicator lamp flashes and a warning
sounds for 10 seconds and the message
K
Lock retractable roof
is
shown in the multifunction display when
starting to drive
Warning!
G
Stop the vehicle and lock the hardtop before
continuing to drive. You could otherwise en-
danger yourself and others.
Page 204 of 474

202 Controls in detailRetractable hardtopIndicator lamp in the retractable hard-
top switch lights when vehicle is
stopped
If the indicator lamp in the retractable
hardtop switch lights while the vehicle is
standing still and the switch was not acti-
vated, then the retractable hardtop is not
locked.�
Properly lock the retractable hardtop
(�page 199) before continuing to
drive.
The retractable hardtop will not lock
There is a malfunction in the retractable
hardtop system.
�
Notify an authorized Mercedes-Benz
Center.Wind screen
The wind screen deflects drafts away from
the driver and passenger when the hardtop
is lowered. It is stored in a separate stor-
age bag.
Installing
�
Leave the wind screen folded and place
it on the roll bar.1Guide tabs
�
Slide the wind screen into the roll bar
until the guide taps on each side latch
underneath the roll bar. Make sure the
fastening straps do not get caught.
�
Raise the roll bar slightly (
�page 73).
Warning!
G
The wind screen can restrict the driver’s vi-
sion to the rear of the vehicle. To prevent a
possible accident when visibility is limited
(e.g. in darkness), the upper part of the wind
screen should be folded back.
Page 205 of 474

203 Controls in detail
Retractable hardtop
2Buckle�
Guide the fastening straps around the
top of the roll bar and close buckles 2.
�
Tighten the fastening straps if neces-
sary.
�
Lower the roll bar.
�
Fold the upper section of the wind
screen up towards the head restraints
until it stops.Removing
�
Fold the upper section of the wind
screen back down.
�
Raise the roll bar slightly (
�page 73).
1Release button
�
Undo the buckles on the upper section
of the roll bar by pressing release
button1.
�
Lower the roll bar. Make sure the fas-
tening straps do not get caught.
�
Pull the wind screen out towards the
front of the vehicle. Be careful not to
damage interior trim with the guide
tabs.
�
Place the wind screen back into the
bag.
Sunshade for panorama roof*
The sunshade protects you from excessive
sunlight coming in through the panorama
roof.Warning!
G
Do not operate the sunshade while driving.
Adjusting the sunshade while driving could
cause the driver to lose control of the vehi-
cle.
Page 234 of 474

232 Controls in detailUseful featuresLuggage compartment in the rear
1Holder
2Strap
3Latch
4Release button
�
Pull strap2 out of holder1.
�
Secure the luggage with the strap so
that it cannot move.
�
Insert strap2 into latch3.
Releasing the strap
�
Press release button4 and guide
strap2 back to holder1.
Warning!
G
Secure all pieces of luggage in the rear with
the luggage straps. Unsecured pieces of lug-
gage can otherwise cause injury during a
braking maneuver and can increase the risk
of injury in an accident.
Never allow anyone to ride in the rear.
The luggage straps can only secure light lug-
gage items. Carry heavy pieces of luggage in
the trunk.
The rear compartment area is not designed
or intended to accommodate occupants. Se-
vere personal injury or death may be the re-
sult in an accident.
Warning!
G
The shelf below the rear window should not
be used to carry objects. This will avoid such
objects from being thrown about and injur-
ing vehicle occupants during an accident or
sudden maneuver.
The trunk is the preferred place to carry ob-
jects.
Page 235 of 474
233 Controls in detail
Useful features
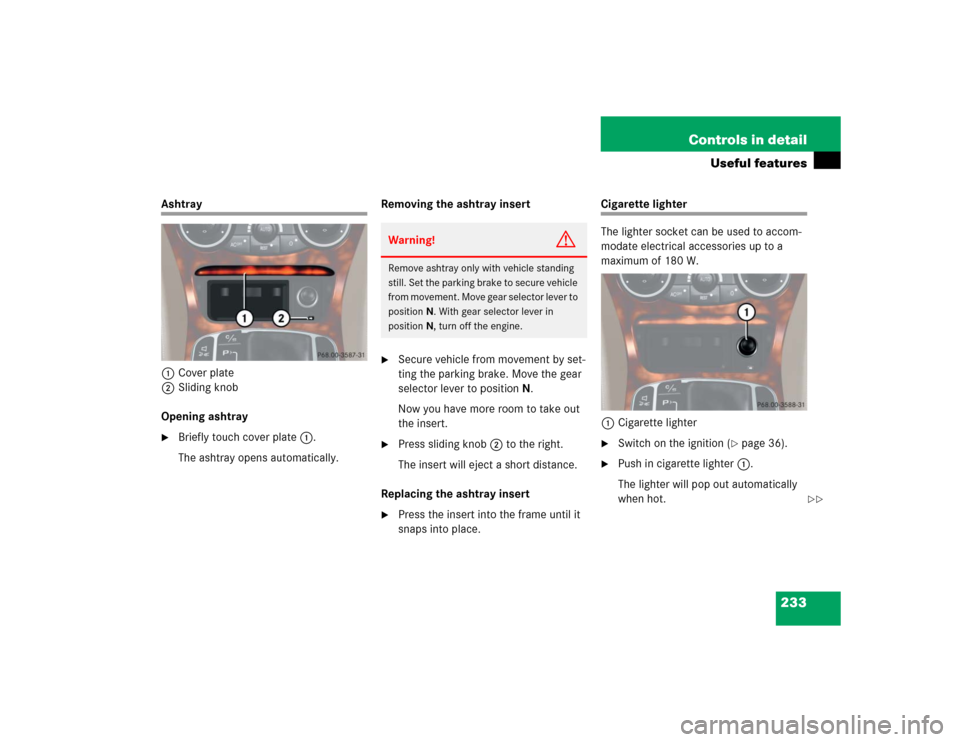
Ashtray
1Cover plate
2Sliding knob
Opening ashtray�
Briefly touch cover plate1.
The ashtray opens automatically.Removing the ashtray insert
�
Secure vehicle from movement by set-
ting the parking brake. Move the gear
selector lever to positionN.
Now you have more room to take out
the insert.
�
Press sliding knob2 to the right.
The insert will eject a short distance.
Replacing the ashtray insert
�
Press the insert into the frame until it
snaps into place.
Cigarette lighter
The lighter socket can be used to accom-
modate electrical accessories up to a
maximum of 180 W.
1Cigarette lighter�
Switch on the ignition (
�page 36).
�
Push in cigarette lighter1.
The lighter will pop out automatically
when hot.
Warning!
G
Remove ashtray only with vehicle standing
still. Set the parking brake to secure vehicle
from movement. Move gear selector lever to
positionN. With gear selector lever in
positionN, turn off the engine.
��
Page 236 of 474

The steering wheel heating warms up the
leather area of the steering wheel.
The lever is on the lower left-hand side of")
234 Controls in detailUseful features
Heated steering wheel* (SL 500, SL 600)
The steering wheel heating warms up the
leather area of the steering wheel.
The lever is on the lower left-hand side of
the steering wheel.
1Switching on
2Indicator lamp
3Switching offSwitching on
�
Switch on the ignition (
�page 36).
�
Turn switch at tip of stalk in the direc-
tion of arrow1.
The steering wheel is heated. Indicator
lamp2 comes on.
Switching off
�
Turn switch at tip of stalk in the direc-
tion of arrow3.
The steering wheel heating is turned
off. Indicator lamp2 goes out.
Warning!
G
Never touch the heating element or sides of
the lighter; they are extremely hot. Hold the
knob only.
When leaving the vehicle, always remove the
SmartKey or the SmartKey with
KEYLESS-GO* from the starter switch, take
it with you, and lock the vehicle. Do not
leave children unattended in the vehicle, or
with access to an unlocked vehicle. Unsu-
pervised use of vehicle equipment may
cause serious personal injury.
iThe steering wheel heating does not
turn off automatically.
��
Page 238 of 474
.
�
Flip up cover and insert electrical plug")
236 Controls in detailUseful featuresElectrical outlet
An electrical outlet is located on the right
side of the trunk.�
Switch on the ignition (
�page 36).
�
Flip up cover and insert electrical plug
(cigar lighter type).
Telephone*
Radio transmitters, such as a portable tele-
phone or a citizens band unit, should only
be used inside the vehicle if they are con-
nected to an antenna that is installed on
the outside of the vehicle.
The external antenna must be approved by
Mercedes-Benz. Please contact an autho-
rized Mercedes-Benz Center for informa-
tion on the installation of an approved
external antenna. Refer to the radio trans-
mitter operation instructions regarding use
of an external antenna.
iThe electrical outlet can be used to ac-
commodate electrical consumers (e.g.
air pump, auxiliary lamps) up to a max-
imum of 180 W.
Warning!
G
Never operate radio transmitters equipped
with a built-in or attached antenna (i.e. with-
out being connected to an external antenna)
from inside the vehicle while the engine is
running. Doing so could lead to a malfunc-
tion of the vehicle’s electronic system, pos-
sibly resulting in an accident and/or serious
personal injury.
Warning!
G
Please do not forget that your primary re-
sponsibility is to drive the vehicle. A driver’s
attention to the road must always be
his /her primary focus when driving. For
your safety and the safety of others, we rec-
ommend that you pull over to a safe location
and stop before placing or taking a tele-
phone call.
If you choose to use the telephone
1 while
driving, please use the hands-free device
and only use the telephone when road,
weather, and traffic conditions permit.
Some jurisdictions prohibit the driver from
using a cellular telephone while driving a ve-
hicle.
Only operate the COMAND (Cockpit Man-
agement and Data System)
1 if road, weath-
er, and traffic conditions permit.
1Observe all legal requirements
Page 265 of 474

263 Operation
Driving instructions
Road salts and chemicals can adversely af-
fect braking efficiency. Increased pedal
force may become necessary to produce
the normal brake effect.
Depressing the brake pedal periodically
when traveling at length on salt-strewn
roads can bring road-salt-impaired braking
efficiency back to normal.
If the vehicle is parked after being driven
on salt-treated roads, the braking efficien-
cy should be tested as soon as possible af-
ter driving is resumed.
For more information, see “Winter driving”
(
�page 309).
Standing water
Warning
G
Make sure not to endanger any other road
users when carrying out these braking ma-
neuvers.
Warning!
G
If the vehicle becomes stuck in snow, make
sure that snow is kept clear of the exhaust
pipe and from around the vehicle with the
engine running. Otherwise, deadly carbon
monoxide (CO) gases may enter vehicle in-
terior resulting in unconsciousness and
death.
To assure sufficient fresh air ventilation,
open a window slightly on the side of the ve-
hicle not facing the wind.Warning!
G
The outside temperature indicator is not de-
signed to serve as an Ice-Warning Device
and is therefore unsuitable for that purpose.
Indicated temperatures just above the freez-
ing point do not guarantee that the road sur-
face is free of ice.
!Do not drive through flooded areas or
water of unknown depth. Before driving
through water, determine its depth.
Never accelerate before driving into
water. The bow wave could force water
into the engine and auxiliary equip-
ment, thus damaging them.
If you must drive through standing wa-
ter, drive slowly to prevent water from
entering the passenger compartment
or the engine compartment. Water in
these areas could cause damage to
electrical components or wiring of the
engine or transmission, or could result
in water being ingested by the engine
through the air intake, causing severe
internal engine damage. Any such dam-
age is not covered by the
Mercedes-Benz Limited Warranty.