Page 150 of 474

148 Controls in detailControl systemInstrument cluster submenu
Access the
Inst. cluster
subenu via the
Settings
menu. Use the
Inst. cluster
submenu to change the instrument cluster
display settings. The following functions
are available:Selecting temperature display mode
�
Move the selection marker with button
æ or ç to the
Inst. cluster
submenu.
�
Press button j or k repeatedly
until you see this message in the left
display:
Temp. indicator
.
The selection marker is on the current
setting.
�
Press æ or ç to set temperature
unit to degrees Celsius (
°C) or degrees
Fahrenheit (
°F).Selecting speedometer display mode
�
Move the selection marker with button
æ or ç to the
Inst. cluster
submenu.
�
Press button j or k repeatedly
until you see this message in the left
display:
Digital speedometer
.
The selection marker is on the current
setting.
�
Press æ or ç to set the speed-
ometer units to
Kilometres
or
Miles
.
Function
Page
Selecting temperature display
mode
148
Selecting speedometer display
mode
148
Selecting language
149
Page 151 of 474

149 Controls in detail
Control system
Selecting language�
Move the selection marker with button
æ or ç to the
Inst. cluster
submenu.
�
Press button j or k repeatedly
until the message
Text
appears in the
multifunction display.
The selection marker is on the current
setting.
�
Press æ or ç to select the
language to be used for the
multifunction display messages. Available languages:
�
German
�
English
�
Italian
�
French
�
SpanishTime submenu
Access the
Time
submenu via the
Settings
menu. Use the
Time
submenu to change
the time and date settings. The following
functions are available:
Synchronizing time with head unit
�
Move the selection marker with the
æ or ç button to the
Time
submenu.
�
Press button j or k repeatedly
until the message
Time sync. with
head unit
appears in the multifunction
display.
The selection marker is on the current
setting.
Function
Page
Synchronizing time with head
unit
149
Setting the time (hours)
150
Setting the time (minutes)
151
Selecting time display mode
151
Page 152 of 474
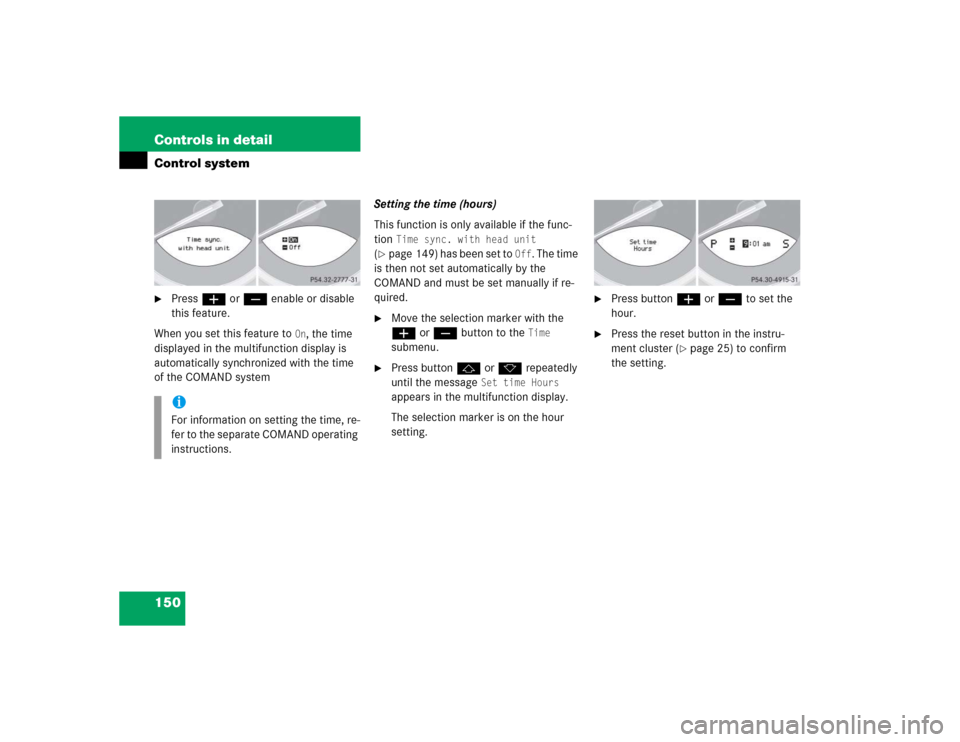
150 Controls in detailControl system�
Press æ or ç enable or disable
this feature.
When you set this feature to
On, the time
displayed in the multifunction display is
automatically synchronized with the time
of the COMAND systemSetting the time (hours)
This function is only available if the func-
tion
Time sync. with head unit
(
�page 149) has been set to
Off
. The time
is then not set automatically by the
COMAND and must be set manually if re-
quired.
�
Move the selection marker with the
æ or ç button to the
Time
submenu.
�
Press button j or k repeatedly
until the message
Set time Hours
appears in the multifunction display.
The selection marker is on the hour
setting.
�
Press button æ or ç to set the
hour.
�
Press the reset button in the instru-
ment cluster (
�page 25) to confirm
the setting.
iFor information on setting the time, re-
fer to the separate COMAND operating
instructions.
Page 153 of 474

This function is only available if the func-
tion
Time sync. with head unit
(
�page 149) has been set to
Off
. The time
is then no")
151 Controls in detail
Control system
Setting the time (minutes)
This function is only available if the func-
tion
Time sync. with head unit
(
�page 149) has been set to
Off
. The time
is then not set automatically by the
COMAND and must be set manually if re-
quired.
�
Move the selection marker with the
æ or ç button to the
Time
submenu.
�
Press button j or k repeatedly
until the message
Set time Minutes
appears in the multifunction display.
The selection marker is on the minute
setting.
�
Press button æ or ç to set the
hour.
�
Press the reset button in the instru-
ment cluster (
�page 25) to confirm
the setting.
Selecting time display mode
�
Move the selection marker with the
æ or ç button to the
Inst.
cluster
submenu.
�
Press button j or k repeatedly
until the message
Clock
appears in the
multifunction display.
The selection marker is on the current
setting.
�
Press æ or ç to set the
12-hour
or
24-hour
time display mode.
iFor information on setting the time, re-
fer to the separate COMAND operating
instructions.
Page 154 of 474

152 Controls in detailControl systemLighting submenu
Access the
Lighting
submenu via the
Settings
menu. Use the
Lighting
sub-
menu to change the lamp and lighting set-
tings on your vehicle. The following
functions are available:Setting daytime running lamp mode
(USA only)
�
Move the selection marker with button
æ or ç to the
Lighting
sub-
menu.
�
Press button j or k repeatedly
until you see
Light circuit Headlamp
mode
in the multifunction display.The selection marker is on the current
setting.
�
Press button æ or ç to select
manual operation (
Manual
) or daytime
running lamp mode (
Constant
).
With daytime running lamp mode activated
and the exterior lamp switch at
positionM or U the low beam head-
lamps are switched on when the engine is
running.
Function
Page
Setting daytime running lamp
mode (USA only)
152
Setting locator lighting
153
Setting night security illumina-
tion
154
Setting interior lighting delayed
switch-off
155
iThis function is not available in coun-
tries where the daytime running lamp
mode is mandatory and therefore in a
constant mode.
Page 155 of 474

153 Controls in detail
Control system
In low ambient light conditions the follow-
ing lamps will switch on additionally:�
Parking lamps
�
Tail lamps
�
License plate lamps
�
Side marker lampsSetting locator lighting
With the locator lighting feature activated
and the exterior lamp switch in position
U, the following lamps will switch on
when the vehicle is unlocked with the
SmartKey during darkness:
�
Parking lamps
�
Tail lamps
�
License plate lamps
�
Front fog lamps
The locator lighting switches off when the
driver’s door is opened.
If you do not open a door after unlocking
the vehicle with the SmartKey, the lamps
will switch off automatically after approxi-
mately 40 seconds.
�
Move the selection marker with button
æ or ç to the
Lighting
sub-
menu
�
Press button j or k repeatedly
until you see
Locator lighting
in the
multifunction display.
The selection marker is on the current
setting.
�
Press button æ or ç to switch
the locator lighting feature to
On.
�
Turn the exterior lamp switch to posi-
tion U when exeting the vehicle.
The locator lighting feature is
activated.
iFor safety reasons, resetting the Lighting
submenu to factory settings
while driving (
�page 146) will not de-
activate the daytime running lamp
mode.
The message following message ap-
pears in the multifunction display:
Cannot be fully reset to factory
settings when driving
.
Page 156 of 474

Use this function to set whether and for
how long you would like the exterior lamps
to il")
154 Controls in detailControl systemSetting night security illumination
(Exterior lamps delayed switch-off)
Use this function to set whether and for
how long you would like the exterior lamps
to illuminate during darkness after exiting
the vehicle and the doors closed. With the
delayed switch-off feature activated and
the exterior lamp switch in position U
before the engine is turned off, the follow-
ing lamps will switch on after you have
removed the SmartKey from the starter
switch: �
Parking lamps
�
Tail lamps
�
License plate lamps
�
Side marker lamps
�
Front fog lampsIf you do not open a door after removing
the SmartKey from the starter switch, the
lamps will switch off automatically after
approximately 60 seconds.
�
Move the selection marker with button
æ or ç to the
Lighting
sub-
menu.
�
Press button j or k repeatedly
until you see
Headlamps delayed
switch-off in the multifunction dis-
play.
The selection marker is on the current
setting.
�
Press button æ or ç to select
the desired lamp-on period. �
0 s
, the delayed switch-off feature
is deactivated.
�
15 s
, 30 s
, 45 s
or
60 s
, select the
desired lamp-on period.
�
Turn the exterior lamp switch to posi-
tion U before turning off the engine
(�page 48).
iYou can reactivate this function within
ten minutes by opening a door.
Page 157 of 474

155 Controls in detail
Control system
You can temporarily deactivate the de-
layed switch-off feature:�
Before exiting the vehicle turn the
SmartKey in the starter switch to
position0.
�
Then turn it to position2 and back
to0.
The delayed switch-off feature is deac-
tivated. It will reactivate as soon as you
reinsert the SmartKey in the starter
switch.Interior lighting delayed switch-off
Use this function to set whether and for
how long you would like the interior light-
ing to remain lit during darkness after you
have removed the SmartKey from the
starter switch.
�
Move the selection marker with button
æ or ç to the
Lighting
sub-
menu.
�
Press button j or k repeatedly
until you see
Int. lighting delayed
switch-off in the multifunction dis-
play.
The selection marker is on the current
setting.
�
Press æ or ç to select the de-
sired lamp-on time period.
You can select:�
0 s
, the interior lighting delayed
switch-off feature is deactivated.
�
5 s
, 10 s
, 15 s
or
20 s
, the interior
lighting delayed switch-off feature
is activated with the desired
lamp-on period.