Page 137 of 474
135 Controls in detail
Lighting
Combination switch
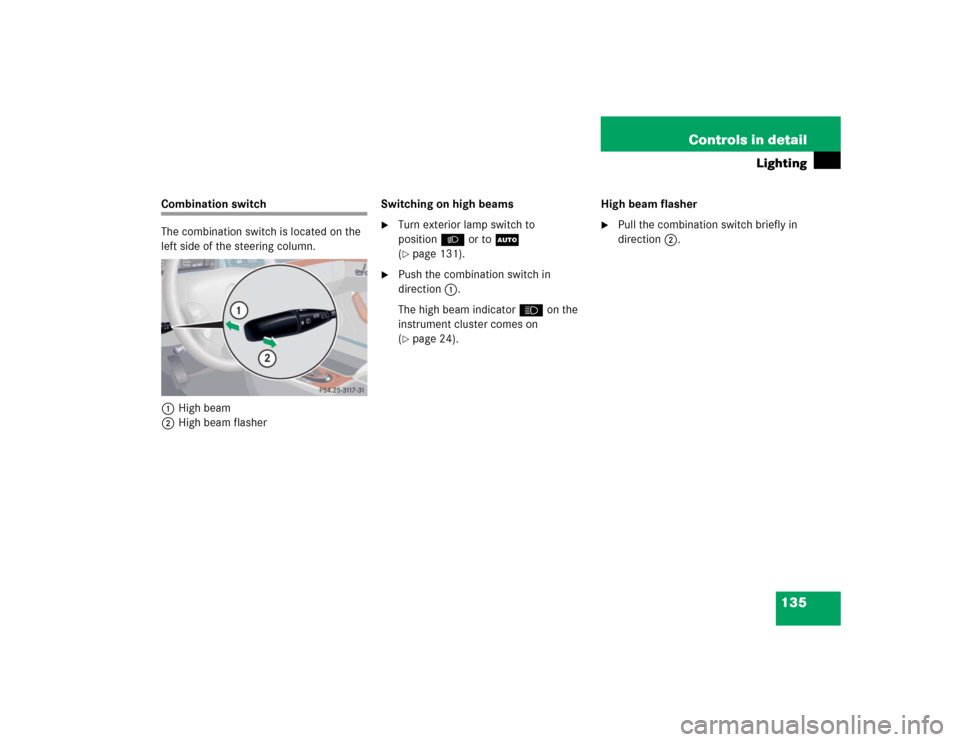
The combination switch is located on the
left side of the steering column.
1High beam
2High beam flasherSwitching on high beams
�
Turn exterior lamp switch to
positionB or toU
(�page 131).
�
Push the combination switch in
direction1.
The high beam indicatorA on the
instrument cluster comes on
(�page 24).High beam flasher
�
Pull the combination switch briefly in
direction2.
Page 143 of 474
,
i.e. cl")
141 Controls in detail
Instrument cluster
Coolant temperature gauge
During severe operating conditions,
e.g. stop-and-go traffic, the coolant tem-
perature may rise close to 248°F (120°C),
i.e. close to the red zone of the tempera-
ture gauge.
The engine should not be operated with
the coolant temperature above 248°F
(120°C), i.e. in the red zone of the coolant
temperature gauge. Doing so may cause
serious engine damage which is not cov-
ered by the Mercedes-Benz Limited War-
ranty.
Trip odometer�
Make sure you are viewing the trip
odometer display.
�
If it is not displayed, press the è or
ÿ button on the multifunction
steering wheel repeatedly until the trip
odometer appears (
�page 143).
�
Press and hold reset buttonJ
(�page 140) until the trip odometer is
reset.
Warning!
G
�
Driving when your engine is badly over-
heated can cause some fluids which
may have leaked into the engine com-
partment to catch fire. You could be se-
riously burned.
�
Steam from an overheated engine can
cause serious burns and can occur just
by opening the hood. Stay away from
the engine if you see or hear steam com-
ing from it.
Turn off the engine, get out of the vehicle
and do not stand near the vehicle until the
engine has cooled down.
iExcessive coolant temperature triggers
a warning in the multifunction display
(�page 359).
Page 145 of 474

143 Controls in detail
Control system
�Control system
The control system is activated as soon as
the SmartKey in the starter switch is
turned to position1 or as soon as the
KEYLESS-GO* start/stop button
(�page 35) is in position1. The control
system enables you to:
�
call up information about your vehicle
�
change vehicle settings
For example, you can use the control sys-
tem to find out when your vehicle is next
due for service, to set the language for
messages in the instrument cluster dis-
play, and much more.
The control system relays information to
the multifunction display.
Multifunction display
1Trip odometer
2Main odometer
iThe displays for the audio systems (ra-
dio, CD player) will appear in English,
regardless of the language selected.
Warning!
G
A driver’s attention to the road and traffic
conditions must always be his/her primary
focus when driving.
For your safety and the safety of others, se-
lecting features through the multifunction
steering wheel should only be done by the
driver when traffic and road conditions per-
mit it to be done safely.
Bear in mind that at a speed of just 30 mph
(approximately 50 km/h), your vehicle is
covering a distance of 44 feet (approximate-
ly 14 m) every second.
Page 146 of 474
144 Controls in detailControl systemMultifunction steering wheel
The displays in the multifunction display
and the settings in the control system are
controlled using the buttons on the multi-
function steering wheel.
1
Multifunction display in the speed-
ometerOperating the control system
2
Selecting the submenu or setting
the volumeæ
up/to increase
ç
down/to decrease
3
Telephone*s
to take a call
t
to end a call
4
Menu systemsè
for next menu
ÿ
for previous menu
5
Moving within a menuj
for next display
k
for previous display
Page 147 of 474

145 Controls in detail
Control system
Pressing any of the buttons on the multi-
function steering wheel will alter what is
shown in the multifunction display.
The information available in the multifunc-
tion display is arranged in menus, each
containing a number of functions or sub-
menus.
The individual functions are then found
within the relevant menu (radio or CD op-
erations under
AUDIO
, for example). These
functions serve to call up relevant informa-
tion or to customize the settings for your
vehicle.It is helpful to think of the menus, and the
functions within each menu, as being ar-
ranged in a circular pattern.
�
If you press buttonè orÿ
repeatedly, you will pass through each
menu one after the other.
�
If you press buttonk orj
repeatedly, you will pass through each
function display, one after the other, in
the current menu.In the
SETTINGS
menu, instead of functions
you will find a number of submenus for
calling up and changing settings. For in-
structions on using these submenus, see
“Settings menu” (�page 160).
The number of menus available in the sys-
tem depends on which optional equipment
is installed in your vehicle.
The menus are described on the following
pages.
Page 155 of 474

153 Controls in detail
Control system
TEL menu*
You can use the functions in the
TEL
menu
to operate your telephone, provided it is
connected to a hands-free system and
switched on.
�
Switch on the telephone and COMAND.
�
Press buttonÿ orè on the
steering wheel repeatedly until you see
the
TEL
menu in the multifunction dis-
play.Which messages will appear in the multi-
function display field depends on whether
your telephone is switched on or off:
�
If the telephone is off, the message in
the multifunction display is:
TEL OFF
.
�
If the telephone is on:
The telephone will then search for a
network. During this time the multi-
function display reads
NO SERVICE
.
As soon as the telephone has found a
network,
READY
is indicated in the mul-
tifunction display.
The standby message indicates that your
telephone is ready for use and you can op-
erate it using the control system.
Warning!
G
A driver’s attention to the road must always
be his/her primary focus when driving. For
your safety and the safety of others, we rec-
ommend that you pull over to a safe location
and stop before placing or taking a tele-
phone call. If you choose to use the tele-
phone while driving, please use the
hands-free device and only use the tele-
phone when weather, road and traffic condi-
tions permit.
Some jurisdictions prohibit the driver from
using a cellular telephone while driving a ve-
hicle.
Bear in mind that at a speed of just 30 mph
(approximately 50 km/h), your vehicle is
covering a distance of 44 feet (approximate-
ly 14 m) every second.
Never operate radio transmitters equipped
with a built-in or attached antenna (i.e. with-
out being connected to an external antenna)
from inside the vehicle while the engine is
running. Doing so could lead to a malfunc-
tion of the vehicle’s electronic system, pos-
sibly resulting in an accident and/or
personal injury.
Page 171 of 474

169 Controls in detail
Control system
Limiting opening height of trunk lid*
This function is available in vehicles with
the trunk lid opening/closing system*.
Use this function to activate or deactivate
the limiting opening height of trunk lid.�
Move the selection marker with
theæ orç button to
VEHICLE
submenu.
�
Press buttonj ork repeatedly
until you see this message in the multi-
function display:OPENING LIMITER
TRUNK LIDThe selection marker is on the current
setting.
�
Press buttonæ orç to switch
the opening limiter for trunk lid
ON
or
OFF
.Convenience submenu
Access the
CONVENIENCE
submenu via the
SETTINGS
menu. Use the
CONVENIENCE
sub-
menu to change the settings for a number
of convenience features. The following
functions are available:Setting key-dependency
Use this function to set whether the mem-
ory settings for the seats, the steering
wheel, the mirrors, and the automatic cli-
mate control should be stored separately
for each SmartKey (
�page 128).
�
Move the selection marker with
theæ orç button to
the
CONVENIENCE
submenu.
�
Press buttonj ork repeatedly
until you see this message in the multi-
function display:
SETTINGS KEY-DEPEN-
DENT
.
The selection marker is on the current
setting.
�
Pressæ orç to set key-depen-
dency to
ON or
OFF
.
Function
Page
Setting key-dependency
169
Activating easy-entry/exit fea-
ture
169
Setting parking position for exte-
rior rear view mirror
171
Setting fold-in function for exteri-
or rear view mirrors
171
Adjusting the drive-dynamic seat
172
Page 172 of 474
.
�
Move the selection marker with
theæ")
170 Controls in detailControl systemActivating easy-entry/exit feature
Use this function to activate and deacti-
vate the easy-entry/exit feature
(�page 114).
�
Move the selection marker with
theæ orç button to
the
CONVENIENCE
submenu.
�
Press buttonj ork repeatedly
until you see this message in the multi-
function display:
EASY-ENTRY FEATURE
ACTIVATE
.
The selection marker is on the current
setting.
�
Pressæ orç to change the
easy-entry/exit setting.
The following settings are available for the
easy-entry/exit feature:
Warning!
G
You must make sure no one can become
trapped or injured by the moving steering
wheel and driver’s seat when the easy-en-
try/exit feature is activated.
To cancel seat/steering wheel movement,
do one of the following:�
Press seat adjustment switch
(�page 38).
�
Move steering column stalk
(�page 40).
�
Press the one of the memory position
buttons or the memory button M
(�page 129).
Do not leave children unattended in the ve-
hicle, or with access to an unlocked vehicle.
Children could open the driver’s door and
unintentionally activate the easy-entry/exit
feature, which could result in an accident
and/or serious personal injury.
OFF
The easy-entry/exit fea-
ture is deactivated.
STEER. COL
Only the steering column
is moved.
ST.COL+SEAT
Both the steering column
and the driver’s seat are
moved.