Page 395 of 474

393 Practical hints
Replacing bulbs
Halogen headlamp�
Press the tab on cover3 and remove
cover.
�
Pull connector7 off of the lamp.
�
Release the retaining springs and take
out the bulb.
�
Insert the new bulb in the socket so
that the base is in the recess on the
lower left.
�
Attach the retaining springs.
�
Insert connector7 into the bulb.
�
Press cover3 onto the housing until
the tab engages.Replacing halogen high beam bulbs
�
Press the tab on cover2 and remove
cover.
�
Pull connector 6 off of the bulb.
�
Apply pressure on the bulb contacts
from above until the bulb releases from
the retaining springs.
�
Remove bulb.
�
Insert the new bulb in the socket with
the marking facing upward.
�
Press the bulb upward on the contacts
until it engages in the retaining springs.
�
Insert connector6 onto the bulb.
�
Press cover2 onto the housing until
the tab engages.Front turn signal lamp bulb
�
Turn bulb socket8 counterclockwise
and pull out.
�
Gently push bulb into socket, turn
counterclockwise and remove.
�
Insert new bulb in socket, push in and
twist clockwise.
�
Reinstall bulb socket in lamp and twist
clockwise until it engages.
Page 396 of 474
394 Practical hintsReplacing bulbsParking and standing lamp bulb�
Press the tab on cover2 and remove
cover.
�
Pull out the bulb socket5 with the
bulb.
�
Pull the bulb out of the bulb socket5.
�
Insert a new bulb in the bulb socket5.
�
Reinstall the bulb socket5.
�
Press cover2 onto the housing until
the tab engages.Side marker lamp bulb
�
Carefully slide lamp towards rear.
�
Remove front end first.
�
Twist bulb socket counterclockwise
and pull out.
�
Pull bulb out of the bulb socket.
�
Insert new bulb in socket.
�
Reinstall bulb socket, push in and twist
clockwise.
�
To reinstall lamp, set rear end in
bumper and let front end snap into
place.
Replacing bulbs for rear lamps
Before you start to replace a bulb for a rear
lamp, do the following first:�
Turn the exterior lamp switch to M
(�page 50).
�
Open the trunk (
�page 103).
Page 397 of 474
395 Practical hints
Replacing bulbs
Tail lamp unit
1Black socket:
Backup lamp
2White socket:
Turn signal lamp
3Red socket:
Tail, standing and parking lamp
4Red socket:
Driver’s side: tail, parking and rear fog
lamp
Passenger’s side: tail and parking lamp
�
Turn the catch, and move the trim to
the side.
�
Turn bulb socket counterclockwise and
pull out.
�
Gently twist bulb counterclockwise and
pull out of bulb holder.
�
Insert new bulb into the holder and turn
it clockwise.
�
Reinstall bulb socket.
The bulb socket should audibly click.
�
Replace trim and secure with lock. License plate lamp
1Screws
�
Loosen both screws1.
�
Remove the license plate lamp.
�
Replace the bulb.
�
Reinstall the license plate lamp.
�
Retighten screws1.
Page 399 of 474
397 Practical hints
Replacing wiper blades
Installing wiper blades�
Slide the wiper blade onto wiper arm
until it locks in place
�
Rotate the wiper blade into position
parallel to wiper arm.
�
Fold the wiper arm backward to rest on
the windshield. Make sure you hold
onto the wiper when folding the wiper
arm back.
!Never open the hood when the wiper
arm is folded forward.
Hold on to the wiper when folding the
wiper arm back. If released, the force
of the impact from the tensioning
spring could crack the windshield.
Do not allow the wiper arms to contact
the windshield glass without a wiper
blade inserted.
Make certain that the wiper blades are
properly installed. Improperly installed
wiper blades may cause windshield
damage.
For your convenience, we recommend
that you have this work carried out by
an authorized Mercedes-Benz Center.
Page 401 of 474
.
Lifting the vehicle
�
Prevent the")
399 Practical hints
Flat tire
Preparing the vehicle�
Take vehicle tool kit tray and vehicle
jack out of trunk.
�
Take the spare wheel out of wheel well
(�page 379).
Lifting the vehicle
�
Prevent the vehicle from rolling away
by blocking wheels with wheel chocks
(not included) or other sizable objects.
When changing wheel on a level surface:
�
Place one chock in front of and one be-
hind the wheel that is diagonally oppo-
site to the wheel being changed.
When changing wheel on a hill:
�
Place chocks behind the downhill sides
of both wheels of the axle not being
worked on.
�
Take the two-piece wheel wrench out
of the vehicle tool kit tray. Assemble
wheel wrench.
�
On wheel to be changed, loosen but do
not yet remove the wheel bolts (ap-
proximately one full turn with wrench).
The tube openings are located directly be-
hind the front wheel housings and in front
of the rear wheel housings.
The dimensions of the spare wheel are dif-
ferent from those of the road wheels. As a
result, the vehicle handling characteristics
change when driving with a mounted spare
wheel. Adapt your driving style accordingly.
Warning!
G
The jack is designed exclusively for jacking
up the vehicle at the jack tubes built both
sides of the vehicle. To help avoid personal
injury, use the jack only to lift the vehicle
during a wheel change. Never get beneath
the vehicle while it is supported by the jack.
Keep hands and feet away from the area un-
der the lifted vehicle. Always firmly set park-
ing brake and block wheels before raising
vehicle with jack.
Do not disengage parking brake while the
vehicle is raised. Be certain that the jack is
always vertical (plumb line) when in use, es-
pecially on hills. Always try to use the jack
on level surface. Make sure the jack arm is
fully inserted in the jack tube. Always lower
the vehicle onto sufficient capacity jack-
stands before working under the vehicle.
Page 402 of 474
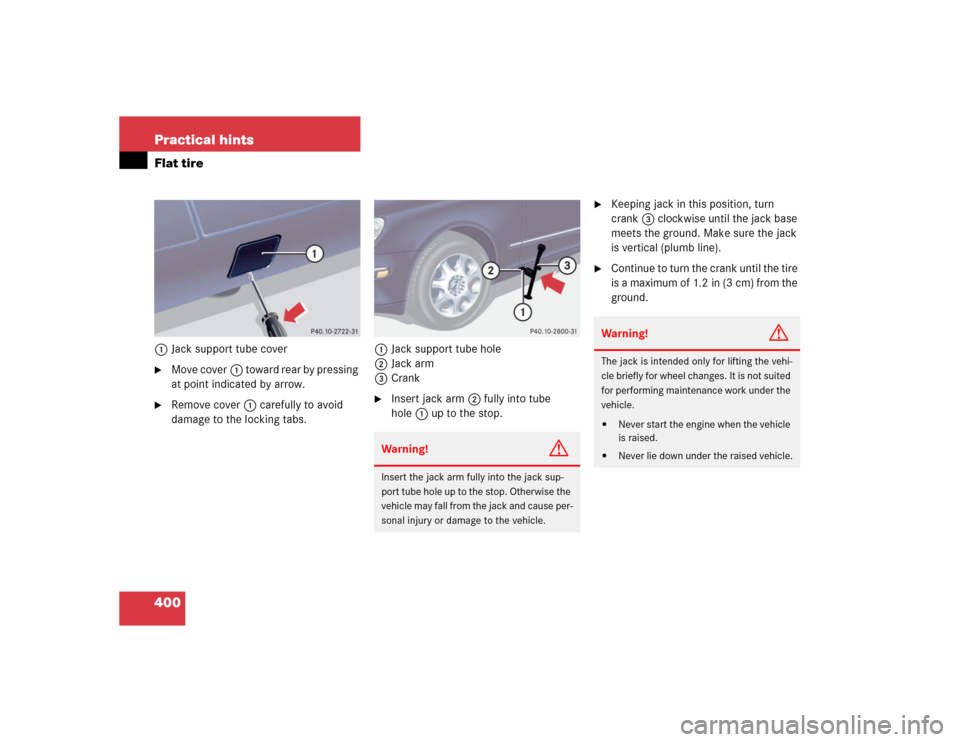
400 Practical hintsFlat tire1Jack support tube cover�
Move cover1 toward rear by pressing
at point indicated by arrow.
�
Remove cover1 carefully to avoid
damage to the locking tabs.1Jack support tube hole
2Jack arm
3Crank
�
Insert jack arm2 fully into tube
hole1 up to the stop.
�
Keeping jack in this position, turn
crank3 clockwise until the jack base
meets the ground. Make sure the jack
is vertical (plumb line).
�
Continue to turn the crank until the tire
is a maximum of 1.2 in (3 cm) from the
ground.
Warning!
G
Insert the jack arm fully into the jack sup-
port tube hole up to the stop. Otherwise the
vehicle may fall from the jack and cause per-
sonal injury or damage to the vehicle.
Warning!
G
The jack is intended only for lifting the vehi-
cle briefly for wheel changes. It is not suited
for performing maintenance work under the
vehicle.�
Never start the engine when the vehicle
is raised.
�
Never lie down under the raised vehicle.
Page 404 of 474

402 Practical hintsFlat tireLowering the vehicle�
Lower vehicle by turning crank coun-
terclockwise until vehicle is resting ful-
ly on its own weight.
�
Remove the jack.
1 - 5 Wheel bolts
�
Tighten the five wheel bolts evenly, fol-
lowing the diagonal sequence illustrat-
ed (1 to 5), until all bolts are tight.
Observe a tightening torque of
110 lb-ft (150 Nm).
�
Before storing the jack in the trunk, it
should be fully collapsed, with handle
folded in.
�
Place the wheel bolt wrench, alignment
bolt and jack back in the vehicle tool kit
in the trunk and close the covering lid.Replacing jack support tube cover
�
Slide tongue of cover under the upper
edge of the tube opening.
�
Applying even pressure, press cover
until it snaps into place. Be careful not
to damage the locking tabs or clamp
the plastic retaining strap.
Warning!
G
Have the tightening torque checked after
changing a wheel. The wheels could come
loose if they are not tightened to a torque of
110 lb-ft (150 Nm).
!You can also screw the faulty wheel
down into the spare wheel well in the
trunk.
Do not activate the tire inflation pres-
sure monitor* until the depressurized
tire is no longer in the vehicle.
Page 405 of 474

403 Practical hints
Battery
�Battery
The battery is located on the right side of
the trunk under the battery cover.
1Battery cover
Warning!
G
Failure to follow these instructions can re-
sult in severe injury or death.
Never lean over batteries while connecting,
you might get injured.
Battery fluid contains sulfuric acid. Do not
allow this fluid to come in contact with eyes,
skin or clothing. In case it does, immediately
flush affected area with water and seek
medical help if necessary.
A battery will also produce hydrogen gas,
which is flammable and explosive. Keep
flames or sparks away from battery, avoid
improper connection of jumper cables,
smoking, etc.
Warning!
G
Do not place metal objects on the battery as
this could result in a short circuit.
Use leak-proof battery only to avoid the risk
of acid burns in the event of an accident.!Never loosen or detach battery termi-
nal clamps while the engine is running
or the SmartKey is in the starter switch.
Otherwise the alternator and other
electronic components could be se-
verely damaged.
Have the battery checked regularly by
an authorized Mercedes-Benz Center.
Refer to Maintenance Booklet for main-
tenance intervals or contact an autho-
rized Mercedes-Benz Center for further
information.
Warning!
G
With a disconnected battery�
you will no longer be able to turn the
SmartKey in the starter switch and
pressing the KEYLESS-GO* start/stop
button (
�page 35) on the gear selector
lever will have no effect
�
the gear selector lever will remain
locked in positionP