Page 333 of 474

331 Operation
Vehicle care
We have selected car-care products and
compiled recommendations which are
specially matched to our vehicles and
which always reflect the latest technology.
You can obtain Mercedes-Benz approved
car-care products at an authorized
Mercedes-Benz Center.
Scratches, corrosive deposits, corrosion or
damage due to negligent or incorrect care
cannot always be removed or repaired with
the car-care products recommended here.
In such cases it is best to seek aid at an au-
thorized Mercedes-Benz Center.
The following topics deal with the cleaning
and care of your vehicle and give important
“how-to” information as well as references
to Mercedes-Benz approved car-care prod-
ucts.Power-wash
When using a power-wash for cleaning the
vehicle, always observe the manufactur-
er’s operating instructions.Tar stains
Quickly remove tar stains before they dry
and become more difficult to remove. A tar
remover is recommended.
Paintwork, painted body components
Mercedes-Benz approved Paint Care
should be applied when water drops on the
paint surface do not “bead up”, normally
every three to five months, depending on
climate and washing detergent used.
Mercedes-Benz approved Paint Cleaner
should be applied if the paint surface
shows signs of embedded dirt (i.e. loss of
gloss).
Do not apply any of these products or wax
if your vehicle is parked in the sun or if the
hood is still hot.
Use the appropriate MB-Touch-Up Stick
for quick and provisional repairs of minor
paint damage (i.e. chips from stones, vehi-
cle doors, etc.).
iVehicles with KEYLESS-GO*:
If a door handle is hit by a strong jet of
water, and a SmartKey with
KEYLESS-GO* is in close proximity, i.e.
within approx. 3 ft. (approx. 1 m), the
vehicle could be inadvertently locked
or unlocked. !Never use a round nozzle to
power-wash tires. The intense jet of
water can result in damage to the tire.
Always replace a damaged tire.
Always keep the jet of water moving
across the surface. Do not aim directly
at electrical parts, electrical connec-
tors, seals, or other rubber parts.
Page 334 of 474

332 OperationVehicle careEngine cleaning
Prior to cleaning the engine compartment
make sure to protect electrical compo-
nents and connectors from the intrusion of
water and cleaning agents.
Corrosion protection, such as MB Anticor-
rosion Wax should be applied to the engine
compartment after every engine cleaning.
Before applying, all control linkage bush-
ings and joints should be lubricated. The
poly-V-belt and all pulleys should be pro-
tected from any wax.
Vehicle washing
Do not use hot water or wash your vehicle
in direct sunlight. Only use a mild car wash
detergent, such as Mercedes-Benz ap-
proved Car Shampoo.
Thoroughly spray the vehicle with a dif-
fused jet of water. Direct only a very weak
spray towards the ventilation intake. Use
plenty of water and rinse the sponge and
chamois frequently. Rinse with clear water and thoroughly dry
with a chamois. Do not allow cleaning
agents to dry on the finish.
Due to the width of the vehicle, fold in ex-
terior rear view mirrors prior to running the
vehicle through an automatic car wash to
prevent damage to the mirrors.
In the winter, thoroughly remove all traces
of road salt as soon as possible.
When washing the underbody, do not for-
get to clean the inner sides of the wheels.Ornamental moldings
For regular cleaning and care of very dirty
chrome-plated parts, use a chrome clean-
er.
Headlamps, tail lamps, side markers,
turn signal lenses
�
Use a mild car wash detergent, such as
Mercedes-Benz approved Car Sham-
poo, with plenty of water.
To prevent scratches, never apply strong
force and use only a soft, non-scratchy
cloth when cleaning the lenses. Do not at-
tempt to wipe dirty lenses with a dry cloth
or sponge.
iVehicles with KEYLESS-GO*:
If a door handle is hit by a strong jet of
water, and a SmartKey with
KEYLESS-GO* is in close proximity, i.e.
within approx. 3 ft. (approx. 1 m), the
vehicle could be inadvertently locked
or unlocked.
Page 339 of 474
337 Practical hints
What to do if …?
Where will I find ...?
Unlocking/locking in an emergency
Opening/closing in an emergency
Replacing SmartKey batteries
Replacing bulbs
Replacing wiper blades
Flat tire
Battery
Jump starting
Towing the vehicle
Fuses
Page 340 of 474

338 Practical hintsWhat to do if …?Lamps in instrument cluster
General information:If any of the following lamps in the instru-
ment cluster fails to come on during the
bulb self-check when switching on theignition, have the respective bulb checked
and replaced if necessary.Problem
Possible cause
Suggested solution
-
The yellow ABS malfunction in-
dicator lamp comes on while
driving.
The ABS has detected a malfunction and
has switched off. The BAS and the ESP are
also switched off (see messages in multi-
function display).
The brake system is still functioning nor-
mally but without the ABS available.
If the ABS control unit is malfunctioning,
other systems such as Parktronic*,
Distronic*, and the automatic transmission
may also be malfunctioning.
�
Continue driving with added caution.
Wheels may lock during hard braking,
reducing steering capability.
�
Read and observe messages in the mul-
tifunction display (
�page 347).
�
Have the system checked at an autho-
rized Mercedes-Benz Center as soon as
possible.
Failure to follow these instructions increas-
es the risk of an accident.
The charging voltage has fallen below
10 volts and the ABS has switched off.
The battery may not be charged sufficiently.
�
Switch off electrical consumers that are
currently not needed, e.g. seat heat-
ing*.
�
If necessary, have the generator
(alternator) and battery checked.
When the voltage is above this value again,
the ABS is operational again.
Page 352 of 474

350 Practical hintsWhat to do if …?Display
Possible cause
Possible solution
ABC
ACTIVE BODY CONTROL
VISIT WORKSHOP
The capability of the ABC system is restrict-
ed.
�
Do not exceed a speed of 50 mph (80 km/h).
�
Visit an authorized Mercedes-Benz center as
soon as possible.
ABS
MALFUNCTION
VISIT WORKSHOP
The ABS has detected a malfunction and
has switched off. The ESP and the BAS are
also deactivated.
The brake system is still functioning nor-
mally but without the ABS available.
�
Continue driving with added caution. Wheels
may lock during hard braking, reducing steer-
ing capability.
�
Have the system checked at an authorized
Mercedes-Benz Center as soon as possible.
Failure to follow these instructions increases the
risk of an accident.
DISPLAY DEFECTIVE
VISIT WORKSHOP
The ABS or the ABS display is malfunction-
ing.
�
Continue driving with added caution. Wheels
may lock during hard braking, reducing steer-
ing capability.
�
Have the system checked at an authorized
Mercedes-Benz Center as soon as possible.
Failure to follow these instructions increases the
risk of an accident.
AIR CLEANER
CHANGE CARTRIDGE
VISIT WORKSHOP
The air filter is clogged.
�
Have the air filter checked by an authorized
Mercedes-Benz Center.
Page 366 of 474

364 Practical hintsWhat to do if …?Display
Possible cause
Possible solution
_
ENTRY POSITION
DO NOT DRIVE
Seat, exterior mirrors and steering wheel
have not yet moved to their preset driving
positions.
�
Wait until the seat, exterior mirrors and
steering wheel have moved to their driv-
ing positions.
The message will disappear.
Y
HOOD OPEN!
You are driving with the hood open.
�
Close the hood (
�page 287).
I
REMOVE KEY!
You have forgotten to remove the
SmartKey.
�
Remove the SmartKey from the ignition.
REPLACE KEY!
DRIVE TO WORKSHOP
The SmartKey is malfunctioning.
�
Visit an authorized Mercedes-Benz Cen-
ter as soon as possible.
AUTOMATIC LIGHT ON
REMOVE KEY!
SmartKey in starter switch position 1
or2.
�
Remove the SmartKey from the starter
switch.
KEY
CHECK BATTERY
The battery in the KEYLESS-GO* key is
discharged.
�
Replace the battery (
�page 387).
KEY
NOT RECOGNIZED
SmartKey with KEYLESS-GO* is not rec-
ognized while the engine is running be-
cause�
the SmartKey is not in the vehicle
�
there is strong radio-frequency inter-
ference
�
Stop the vehicle as soon as it is safe to do
so.
�
Search for the SmartKey.
Otherwise the vehicle cannot be centrally
locked nor can the engine be started again
after it has been stopped.
Page 367 of 474

365 Practical hints
What to do if …?
Display
Possible cause
Possible solution
F
KEY
NOT RECOGNIZED
The SmartKey with KEYLESS-GO* is mo-
mentarily not recognized.
�
Change the position of the SmartKey with
KEYLESS-GO* in the vehicle.
�
Operate the vehicle with the SmartKey in
the starter switch if necessary.
KEY
STILL IN VEHICLE
A SmartKey with KEYLESS-GO* left in the
vehicle was recognized while locking the
vehicle from the outside.
�
Take the SmartKey with KEYLESS-GO*
out of the vehicle.
KEY
DRIVE TO WORKSHOP
The KEYLESS-GO* system is malfunction-
ing.
�
Visit an authorized Mercedes-Benz Cen-
ter as soon as possible.
.
3RD BRAKE LIGHT
CHECK LIGHT
The high mounted brake lamp is malfunc-
tioning.
�
Visit an authorized Mercedes-Benz Cen-
ter as soon as possible.
STOP LIGHT
VISIT WORKSHOP
Brake lamp illumination is delayed or
lamp is permanently on.
�
Visit an authorized Mercedes-Benz Cen-
ter as soon as possible.
BRAKE LIGHT LEFT
CHECK LIGHT
SUBSTITUTE LAMP ON!
The left brake lamp is malfunctioning. A
substitute bulb is being used.
�
Visit an authorized Mercedes-Benz Cen-
ter as soon as possible.
BRAKE LIGHT RIGHT
CHECK LIGHT
SUBSTITUTE LAMP ON!
The right brake lamp is malfunctioning. A
substitute bulb is being used.
�
Visit an authorized Mercedes-Benz Cen-
ter as soon as possible.
DISPLAY DEFECTIVE
VISIT WORKSHOP
The display for the lamps or the system is
malfunctioning.
�
Visit an authorized Mercedes-Benz Cen-
ter as soon as possible.
Page 381 of 474
379 Practical hints
Where will I find ...?
�Where will I find ...?
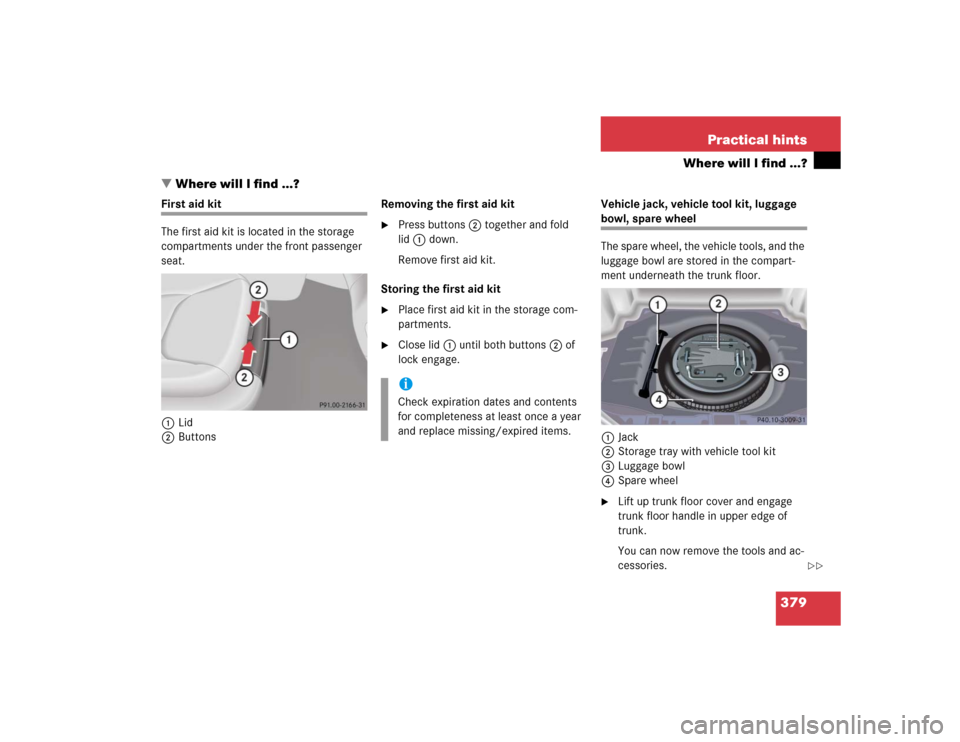
First aid kit
The first aid kit is located in the storage
compartments under the front passenger
seat.
1Lid
2ButtonsRemoving the first aid kit
�
Press buttons2 together and fold
lid1 down.
Remove first aid kit.
Storing the first aid kit
�
Place first aid kit in the storage com-
partments.
�
Close lid1 until both buttons2 of
lock engage.Vehicle jack, vehicle tool kit, luggage
bowl, spare wheel
The spare wheel, the vehicle tools, and the
luggage bowl are stored in the compart-
ment underneath the trunk floor.
1Jack
2Storage tray with vehicle tool kit
3Luggage bowl
4Spare wheel�
Lift up trunk floor cover and engage
trunk floor handle in upper edge of
trunk.
You can now remove the tools and ac-
cessories.
iCheck expiration dates and contents
for completeness at least once a year
and replace missing/expired items.
��