Page 164 of 474
162 Controls in detailControl systemThe table below shows what settings can
be changed within the various menus. De-
tailed instructions on making individual
settings can be found on the following pag-
es.INSTRUMENT CLUSTER
LIGHTING
VEHICLE
CONVENIENCE
Select temperature display
mode
Set daytime running lamp mode
(USA only)
Set automatic locking
Set key-dependency
Select multifunction display
mode
Set locator lighting
Limiting opening height of trunk
lid*
Activate easy-entry/exit feature
Select language
Exterior lamps delayed shut-off
Set parking position for exterior
rear view mirror
Select tire inflation pressure
unit
Interior lighting delayed shut-off
Set fold-in function for exterior
rear view mirrorsAdjusting the drive-dynamic
seat
Page 171 of 474

169 Controls in detail
Control system
Limiting opening height of trunk lid*
This function is available in vehicles with
the trunk lid opening/closing system*.
Use this function to activate or deactivate
the limiting opening height of trunk lid.�
Move the selection marker with
theæ orç button to
VEHICLE
submenu.
�
Press buttonj ork repeatedly
until you see this message in the multi-
function display:OPENING LIMITER
TRUNK LIDThe selection marker is on the current
setting.
�
Press buttonæ orç to switch
the opening limiter for trunk lid
ON
or
OFF
.Convenience submenu
Access the
CONVENIENCE
submenu via the
SETTINGS
menu. Use the
CONVENIENCE
sub-
menu to change the settings for a number
of convenience features. The following
functions are available:Setting key-dependency
Use this function to set whether the mem-
ory settings for the seats, the steering
wheel, the mirrors, and the automatic cli-
mate control should be stored separately
for each SmartKey (
�page 128).
�
Move the selection marker with
theæ orç button to
the
CONVENIENCE
submenu.
�
Press buttonj ork repeatedly
until you see this message in the multi-
function display:
SETTINGS KEY-DEPEN-
DENT
.
The selection marker is on the current
setting.
�
Pressæ orç to set key-depen-
dency to
ON or
OFF
.
Function
Page
Setting key-dependency
169
Activating easy-entry/exit fea-
ture
169
Setting parking position for exte-
rior rear view mirror
171
Setting fold-in function for exteri-
or rear view mirrors
171
Adjusting the drive-dynamic seat
172
Page 174 of 474
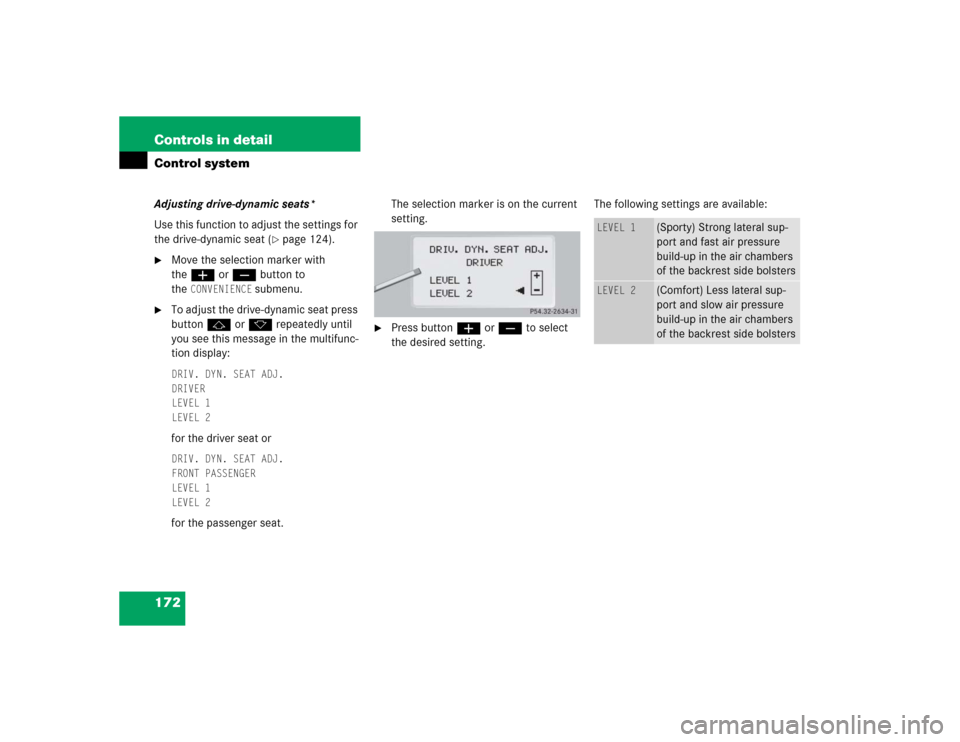
172 Controls in detailControl systemAdjusting drive-dynamic seats*
Use this function to adjust the settings for
the drive-dynamic seat (
�page 124).
�
Move the selection marker with
theæ orç button to
the
CONVENIENCE
submenu.
�
To adjust the drive-dynamic seat press
buttonj ork repeatedly until
you see this message in the multifunc-
tion display: DRIV. DYN. SEAT ADJ.
DRIVER
LEVEL 1
LEVEL 2for the driver seat orDRIV. DYN. SEAT ADJ.
FRONT PASSENGER
LEVEL 1
LEVEL 2for the passenger seat.The selection marker is on the current
setting.
�
Press buttonæ orç to select
the desired setting. The following settings are available:
LEVEL 1
(Sporty) Strong lateral sup-
port and fast air pressure
build-up in the air chambers
of the backrest side bolsters
LEVEL 2
(Comfort) Less lateral sup-
port and slow air pressure
build-up in the air chambers
of the backrest side bolsters
Page 175 of 474
.
Your vehicle’s t")
173 Controls in detail
Automatic transmission
�Automatic transmission
For more information on driving with an
automatic transmission, see “Automatic
transmission” (
�page 46).
Your vehicle’s transmission adapts its gear
shifting process to your individual driving
style by continually adjusting the shift
points up or down. These shift point adjust-
ments are performed based on current
operating and driving conditions.
If the operating conditions change, the
automatic transmission reacts by
adjusting its shift program.
Gearshift pattern for automatic
transmission
The automatic transmission selects indi-
vidual gears automatically, depending on:�
the gear selector lever
positionD(
�page 177) with
gear ranges (�page 176)
�
the selected program mode:
(C/S) (
�page 179)
or
(M/C/S) (S 55 AMG only)
(
�page 183)
�
the position of the accelerator pedal
(�page 180)
�
the vehicle speed
iDuring the brief warm-up, transmission
upshifting is delayed. This allows the
catalytic converter to heat up more
quickly to operating temperature.
Page 198 of 474

196 Controls in detailAutomatic climate controlAdjusting the temperature for center
air vents
When outside temperatures are low, you
can manually raise the air temperature for
the center and side air vents. The
thumbwheel4 is located between the
center air vents (
�page 192).
Automatic temperature control
�
Turn thumbwheel 4 to A.
The indicator lamp above the thumb-
wheel comes on. The temperature is
automatically adjusted to the set value.Turning on warm air
�
Turn thumbwheel 4 in the direction of
the white marking.
Warm air will enter from the center air
vent.
Turning on cooler air
�
Turn thumbwheel4 in the direction of
the blue marking.
Cooler air will enter from the center air
vent.
Adjusting air distribution
Use air distribution controlsc and6
(�page 194) to separately adjust the air
distribution on each side of the passenger
compartment. The following symbols are
found on the controls:Symbol
Function
h
Directs air through the cen-
ter air vents
d
Directs air to the windows
»
Directs air into the entire
vehicle interior
c
Directs air to the footwells
Page 199 of 474

197 Controls in detail
Automatic climate control
Adjusting manually�
Press left or right buttonU.
The button emerges and theh,
», d and csymbols become
visible.
�
Turn the marking on the regulator to
the desired symbol.
The air will be directed to the vents cor-
responding to this symbol.
Adjusting automatically
�
Press left or right buttonU until it
clicks in.
Theh, », d and
csymbols are no longer visible.
The air distribution is adjusted auto-
matically.Windows fogged on the inside
�
Press button± to switch on the air
conditioning (
�page 194).
The indicator lamp in the button goes
out.
�
Press button, to switch off the air
recirculation (
�page 194).
The indicator lamp on the button goes
out.
�
Make sure left and right buttonU
emerges.
Theh, », d and
csymbols become visible.
�
Press left and rightd button.
�
Set blower to the maximum speed.
�
Adjust left and right air vents1
and6 upwards (
�page 192).
�
Increase temperature setting.
�
Open side air vents9 and direct them
onto the side windows (
�page 192).
Windshield fogged on the outside
�
Switch the windshield wipers on
(�page 52).
�
Press on both U buttons until they
click in.
Theh, », d and c sym-
bols are no longer visible.
Page 200 of 474
198 Controls in detailAutomatic climate controlAdjusting air volume
Use air volume control9 (
�page 194) for
both automatic and manual air volume ad-
justment.
Adjusting automatically
�
PressA on air volume switch9
(�page 194).
The display shows “AUTO.” The air vol-
ume is adjusted automatically.Adjusting manually
Reducing air volume
�
Press switch9 down until the desired
air volume is reached.
The display shows the current level.
Increasing air volume
�
Press switch9 up until the desired air
volume is reached.
The display shows the current level.
Maximum cooling MAXCOOL
If the left and right air distribution controls
as well as the air volume control are set
toU and there is a high need for cool-
ing, the display “AUTO MAXCOOL” ap-
pears.
This provides the fastest possible cooling
of the vehicle interior (when windows and
tilt/sliding sunroof are closed).
Page 244 of 474
242 Controls in detailUseful featuresVanity mirrors
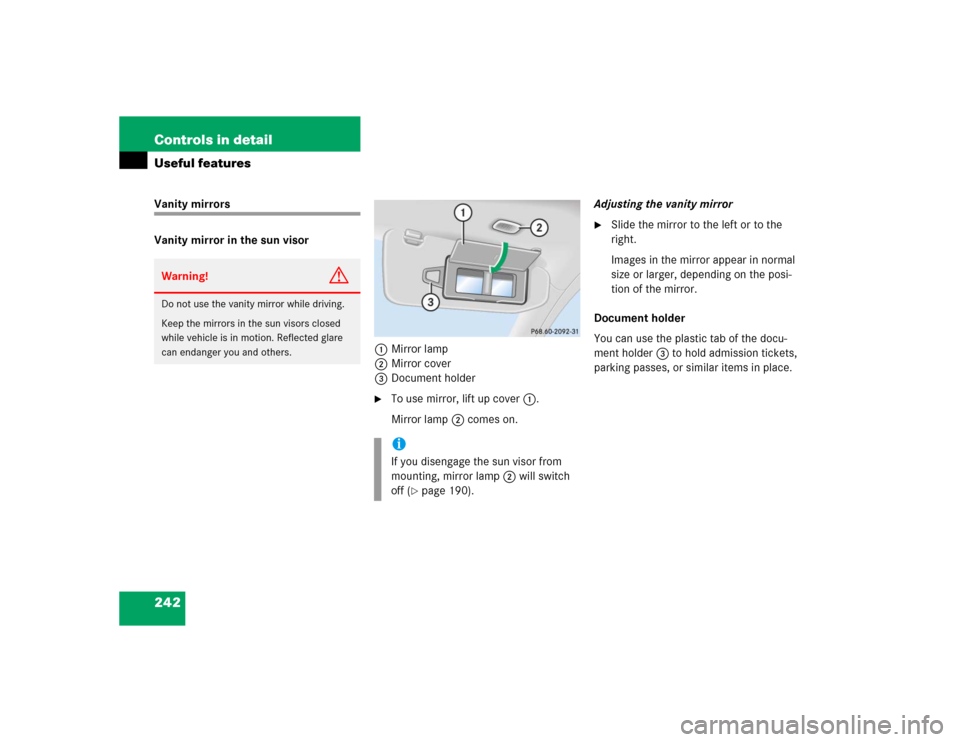
Vanity mirror in the sun visor
1Mirror lamp
2Mirror cover
3Document holder
�
To use mirror, lift up cover1.
Mirror lamp2 comes on.Adjusting the vanity mirror
�
Slide the mirror to the left or to the
right.
Images in the mirror appear in normal
size or larger, depending on the posi-
tion of the mirror.
Document holder
You can use the plastic tab of the docu-
ment holder3 to hold admission tickets,
parking passes, or similar items in place.
Warning!
G
Do not use the vanity mirror while driving.
Keep the mirrors in the sun visors closed
while vehicle is in motion. Reflected glare
can endanger you and others.
iIf you disengage the sun visor from
mounting, mirror lamp2 will switch
off (
�page 190).