Page 44 of 474
42 Getting startedAdjustingThe buttons are located on the driver’s
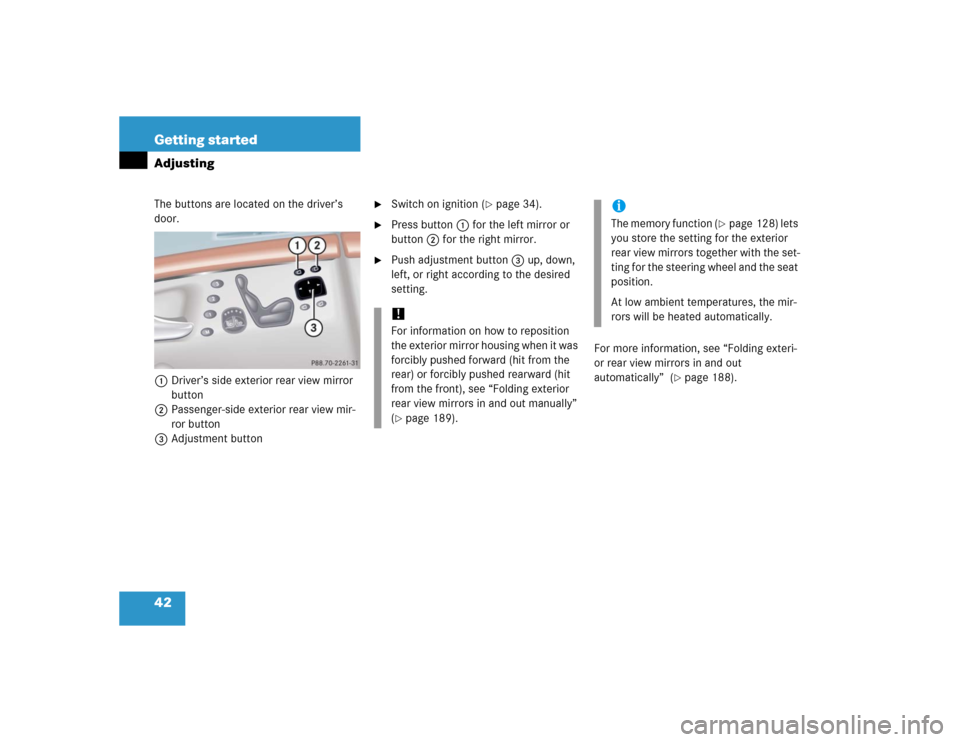
door.
1 Driver’s side exterior rear view mirror
button
2Passenger-side exterior rear view mir-
ror button
3Adjustment button
�
Switch on ignition (
�page 34).
�
Press button1 for the left mirror or
button2 for the right mirror.
�
Push adjustment button3 up, down,
left, or right according to the desired
setting.
For more information, see “Folding exteri-
or rear view mirrors in and out
automatically” (
�page 188).
!For information on how to reposition
the exterior mirror housing when it was
forcibly pushed forward (hit from the
rear) or forcibly pushed rearward (hit
from the front), see “Folding exterior
rear view mirrors in and out manually”
(�page 189).
iThe memory function (
�page 128) lets
you store the setting for the exterior
rear view mirrors together with the set-
ting for the steering wheel and the seat
position.
At low ambient temperatures, the mir-
rors will be heated automatically.
Page 78 of 474

76 Safety and SecurityOccupant safety�
Reinstall cover after removing the
tether strap.Child seat anchors – LATCH type
This vehicle is equipped with two LATCH
(L
ower A
nchors and T
ethers for CH
ildren)
type anchors (at each of the rear seats) for
the installation of a LATCH child seat with
the matching anchor fittings.
If you have not installed a child seat, the
LATCH anchor are covered with an uphol-
stery blend.
1Indicates the position of the anchors
2Anchors
3Upholstery blend
4Installation device
�
Move rear power seats*/bench* to the
rearmost position (
�page 117).
�
Fold upholstery blend3 upward.
�
Turn installation device4 to a vertical
position so that upholstery blend3
does not fold down.
�
Install child seat according to the man-
ufacturer’s instructions.
A solid connection is established be-
tween the child seat and the body of
the vehicle.
Do not adjust rear power seat*/bench*
position after installing child restraint.
Warning!
G
Vehicles with adjustable rear seats/bench*:
Never adjust the rear seat position after in-
stalling the child restraint. Adjusting the rear
seat position after installing the child re-
straint could damage the child restraint
and/or introduce undesirable slack into the
webbing and loosen or misposition the child
restraint, lessening the effectiveness of the
child restraint and thus increasing the
chance or severity of injury in an accident.
��
Page 79 of 474

77 Safety and Security
Occupant safety
Warning!
G
Vehicles with adjustable rear seats/bench*:
Never adjust the rear seat position after in-
stalling the child restraint. Adjusting the rear
seat position after installing the child re-
straint could damage the child restraint
and/or introduce undesirable slack into the
webbing and loosen or misposition the child
restraint, lessening the effectiveness of the
child restraint and thus increasing the
chance or severity of injury in an accident.iThe child seat must be firmly attached
in the right and left side anchor fittings.
Make sure the seat belt for the center
seat can operate freely with a child
seat installed.
Non-LATCH type child seats may also
be used and can be installed using the
vehicle’s seat belt system. Install child
seat according to the manufacturer’s
instructions.
Warning!
G
Children too big for child restraint systems
must ride in back seats using regular seat
belts. Position shoulder belt across chest
and shoulder, not face or neck. A booster
seat may be necessary to achieve proper
belt positioning for children from 41 lbs until
they reach a height where a lap/shoulder
belt fits properly without a booster.
Install child seat according to manufactur-
er’s instructions.
The child seat must be firmly attached in
right and left side anchors2.
An incorrectly mounted child seat may come
loose during an accident which could result
in serious injury or death to the child.
Damaged or impact damaged child seats or
child seat mounting fittings must be re-
placed.
Do not leave children unattended in the ve-
hicle, even if the children are secured in a
child restraint system.
Page 116 of 474
.
Easy-entry/exit feature
This feature allows for easier entry into and
exit from the vehicle.
The")
114 Controls in detailSeatsFor more information on seat adjustment,
see “Adjusting” (
�page 37).
Easy-entry/exit feature
This feature allows for easier entry into and
exit from the vehicle.
The easy-entry/exit feature can be activat-
ed or deactivated in the
CONVENIENCE
sub-
menu of the control system (
�page 170).When exiting the vehicle, with the easy-en-
try/exit feature activated and depending
on your selection, the steering wheel tilts
upwards and/or the driver’s seat moves a
few inches to the rear when you:
�
remove the SmartKey from the starter
switch,
or
�
open the driver’s door with the
SmartKey in starter switch position 0
or 1 or the KEYLESS-GO* start/stop
button (
�page 35) in position 1.
Warning!
G
You must make sure no one can become
trapped or injured by the moving steering
wheel and driver’s seat when the easy-en-
try/exit feature is activated.
To cancel seat/steering wheel movement,
do one of the following:�
Press seat adjustment switch
(�page 38).
�
Move steering column stalk
(�page 40).
�
Press one of the memory position but-
tons (
�page 129).
Do not leave children unattended in the ve-
hicle, or with access to an unlocked vehicle.
Children could open the driver’s door and
unintentionally activate the easy-entry/exit
feature, which could result in an accident
and/or serious personal injury.
Page 119 of 474
117 Controls in detailSeats
Rear seats
Power seat bench*
The switches for adjusting the seat bench
are located at the respective rear doors.
1Seat bench fore and aft adjustment
2Head restraint heightSeat bench fore and aft adjustment
�
Press switch forward or backward in di-
rection of arrow1.
Head restraint height
�
Press switch up or down in direction of
arrow2.Individual power seats*
The switches for adjusting the seats are lo-
cated at the respective rear doors.
1Seat fore and aft adjustment
2Seat height
3Head restraint heightWarning!
G
For your protection, drive only with properly
positioned head restraints.
Adjust head restraint so that the center of
the head restraint supports the back of the
head at eye level. This will reduce the poten-
tial for injury to the head and neck in the
event of an accident or similar situation.
Do not drive the vehicle without the seat
head restraints. Head restraints are intend-
ed to help reduce injuries during an acci-
dent.
Page 120 of 474

118 Controls in detailSeatsSeat fore and aft adjustment�
Press switch forward or backward in di-
rection of arrow1.
Seat height
�
Press switch up or down in the direc-
tion of arrow2.
Head restraint height
�
Press switch up or down in direction of
arrow3.
Power seat, setting front passenger
seat position from rear*
This function lets you adjust the position of
the front passenger seat from the rear.
Warning!
G
For your protection, drive only with properly
positioned head restraints.
Adjust head restraint so that the center of
the head restraint supports the back of the
head at eye level. This will reduce the poten-
tial for injury to the head and neck in the
event of an accident or similar situation.
Do not drive the vehicle without the seat
head restraints. Head restraints are intend-
ed to help reduce injuries during an acci-
dent.
Warning!
G
When adjusting the front passenger seat,
make sure the seat, if occupied, is as far
from the passenger front air bag as possi-
ble.
Otherwise, the passenger could be seriously
or even fatally injured in the event of an ac-
cident or braking maneuver.
Make sure no one is caught or injured while
the seat is being adjusted.
Even with the SmartKey or SmartKey with
KEYLESS-GO* removed from the starter
switch or the SmartKey with KEYLESS-GO*
removed from the vehicle, the power seats
can be operated when the respective door is
open. Therefore, do not leave children unat-
tended in the vehicle, or with access to an
unlocked vehicle. Unsupervised use of vehi-
cle equipment may cause an accident
and/or serious personal injury.
Page 121 of 474

119 Controls in detailSeats
The switch is located on the right rear pas-
senger door.
1Front passenger seat adjustment
2Right rear passenger seat adjustment
3Seat height
4Head restraint height
5Backrest tilt
6Seat fore and aft adjustment
�
Switch on ignition (
�page 34).
or
�
Open the right rear passenger door.
�
Press button1 to adjust the front
passenger seat.
�
To adjust right rear passenger seat,
press button2 (
�page 119).Passenger seat fore and aft adjustment
�
Press the switch forward or backward
in direction of arrow6.
Passenger seat backrest tilt
�
Press the switch forward or backward
in direction of arrow5.
Passenger seat height
�
Press the switch up or down in the
direction of arrow3.
Passenger seat head restraint height
�
Press the switch up or down in
direction of arrow4.
iAdjusting the passenger seat position
from the rear is not possible if you de-
activate the operation of the rear door
windows (
�page 78).
!Do not move the front passenger seat
completely forward if objects are
stored in the parcel net in the front pas-
senger-side footwell. Items in the net
may be damaged.
iAdjust the head restraint in such a way
that it is as close to the head as possi-
ble.
��
Page 142 of 474
.
1Reset buttonJ
The instrument cl")
140 Controls in detailInstrument clusterA full view illustration of the instrument
cluster can be found in the “At a glance”
section of this manual (
�page 24).
1Reset buttonJ
The instrument cluster is activated when
you:
�
open a door
�
turn on the ignition
�
press the reset buttonJ1
�
switch on the exterior lamps
You can change the instrument cluster set-
tings in the instrument cluster submenu of
the control system (
�page 163).
Instrument cluster illumination
1Knob for adjusting instrument cluster
illumination
Use knob1 to adjust the illumination
brightness for the instrument cluster.
�
Press knob1.
The knob will pop out.
To brighten illumination
�
Turn knob1 in the instrument cluster
clockwise.
The instrument cluster illumination will
brighten.
To dim illumination
�
Turn knob1 in the instrument cluster
counterclockwise.
The instrument cluster illumination will
dim.
iThe instrument cluster illumination is
dimmed or brightened automatically to
suit ambient light conditions.
The instrument cluster illumination will
also be adjusted automatically when
you switch on the vehicle’s exterior
lamps.