Page 188 of 474
.Headlamp cleaning system*
(Standardon S500, S600, S55AMG)
The switch is located")
186 Controls in detailGood visibilityFor information on the windshield wipers,
see “Windshield wipers” (
�page 52).Headlamp cleaning system*
(Standardon S500, S600, S55AMG)
The switch is located on the left side of the
dashboard.
1Headlamp washer switch�
Switch on ignition (
�page 34).
�
Press switch1.
The headlamps are cleaned with a
high-pressure water jet.
For information on filling up the washer
reservoir, see “Windshield washer system
and headlamp cleaning system*”
(
�page 295).
Rear view mirrors
For information on setting the rear view
mirrors, see “Mirrors” (
�page 41).
Auto-dimming rear view mirror
The reflection brightness of the exterior
rear view mirror on the driver’s side and
the interior rear view mirror will respond
automatically to glare when
�
the ignition is switched on
and
�
incoming light from headlamps falls on
the sensor in the interior rear view
mirror
The interior rear view mirror will not react if
�
reverse gear is engaged
�
the interior lighting is turned on
Page 189 of 474

187 Controls in detail
Good visibility
Activating exterior rear view mirror
parking position
Follow these steps to activate the mirror
parking position so that the passen-
ger-side exterior rear view mirror will be
turned downward to the stored position.�
Make sure you have stored a parking
position for the passenger-side exterior
rear view mirror (
�page 130).
�
Make sure the
MIRROR SETTING WHEN
PARKING
function in the
CONVENIENCE
submenu of the control system is
switched to
ON (�page 171).
�
Switch on ignition (
�page 34).
Warning!
G
The auto-dimming function does not react if
incoming light is not aimed directly at sen-
sors in the interior rear view mirror.
The interior rear view mirror and the exterior
rear view mirror on the driver’s side do not
react, for example, if the rear window sun
shade* is in raised position.
Glare can endanger you and others.Warning!
G
In the case of an accident, liquid electrolyte
may escape from the mirror housing if the
mirror glass breaks.
Electrolyte has an irritating effect. Do not al-
low the liquid to come into contact with
eyes, skin, clothing, or respiratory system.
In case it does, immediately flush affected
area with water, and seek medical help if
necessary.
!Electrolyte drops coming into contact
with the vehicle paint finish can be
completely removed only while in the
liquid state by applying plenty of water.Warning!
G
Exercise care when using the passen-
ger-side exterior rear view mirror. The mirror
surface is convex (outwardly curved surface
for a wider field of view). Objects in mirror
are closer than they appear. Check your in-
side rear view mirror or glance over your
shoulder before changing lanes.
��
Page 209 of 474

207 Controls in detail
Power windows
�Power windows
Opening and closing the power windows
The side windows are opened and closed
electrically. The switches for all side win-
dows are on the driver’s door. The switch-
es for the respective windows are on the
front passenger door and the rear doors.
1Left front window
2Right front window
3Right rear window
4Left rear window
5Rear window override switch
(
�page 78)
Warning!
G
When closing the windows, make sure that
there is no danger of anyone being harmed
by the closing procedure.
The closing of the door windows can be im-
mediately halted by releasing the switch or,
if the switch was pressed past the resis-
tance point and released, by pressing the re-
spective switch.
The door windows are equipped with the ex-
press-close and automatic reversal func-
tion. If the window encounters an
obstruction that blocks its path in a circum-
stance where you pressed the switch past
the resistance point and released it to close
the window, the automatic reversal function
will stop the window and open it slightly.
If the window encounters an obstruction
that blocks its path in a circumstance where
you are closing the window by pressing and
holding the switch, by pressing and holding
button ‹ on the SmartKey, or by press-
ing and holding the lock button (vehicles
with KEYLESS-GO*) on the door handle, the
automatic reversal function will not operate.
When leaving the vehicle, always remove the
SmartKey or SmartKey with KEYLESS-GO*
from the starter switch, take it with you, and
lock the vehicle. Do not leave children unat-
tended in the vehicle, or with access to an
unlocked vehicle. Unsupervised use of vehi-
cle equipment may cause an accident
and/or serious personal injury.iYou can also open or close the win-
dows using the SmartKey, see “Sum-
mer opening feature” (
�page 209) and
“Convenience closing feature”
(
�page 210).
You can close and reopen the windows
using the air recirculation button,
or the charcoal filter buttone in the
climate control panel (
�page 194).
Page 211 of 474

209 Controls in detail
Power windows
Stopping windows during Express-op-
eration�
Briefly press the respective power win-
dow switch again.
Synchronizing the power windows
The power windows must be synchronized�
after the battery has been disconnect-
ed
�
if the power windows cannot be fully
opened (Express-open) or closed
(Express-close)
Each power window must be synchronized.
�
Close all doors.
�
Switch on ignition (
�page 34).
�
Press and hold switch1 to 4 at the
symbolj until the windows are
completely closed.
�
Hold on to switches1 to 4 for ap-
proximately one second.
The power windows are synchronized.
Summer opening feature
If the weather is warm, you can ventilate
the vehicle before driving off by simulta-
neously: �
opening the side windows
�
opening the tilt/sliding sunroof
�
turning on the seat ventilation* for the
driver’s seat
!If the upward movement of the window
is blocked during the closing proce-
dure, the window will stop and open
slightly.Remove the obstruction, press
the respective power window switch at
the symbolj again past the resis-
tance point and release.If the window
still does not close when there is no ob-
struction, press and hold the respec-
tive power window switch at the
symbolj. The side window will
then close without the obstruction sen-
sor function.
iThe seat ventilation* for the driver’s
seat is automatically set to the highest
level if activated via summer opening
feature.
Page 215 of 474

213 Controls in detail
Power tilt/sliding sunroof
Stopping the power tilt/sliding sunroof
during Express-operation�
Move the switch in any direction.
Synchronizing the power tilt/sliding
sunroof
The tilt/sliding sunroof must be synchro-
nized�
after the battery has been
disconnected or discharged
�
after the tilt/sliding sunroof has been
closed manually (
�page 386)
�
the tilt/sliding sunroof does not open
smoothly
�
after a malfunction
�
Switch on ignition (
�page 34).
�
Press and hold the sunroof switch in di-
rection of arrow1 until the tilt/sliding
sunroof is fully raised at the rear.
Keep holding the sunroof switch in the
direction of arrow1 for approximately
one second.
�
Check the Express-open feature
(�page 212).
If the tilt/sliding sunroof opens com-
pletely, the sunroof is synchronized.
Otherwise repeat the above steps.
iThe selecting a tilt/sliding sunroof
opening position feature is activated
for Canada vehicles, but deactivated
for U.S. vehicles at the factory. If you
wish to have it activated, contact an au-
thorized Mercedes-Benz Center.
To select a tilt/sliding sunroof opening
position, press the sunroof switch to
the resistance point and release it
when the tilt/sliding sunroof has
reached the desired position. The
tilt/sliding sunroof now opens to the
position set when the sunroof switch is
pressed past the resistance point in the
“open” direction.
iIf the movement of the tilt/sliding sun-
roof is blocked during the closing pro-
cedure, the sunroof will stop and
reopen slightly.
Page 246 of 474
244 Controls in detailUseful featuresGlove box
1Unlocked
2Locked
3Glove box lid release
Locking the glove box�
Insert mechanical key (
�page 383)
into the glove box lock.
�
Turn the mechanical key to
position2.Unlocking the glove box
�
Insert mechanical key (
�page 383)
into the glove box lock.
�
Turn the mechanical key to
position1.
Opening the glove box
�
Press glove box lid release3.
The glove box lid opens downward.
Closing the glove box
�
Push lid up to close.Storage compartment in the glove box
A storage compartment is located in the
cover of the glove box. It can be used to
store check cards, pens, a flashlight, etc.
1Storage compartment in glove box
�
Lightly press the marking on the lid of
storage compartment1.
The lid opens upward.
Page 247 of 474
245 Controls in detail
Useful features
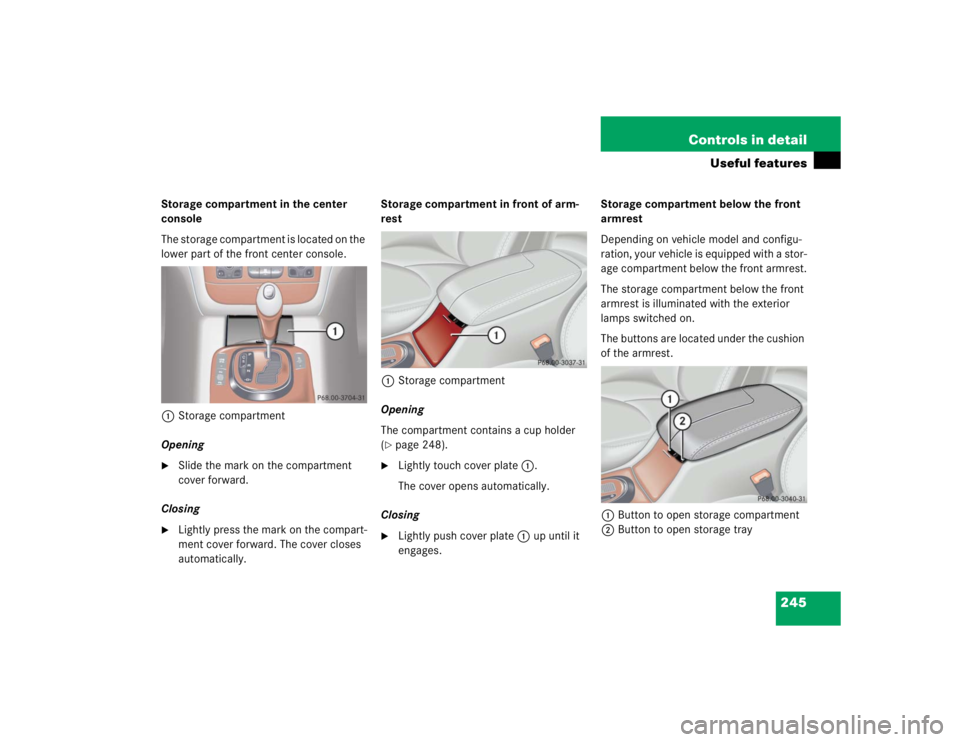
Storage compartment in the center
console
The storage compartment is located on the
lower part of the front center console.
1Storage compartment
Opening�
Slide the mark on the compartment
cover forward.
Closing
�
Lightly press the mark on the compart-
ment cover forward. The cover closes
automatically.Storage compartment in front of arm-
rest
1Storage compartment
Opening
The compartment contains a cup holder
(
�page 248).
�
Lightly touch cover plate1.
The cover opens automatically.
Closing
�
Lightly push cover plate1 up until it
engages.Storage compartment below the front
armrest
Depending on vehicle model and configu-
ration, your vehicle is equipped with a stor-
age compartment below the front armrest.
The storage compartment below the front
armrest is illuminated with the exterior
lamps switched on.
The buttons are located under the cushion
of the armrest.
1Button to open storage compartment
2Button to open storage tray
Page 252 of 474
250 Controls in detailUseful features1Compartment for cup holder
Opening cup holder�
Push front of sliding compartment1.
The cup holder slides out.
Closing cup holder
�
Push sliding compartment1 back un-
til it engages.Parcel net in front passenger footwell
A small convenience parcel net is located
in the front passenger footwell. It is for
small and light items, such as road maps,
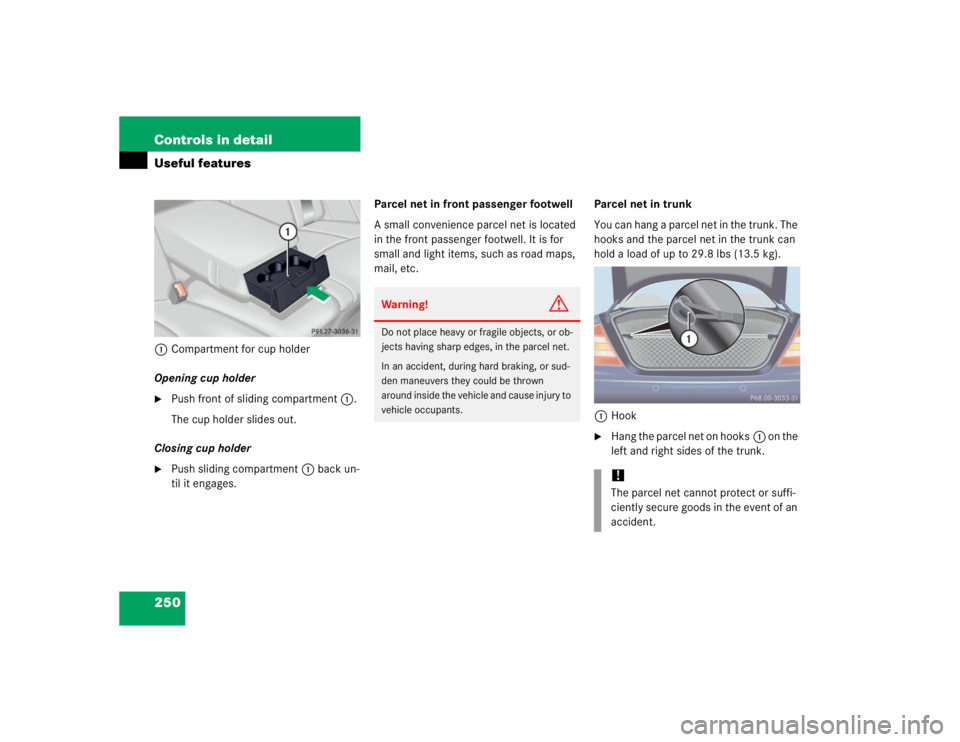
mail, etc.Parcel net in trunk
You can hang a parcel net in the trunk. The
hooks and the parcel net in the trunk can
hold a load of up to 29.8 lbs (13.5 kg).
1Hook
�
Hang the parcel net on hooks1 on the
left and right sides of the trunk.
Warning!
G
Do not place heavy or fragile objects, or ob-
jects having sharp edges, in the parcel net.
In an accident, during hard braking, or sud-
den maneuvers they could be thrown
around inside the vehicle and cause injury to
vehicle occupants.
!The parcel net cannot protect or suffi-
ciently secure goods in the event of an
accident.