Page 138 of 474
136 Controls in detailLightingHazard warning flasher
The hazard warning flasher can be
switched on at all times, even with the
SmartKey removed from the starter switch
or with the SmartKey with KEYLESS-GO*
removed from the vehicle.
The hazard warning flasher switches on au-
tomatically when an airbag deploys.
1Hazard warning flasher switchSwitching on the hazard warning
flasher
�
Press hazard warning flasher switch.
All turn signals will flash.Switching off the hazard warning
flasher
�
Press hazard warning flasher switch
again.
iWith the hazard warning flasher acti-
vated and the combination switch set
for either left or right turn, only the re-
spective left or right turn signals will
operate when the SmartKey in the
starter switch is in position1 or2 or
the KEYLESS-GO* start/stop button
(�page 35) is pressed once or twice.
iIf the hazard warning flasher was acti-
vated automatically, press switch1
twice.
Page 139 of 474

137 Controls in detail
Lighting
Interior lighting
The controls are located in the overhead
control panel.
1Left reading lamp on/off
2Rear interior lamps on/off
3Right reading lamp on/off
4Rocker switch for automatic
control on/offAutomatic control
Activating
�
Press rocker switch 4 to the center
position.
The interior lighting switches on in
darkness when you:�
unlock the vehicle
�
remove the SmartKey from the
starter switch
�
open a door
�
open the trunk
The interior lighting switches off automati-
cally following an adjustable time delay.
For more information, see “Setting interior
lighting delayed shut-off” (
�page 167).Deactivating
�
Press the ñ symbol on rocker
switch 4.
The interior lighting remains switched
off in darkness, even when you:�
unlock the vehicle
�
remove the SmartKey from the
starter switch
�
open a door
�
open the trunk
Manual control
Front interior lighting
�
Press the ð symbol on rocker
switch 4.
The front interior lighting switches on.
�
Press the ñ symbol on rocker
switch 4 again.
The front interior lighting switches off.
The automatic control function is acti-
vated.
iLeaving an interior light switch in the
ON position for extended periods of
time with the engine turned off could
result in a discharged battery.
iIf the door remains open, the interior
lighting switches off automatically after
approximately five minutes.
Page 140 of 474
138 Controls in detailLightingRear interior lighting�
Press switch2 on theò symbol.
The rear compartment lighting switch-
es on.
�
Press switch2 on theò symbol
again.
The rear compartment lighting switch-
es off.Reading lamps in the front
The reading lamps are located in the over-
head control panel.
�
Press reading lamp switch1or3 to
switch on the desired reading lamp.
�
Press reading lamp switch1or3
again to switch off the respective read-
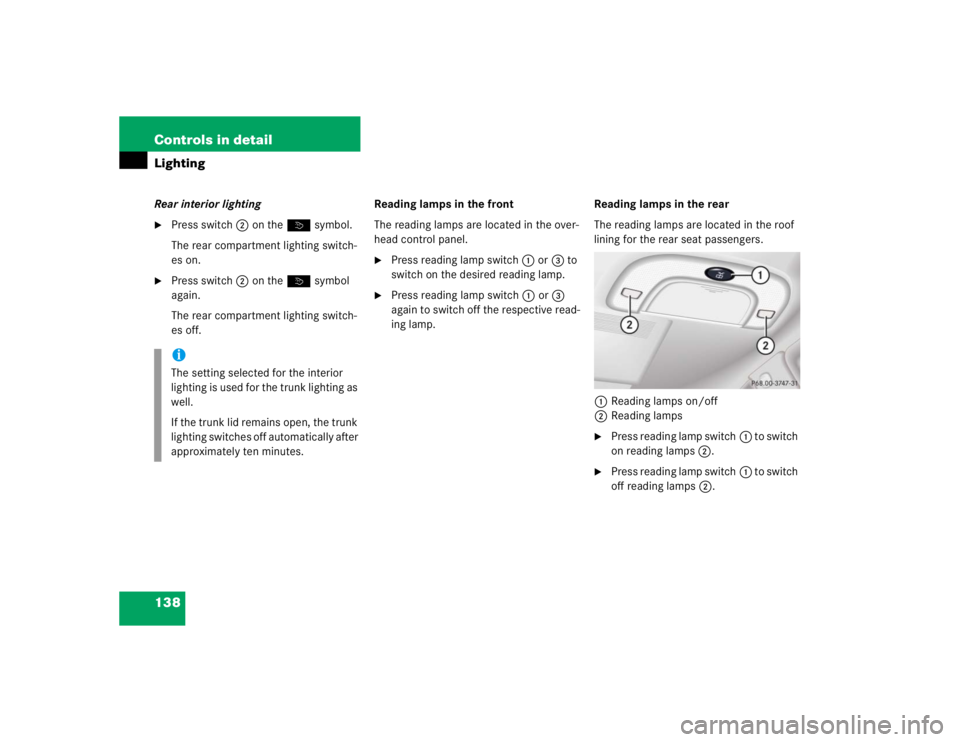
ing lamp.Reading lamps in the rear
The reading lamps are located in the roof
lining for the rear seat passengers.
1Reading lamps on/off
2Reading lamps
�
Press reading lamp switch1 to switch
on reading lamps2.
�
Press reading lamp switch1 to switch
off reading lamps2.
iThe setting selected for the interior
lighting is used for the trunk lighting as
well.
If the trunk lid remains open, the trunk
lighting switches off automatically after
approximately ten minutes.
Page 141 of 474

139 Controls in detail
Lighting
Courtesy lighting
For better orientation in the dark, courtesy
lamps will illuminate the interior of your ve-
hicle as follows:
With parking lamps switched on:�
the door handles
�
the driver and passenger footwells
With the SmartKey in the starter switch
position1:
�
the door handles
�
the center console
Door entry lamps
For better orientation in the dark, the cor-
responding door entry lamps will switch on
in darkness when you open a door and the
automatic control is activated.
The door entry lamps switch off when the
corresponding door is closed.
Trunk lighting
The trunk lighting switches on if the trunk
lid is opened.
If you leave the trunk open for an extended
period of time, the trunk lighting will switch
off automatically after approximately
ten minutes.
iIf you turn the SmartKey in the starter
switch to position0 and switch off the
exterior headlamps, the door handle
lamps will remain lit for approximately
five minutes.
iIf you turn the SmartKey in the starter
switch to position0 and switch off the
exterior headlamps, the door entry
lamps will remain lit for approximately
five minutes.
Page 142 of 474
.
1Reset buttonJ
The instrument cl")
140 Controls in detailInstrument clusterA full view illustration of the instrument
cluster can be found in the “At a glance”
section of this manual (
�page 24).
1Reset buttonJ
The instrument cluster is activated when
you:
�
open a door
�
turn on the ignition
�
press the reset buttonJ1
�
switch on the exterior lamps
You can change the instrument cluster set-
tings in the instrument cluster submenu of
the control system (
�page 163).
Instrument cluster illumination
1Knob for adjusting instrument cluster
illumination
Use knob1 to adjust the illumination
brightness for the instrument cluster.
�
Press knob1.
The knob will pop out.
To brighten illumination
�
Turn knob1 in the instrument cluster
clockwise.
The instrument cluster illumination will
brighten.
To dim illumination
�
Turn knob1 in the instrument cluster
counterclockwise.
The instrument cluster illumination will
dim.
iThe instrument cluster illumination is
dimmed or brightened automatically to
suit ambient light conditions.
The instrument cluster illumination will
also be adjusted automatically when
you switch on the vehicle’s exterior
lamps.
Page 149 of 474
147 Controls in detail
Control system
Menus, submenus and functions
Menu1
Standard dis-
play
Menu2
AUDIO
Menu3
Telephone*
Menu4
NAVI
Menu5
Distronic*
Menu6
Trip computer
Menu7
Vehicle status
message memory
Menu8
Settings
(�page 148)
(�page 148)
(�page 153)
(�page 155)
(�page 156)
(�page 157)
(�page 159)
(�page 160)
Commands/submenusCall up mainte-
nance service
display
Select radio
station
Load phone
book
Activate
route guid-
ance
Call up set-
tings
Fuel consump-
tion statistics
after start
Call up vehicle mal-
function, warning
and system status
messages stored in
memory
Reset to fac-
tory settings
Check tire in-
flation pres-
sure*
Select satellite
radio station*
(USA only)
Search for
name in
phone book
Fuel consump-
tion statistics
since the last
reset
Instrument
cluster
submenu
Check engine
oil level
Select CD
track
Select
number last
dialed
Call up range
Lighting
submenu
Digital speed-
ometer
Select MP3-CD
track
Vehicle
submenuConvenience
submenu
Page 153 of 474

151 Controls in detail
Control system
CD changer* operating mode
General notes
Should excessively high temperatures oc-
cur while in CD mode,
CD TEMP HIGH
will
appear on the multifunction display and
muting will take place. The unit will then
switch back to the last operating mode
used until the temperature has decreased
to a safe operating level.
Should excessively low temperatures oc-
cur while in CD mode,
CD TEMP LOW
will ap-
pear on the multifunction display, but the
CD will continue to play.
Handle CDs carefully to prevent interfer-
ence during playback. Avoid fingerprints
and dust on CDs. Do not write on CDs or
apply any label or other material to them.
Only use original CDs. Using copied CDs
may create problems during playback.Clean CDs from time to time with a com-
mercially available cleaning cloth. No sol-
vents, anti-static sprays, etc. should be
used for cleaning. Replace the CD in its
case after use. Protect CDs from heat and
direct sunlight.
Only use CDs, which bear the label shown
and that conform to the compact disc dig-
ital audio standard (IEC 60908).
Use of CDs which do not meet this stan-
dard may cause damage to the CD chang-
er. Do not play single-CDs (80 mm) with an
adapter.For information on operating the CD
changer, refer to separate COMAND oper-
ating instructions.
!Your CD drive has been designed to
play CDs which correspond to the IEC
60908 standard.
If you insert thicker data carriers,
e.g. ones that have data on both sides
(one side with DVD data, the other side
with audio data), they cannot be eject-
ed and will damage the drive.
Page 161 of 474

159 Controls in detail
Control system
Vehicle status message memory menu
Use the vehicle status message memory
menu to scan malfunction and warning
messages that may be stored in the sys-
tem. Such messages appear in the multi-
function display and are based on
conditions or system status the vehicle’s
system has recorded.
�
Press buttonè orÿ repeatedly
until the vehicle status message mem-
ory appears in the multifunction dis-
play.
No vehicle status messages
If no conditions are recorded in the memo-
ry, the message in the multifunction dis-
play is:
NO MESSAGESVehicle status messages have been re-
corded
If conditions have occurred causing status
messages to be recorded, the number of
messages appears in the multifunction dis-
play:
1Number of messages
�
Press buttonk orj.
The stored messages will now be dis-
played in the order in which the mal-
functions have occurred. See the
“Practical hints” section for malfunc-
tion and warning messages
(�page 347).
Should the vehicle’s system record any
conditions while driving, the number of
messages will reappear in the multifunc-
tion display when the SmartKey in the
starter switch is turned to position0 or re-
moved from the starter switch. If you press
the reset buttonJ in the instrument clus-
ter (�page 140), the next message will be
displayed immediately.
Warning!
G
Malfunction and warning messages are only
indicated for certain systems and are inten-
tionally not very detailed. The malfunction
and warning messages are simply a remind-
er with respect to the operation of certain
systems and do not replace the owner’s
and/or driver’s responsibility to maintain
the vehicle’s operating safety by having all
required maintenance and safety checks
performed on the vehicle and by bringing
the vehicle to an authorized Mercedes-Benz
Center to address the malfunction and
warning messages (
�page 347).
iThe vehicle status message memory
will be cleared when you switch on igni-
tion. You will then only see high-priority
messages in the multifunction display.
These are highlighted in red color
(�page 347).