Page 208 of 474
206 Controls in detailAutomatic climate controlRear automatic climate control panel
iWhen the rear seats are not occupied
(rear seat belts unbuckled) the rear cli-
mate control system adopts the set-
tings of the front climate control
system.
Item
1
Left center air vent, adjustable
2
Display
3
Right center air vent, adjustable
4
Thumbwheel for air distribution
5
Temperature control, right
6
Air volume (automatic, manual)
7
Temperature control, left
8
Rear climate control system on/off
Residual engine heat utilization
Warning!
G
Follow the recommended settings for heat-
ing and cooling as given in the instructions
for the front automatic climate control
(�page 192). Otherwise the windows could
fog up, impairing visibility for the driver and
endangering you and others.
Page 213 of 474

211 Controls in detail
Power tilt/sliding sunroof
�Power tilt/sliding sunroof
Opening and closing the power tilt/sliding sunroof
The tilt/sliding sunroof can be opened and
closed electrically. The switch for the
tilt/sliding sunroof is on the overhead con-
trol panel.
1Push up to raise sunroof at rear
2Pull down to lower sunroof at rear
3Push forward to slide sunroof closed
4Push back to slide sunroof openWith the sunroof closed or tilted open, a
screen can be slid into the roof opening to
guard against sun rays. When sliding the
sunroof open, the screen will also retract.
Warning!
G
When closing the tilt/sliding sunroof, make
sure that there is no danger of anyone being
harmed by the closing procedure.
The closing procedure of the tilt/sliding sun-
roof can be immediately halted by releasing
the switch or, if the switch was moved past
the resistance point and released, by mov-
ing the switch in any direction.
The tilt/sliding sunroof is made out of glass.
In the event of an accident, the glass may
shatter. This may result in an opening in the
roof.
In a vehicle rollover, occupants not wearing
their seat belts or not wearing them properly
may be thrown out of the opening. Such an
opening also presents a potential for injury
for occupants wearing their seat belts
properly as entire body parts or portions of
them may protrude from the passenger
compartment.
��
Page 315 of 474

313 Operation
Tires and wheels
General:
Depending on the design standards used,
the tire size molded into the sidewall may
have no letter or a letter preceding the tire
size designation.
No letter preceding the size designation
(as illustrated above): Passenger car tire
based on European design standards.
Letter “P” preceding the size designation:
Passenger car tire based on U.S. design
standards.
Letter “LT” preceding the size designation:
Light Truck tire based on U.S. design
standards.
Letter “T” preceding the size designation:
Temporary spare tires which are high
pressure compact spares designed for
temporary emergency use only. Tire width
The tire width1 (
�page 312) indicates
the nominal tire width in mm.
Aspect ratio
The aspect ratio2 (�page 312) is the
dimensional relationship between tire
section height and section width and is
expressed in percentage. The aspect ratio
is arrived at by dividing section height by
section width.
Tire code
The tire code3 (
�page 312) indicates
the tire construction type. The “R” stands
for radial tire type. Letter “D” means diag-
onal or bias ply construction; letter “B”
means belted-bias ply construction.
At the tire manufacturer's option, any tire
with a speed capability above 149 mph
(240 km/h) can include a “ZR” in the size
designation (for example: 245/40 ZR 18).
For additional information, see “Tire speed
rating” (
�page 314).Rim diameter
The rim diameter4 (
�page 312) is the
diameter of the bead seat, not the
diameter of the rim edge. Rim diameter is
indicated in inches (in).
Tire load rating
The tire load rating5 (�page 312) is a
numerical code associated with the
maximum load a tire can support.
For example, a load rating of 91 corre-
sponds to a maximum load of 1 356 lbs
(615 kg) the tire is designed to support.
See also “Maximum tire load”
(
�page 318) where the maximum load as-
sociated with the load index is indicated in
kilograms and lbs.
Page 334 of 474

332 OperationVehicle careEngine cleaning
Prior to cleaning the engine compartment
make sure to protect electrical compo-
nents and connectors from the intrusion of
water and cleaning agents.
Corrosion protection, such as MB Anticor-
rosion Wax should be applied to the engine
compartment after every engine cleaning.
Before applying, all control linkage bush-
ings and joints should be lubricated. The
poly-V-belt and all pulleys should be pro-
tected from any wax.
Vehicle washing
Do not use hot water or wash your vehicle
in direct sunlight. Only use a mild car wash
detergent, such as Mercedes-Benz ap-
proved Car Shampoo.
Thoroughly spray the vehicle with a dif-
fused jet of water. Direct only a very weak
spray towards the ventilation intake. Use
plenty of water and rinse the sponge and
chamois frequently. Rinse with clear water and thoroughly dry
with a chamois. Do not allow cleaning
agents to dry on the finish.
Due to the width of the vehicle, fold in ex-
terior rear view mirrors prior to running the
vehicle through an automatic car wash to
prevent damage to the mirrors.
In the winter, thoroughly remove all traces
of road salt as soon as possible.
When washing the underbody, do not for-
get to clean the inner sides of the wheels.Ornamental moldings
For regular cleaning and care of very dirty
chrome-plated parts, use a chrome clean-
er.
Headlamps, tail lamps, side markers,
turn signal lenses
�
Use a mild car wash detergent, such as
Mercedes-Benz approved Car Sham-
poo, with plenty of water.
To prevent scratches, never apply strong
force and use only a soft, non-scratchy
cloth when cleaning the lenses. Do not at-
tempt to wipe dirty lenses with a dry cloth
or sponge.
iVehicles with KEYLESS-GO*:
If a door handle is hit by a strong jet of
water, and a SmartKey with
KEYLESS-GO* is in close proximity, i.e.
within approx. 3 ft. (approx. 1 m), the
vehicle could be inadvertently locked
or unlocked.
Page 337 of 474

335 Operation
Vehicle care
Light alloy wheels
Mercedes-Benz approved Wheel Care
should be used for regular cleaning of the
light alloy wheels.
If possible, clean wheels once a week with
Mercedes-Benz approved Wheel Care, us-
ing a soft bristle brush and a strong spray
of water.
Follow the instructions on container.
Instrument cluster
Use a gentle dishwashing detergent or
mild detergent for delicate fabrics as a
washing solution. Wipe with a cloth moist-
ened in lukewarm solution. Do not use
scouring agents.Steering wheel and gear selector lever
Wipe with a damp cloth and dry thoroughly
or clean with Mercedes-Benz approved
Leather Care.
Cup holder
Use a gentle dishwashing detergent or
mild detergent for delicate fabrics as a
washing solution. Wipe with a cloth moist-
ened in lukewarm solution. Do not use
scouring agents.
Hard plastic trim items
Pour Mercedes-Benz approved Interior
Care onto soft lint-free cloth and apply
with light pressure.
Headliner and shelf below rear window
Clean with soft bristle brush, or use a
dry-shampoo cleaner in case of excessive
dirt.Seat belts
The webbing must not be treated with
chemical cleaning agents. Only use clear,
lukewarm water and soap. Do not dry the
webbing at temperatures above 176°F
(80°C) or in direct sunlight.
iOnly use acid-free cleaning materials.
Acid may cause corrosion or damage
the clear coat.
Warning!
G
Do not bleach or dye seat belts as this may
severely weaken them. In a crash they may
not be able to provide adequate protection.
Page 345 of 474
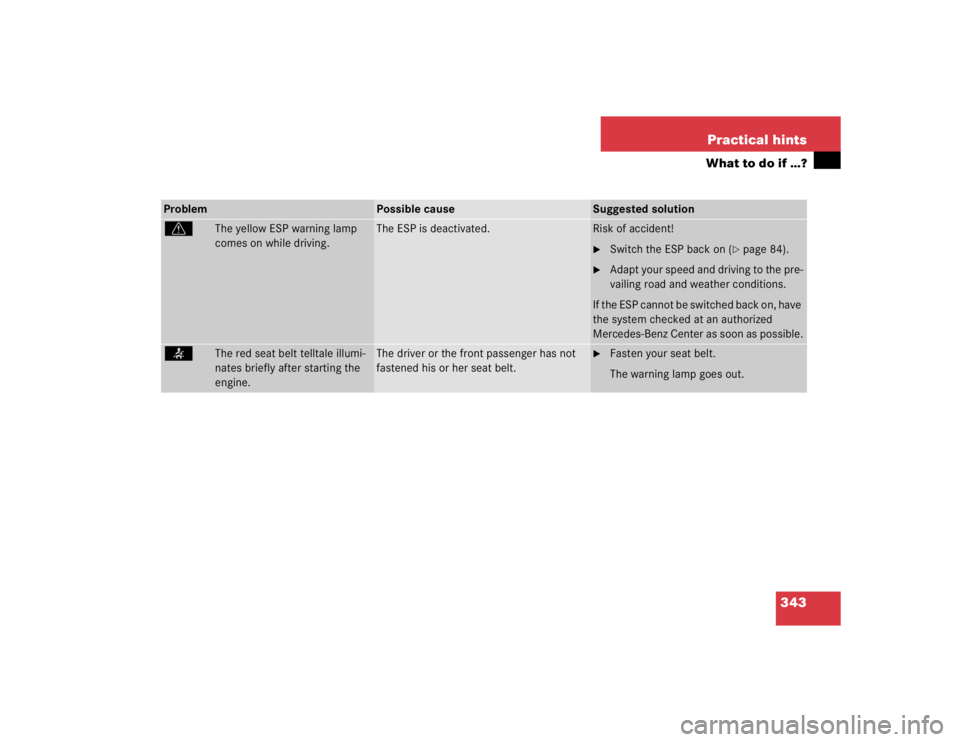
343 Practical hints
What to do if …?
Problem
Possible cause
Suggested solution
v
The yellow ESP warning lamp
comes on while driving.
The ESP is deactivated.
Risk of accident!�
Switch the ESP back on (
�page 84).
�
Adapt your speed and driving to the pre-
vailing road and weather conditions.
If the ESP cannot be switched back on, have
the system checked at an authorized
Mercedes-Benz Center as soon as possible.
<
The red seat belt telltale illumi-
nates briefly after starting the
engine.
The driver or the front passenger has not
fastened his or her seat belt.
�
Fasten your seat belt.
The warning lamp goes out.
Page 358 of 474
356 Practical hintsWhat to do if …?Display
Possible cause
Possible solution
#
BATTERY CHARGE
VISIT WORKSHOP
The battery is no longer charging.
Possible causes:�
alternator malfunctioning
�
broken poly-V-belt
Do not forget that the brake system re-
quires electrical energy and may be oper-
ating with restricted capability.
Considerably greater brake pedal force is
required and the stopping distance is
longer.
�
Stop immediately and check the
poly-V-belt.
If it is broken:
�
Do not continue to drive. Otherwise the
engine will overheat due to an inoperative
water pump which may result in damage
to the engine. Notify an authorized
Mercedes-Benz Center.
If it is intact:
�
Drive immediately to the nearest autho-
rized Mercedes-Benz Center. Adjust driv-
ing to be consistent with reduced braking
responsiveness.
;(USA only)!(Canada only)
RELEASE
PARKING BRAKE
You are driving with the parking brake en-
gaged.
�
Release the parking brake (
�page 48).
Page 362 of 474
360 Practical hintsWhat to do if …?Display
Possible cause
Possible solution
Ï
COOLANT
STOP, ENGINE OFF
The poly-V-belt could be broken.
�
Stop immediately and check the
poly-V-belt.
If it is broken:
�
Do not continue to drive. Otherwise the
engine will overheat due to an inoperative
water pump which may result in damage
to the engine.
�
Notify an authorized Mercedes-Benz Cen-
ter.
If it is intact:
�
Restart the engine only after the message
disappears from the multifunction dis-
play. Doing so could result in serious en-
gine damage that is not covered by the
Mercedes-Benz Limited Warranty.
�
Observe the coolant temperature gauge
(�page 141).
�
Drive immediately to the nearest autho-
rized Mercedes-Benz Center. Adjust driv-
ing to be consistent with reduced braking
responsiveness.
 the rear cli-
mate control system adopts the set-")