Page 9 of 356

Contents
Battery ............................................... 288
Disconnecting the battery ............ 289
Removing the battery ................... 289
Charging and
reinstalling the battery ................. 289
Reconnecting the battery ............. 289
Jump starting ..................................... 291
Towing the vehicle ............................. 293
Front towing eye .......................... 295
Rear towing eye ........................... 295
Stranded vehicle .......................... 296
Fuses ................................................. 297
Aids for changing fuses ................ 298
Main fuse box............................... 298
Fuse box in
front passenger footwell .............. 299
Technical data.................................. 301
Parts service....................................... 302
Warranty coverage ............................. 303
Loss of Service and Warranty
Information Booklet ...................... 303
Identification labels ............................ 304
Layout of poly-V-belt drive .................. 305
Engine ................................................ 306
Rims and tires .................................... 307
Rims and tires ............................... 307
Spare wheel .................................. 308
Electrical system ................................ 309
Main Dimensions ................................ 310
Weights .............................................. 311Fuels, coolants, lubricants, etc. .......... 312
Capacities ..................................... 312
Engine oils .................................... 314
Engine oil additives ....................... 314
Air conditioning refrigerant ........... 314
Brake fluid .................................... 314
Premium unleaded gasoline.......... 315
Fuel requirements......................... 315
Gasoline additives......................... 315
Coolants ....................................... 316
Windshield washer and
headlamp cleaning* system ......... 319
Windshield and headlamp
washer fluid mixing ratio............... 319
Consumer information........................ 320
Uniform tire quality grading .......... 320
Technical terms............................... 323Index................................................. 329
Page 208 of 356

206 OperationDriving instructionsTires�
Check the tread depth and maintain
specified tire pressure (see tire pres-
sure label inside the fuel filler flap).
�
Check tires for possible damage and
remove foreign objects.
�
Replace missing valve caps.
Rims
�
Dented or bent rims can cause tire
pressure loss and damage the tire
beads. For this reason, check and, if
necessary, change rims before driving
off-road.
Vehicle tool kit
�
Check if the vehicle jack is functional.
�
In all cases take the vehicle tool kit, a
strong tow rope, a shovel and a small
plank (to put under the vehicle jack on
sandy soil) with you.Driving in steep terrain
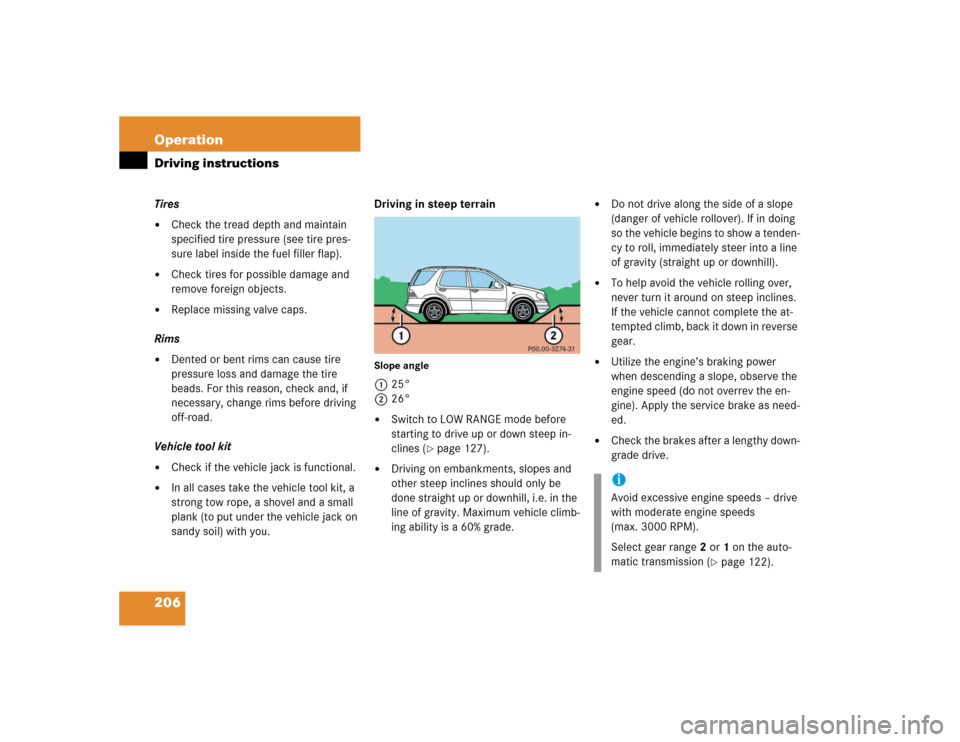
Slope angle1 25°
226°�
Switch to LOW RANGE mode before
starting to drive up or down steep in-
clines (
�page 127).
�
Driving on embankments, slopes and
other steep inclines should only be
done straight up or downhill, i.e. in the
line of gravity. Maximum vehicle climb-
ing ability is a 60% grade.
�
Do not drive along the side of a slope
(danger of vehicle rollover). If in doing
so the vehicle begins to show a tenden-
cy to roll, immediately steer into a line
of gravity (straight up or downhill).
�
To help avoid the vehicle rolling over,
never turn it around on steep inclines.
If the vehicle cannot complete the at-
tempted climb, back it down in reverse
gear.
�
Utilize the engine’s braking power
when descending a slope, observe the
engine speed (do not overrev the en-
gine). Apply the service brake as need-
ed.
�
Check the brakes after a lengthy down-
grade drive.iAvoid excessive engine speeds – drive
with moderate engine speeds
(max. 3000 RPM).
Select gear range2 or1 on the auto-
matic transmission (
�page 122).
Page 233 of 356

231 Operation
Tires and wheels
�Tires and wheels
See an authorized Mercedes-Benz Light
Truck Center for information on tested and
recommended rims and tires for summer
and winter operation. They can also offer
advice concerning tire service and pur-
chase.
Retreaded tires are not tested or recom-
mended by Mercedes-Benz, since previous
damage cannot always be recognized on
retreads. Mercedes-Benz can therefore
not assure the operating safety of the vehi-
cle when such tires are used.
See an authorized Mercedes-Benz Light
Truck Center for information on tested and
recommended rims and tires for summer
and winter operation.
Important guidelines�
Only use sets of tires and rims of the
same type and make.
�
Tires must be of the correct size for the
rim.
�
Break in new tires for approximately
60 miles (100 km) at moderate
speeds.
�
Regularly check the tires and rims for
damage. Dented or bent rims can
cause tire pressure loss or damage to
the tire beads.
�
If vehicle is heavily loaded, check tire
pressure and correct as required.
�
Do not allow your tires to wear down
too far. Adhesion properties on wet
roads are sharply reduced at tread
depths under
1/8in (3 mm).
�
When replacing individual tires, you
should mount new tires on the front
wheels first.
Warning!
G
Replace rims or tires with the same designa-
tion, manufacturer and type as shown on the
original part. See an authorized
Mercedes-Benz Light Truck Center for fur-
ther information. If incorrectly sized rims
and tires are mounted:�
The wheel brakes or suspension compo-
nents can be damaged.
�
The correct operating clearance of the
wheels and the tires are no longer guar-
anteed.
Warning!
G
Worn, old tires can cause accidents. If the
tire tread is badly worn, or if the tires have
sustained damage, replace them.
When replacing rims, use only genuine
Mercedes-Benz wheel bolts specified for the
particular rim type. Failure to do so can re-
sult in the bolts loosening and possibly an
accident.
Page 236 of 356
234 OperationTires and wheelsWarning!
G
Have the tightening torque checked after
changing a wheel. Wheels could become
loose if not tightened with a torque of
110 lb-ft (150 Nm).
Use only genuine Mercedes-Benz wheel
bolts specified for your vehicle’s rims.
Page 247 of 356
245 Operation
Vehicle care
Upholstery
Using aftermarket seat covers or wearing
clothing that has the tendency to give off
coloring (e.g. when wet, etc.) may cause
the upholstery to become permanently dis-
colored. By lining the seats with a proper
intermediate cover, contact-discoloration
will be prevented.
Leather upholstery*
Wipe leather upholstery with a damp cloth
and dry thoroughly or clean with
Mercedes-Benz approved Leather Care.
Exercise particular care when cleaning
perforated leather as its underside should
not become wet.MB Tex upholstery
Pour Mercedes-Benz approved Interior
Care onto soft lint-free cloth and apply
with light pressure.
Plastic and rubber parts
Do not use oil or wax on these parts.
Wood trims
Dampen cloth using water and use damp
cloth to clean wood trims in your vehicle.
Do not use solvents like tar remover or
wheel cleaner nor polishes or waxes as
these may be abrasive.
Page 303 of 356
301 Technical data
Parts service
Warranty coverage
Identification labels
Layout of poly-V-belt drive
Engine
Rims and tires
Electrical system
Main Dimensions
Weights
Fuels, coolants, lubricants, etc.
Consumer information
Page 309 of 356

307 Technical data
Rims and tires
�Rims and tires
Only use tires and rims which have been
specifically developed for your vehicle and
tested and approved by Mercedes-Benz.
Other tires and rims can have detrimental
effects, such as�
poor handling characteristics
�
increased noise
�
increased fuel consumption
Rims and tires
!Moreover, tires and rims not approved
by Mercedes-Benz may, under load,
exhibit dimensional variations and
different tire deformation characteris-
tics that could cause them to come into
contact with the vehicle body or axle
parts. This may result in damage to the
tires or the vehicle.
iFurther information on tires and rims is
available at any authorized
Mercedes-Benz Light Truck Center. A
tire inflation pressure table is located
on the fuel filler cap of the vehicle. The
tire pressure should be checked regu-
larly and should only be adjusted on
cold tires. Follow tire manufacturer’s
maintenance recommendation includ-
ed with vehicle.
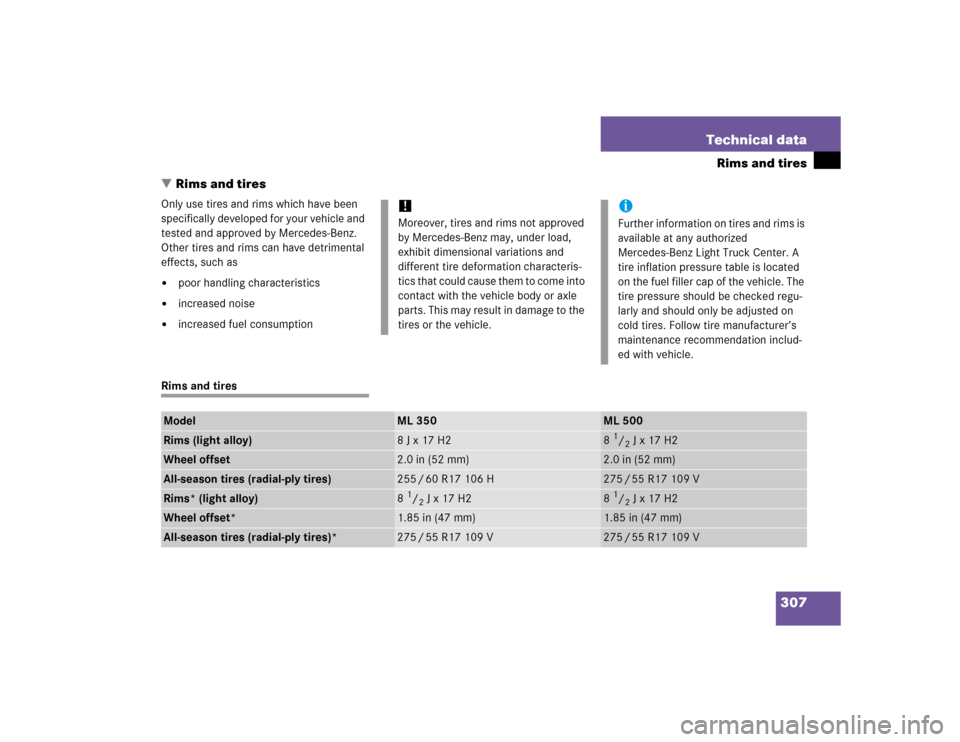
Model
ML 350
ML 500
Rims (light alloy)
8J x 17 H2
81/2J x 17 H2
Wheel offset
2.0in (52mm)
2.0in (52mm)
All-season tires (radial-ply tires)
255 / 60 R17 106 H
275 / 55 R17 109 V
Rims* (light alloy)
81/2 J x 17 H2
81/2 J x 17 H2
Wheel offset*
1.85 in (47 mm)
1.85 in (47 mm)
All-season tires (radial-ply tires)*
275 / 55 R17 109 V
275 / 55 R17 109 V
Page 310 of 356
308 Technical dataRims and tiresSpare wheelModel
ML 350, ML 500
Rim
4Jx18 H2 ET0
Wheel offset
0in (0mm)
Space-saver tire
T155 / 90 D18 113M
1
1Must not be used with snow chains.