Page 144 of 356

142 Controls in detailAutomatic climate control
Residual heat and ventilation
With the engine switched off, it is possible
to continue to heat or ventilate the interior
for up to 30 minutes. This feature makes
use of the residual heat produced by the
engine.
Activating�
Turn the key in the steering lock to
position0 or1 (
�page 33).
�
Press button° (
�page 137).
The indicator lamp on button°
comes on.Deactivating
�
Press button°.
The indicator lamp on button°
goes out.
!If the °button on the automatic
climate control panel starts to flash,
this indicates that the air conditioning
system is losing refrigerant. The com-
pressor has turned itself off. The air
conditioning cannot be turned on
again.
Have the air conditioning system
checked at the nearest authorized
Mercedes-Benz Light Truck Center.
iHow long the system will provide heat-
ing depends on the coolant tempera-
ture and the temperature set by the
operator. The blower will run at lower
speed regardless of the air volume con-
trol setting.
iThe residual heat is automatically
turned off:�
when the ignition is switched on
�
after about 30 minutes
�
if the coolant temperature is too
low
�
if the battery voltage drops
Page 148 of 356

146 Controls in detailPower windowsOpening and closing the side windows
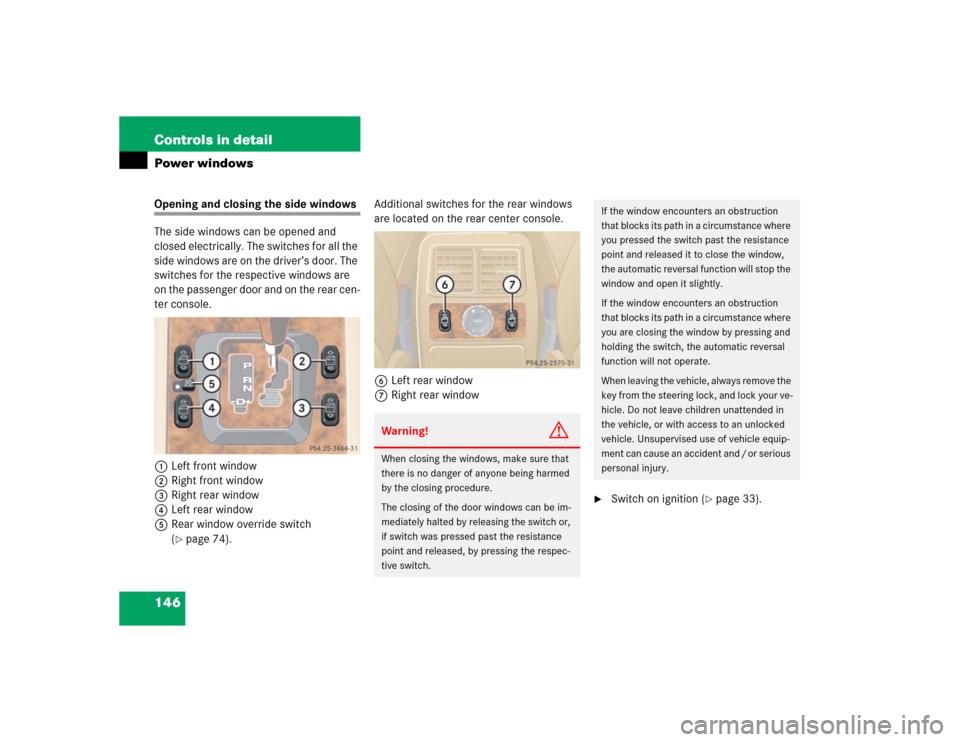
The side windows can be opened and
closed electrically. The switches for all the
side windows are on the driver’s door. The
switches for the respective windows are
on the passenger door and on the rear cen-
ter console.
1Left front window
2Right front window
3Right rear window
4Left rear window
5Rear window override switch
(
�page 74).Additional switches for the rear windows
are located on the rear center console.
6Left rear window
7Right rear window
�
Switch on ignition (
�page 33).
Warning!
G
When closing the windows, make sure that
there is no danger of anyone being harmed
by the closing procedure.
The closing of the door windows can be im-
mediately halted by releasing the switch or,
if switch was pressed past the resistance
point and released, by pressing the respec-
tive switch.
If the window encounters an obstruction
that blocks its path in a circumstance where
you pressed the switch past the resistance
point and released it to close the window,
the automatic reversal function will stop the
window and open it slightly.
If the window encounters an obstruction
that blocks its path in a circumstance where
you are closing the window by pressing and
holding the switch, the automatic reversal
function will not operate.
When leaving the vehicle, always remove the
key from the steering lock, and lock your ve-
hicle. Do not leave children unattended in
the vehicle, or with access to an unlocked
vehicle. Unsupervised use of vehicle equip-
ment can cause an accident and / or serious
personal injury.
Page 150 of 356

148 Controls in detailPower windowsSynchronizing power windows
The power window must be resynchro-
nized each time�
after the battery has been
disconnected.
�
if the power windows cannot be fully
opened (Express-open) or closed (Ex-
press-close).
Synchronizing the power windows
�
Switch on ignition.
�
Press the power window switches at
the symbolj until the side win-
dows are closed.
Hold the switches for approximately
one second.
The power window are synchronized.
Rear quarter windows*
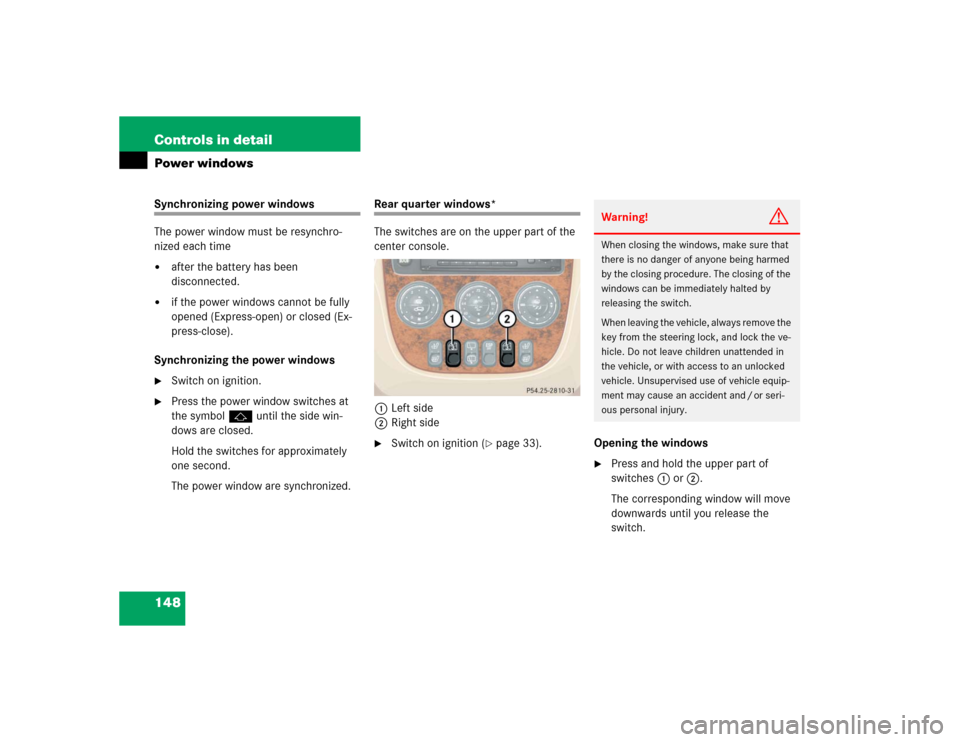
The switches are on the upper part of the
center console.
1Left side
2Right side�
Switch on ignition (
�page 33).Opening the windows
�
Press and hold the upper part of
switches1 or2.
The corresponding window will move
downwards until you release the
switch.Warning!
G
When closing the windows, make sure that
there is no danger of anyone being harmed
by the closing procedure. The closing of the
windows can be immediately halted by
releasing the switch.
When leaving the vehicle, always remove the
key from the steering lock, and lock the ve-
hicle. Do not leave children unattended in
the vehicle, or with access to an unlocked
vehicle. Unsupervised use of vehicle equip-
ment may cause an accident and / or seri-
ous personal injury.
Page 153 of 356

151 Controls in detail
Power tilt / sliding sunroof*
�
Switch on ignition (
�page 33).Opening and closing the power
tilt / sliding sunroof
�
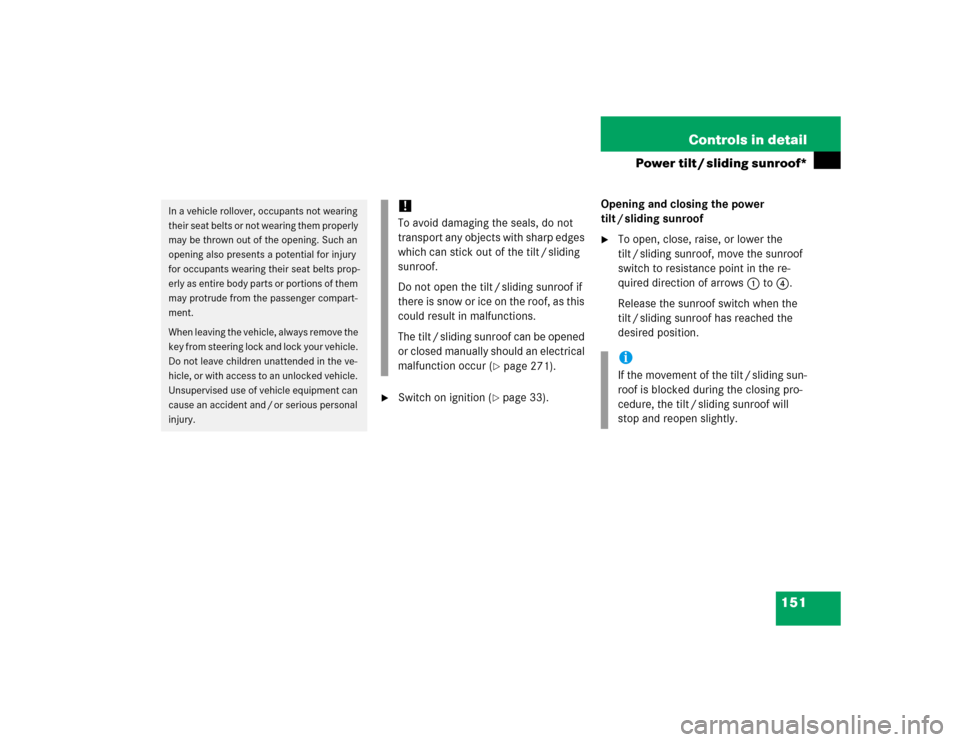
To open, close, raise, or lower the
tilt / sliding sunroof, move the sunroof
switch to resistance point in the re-
quired direction of arrows1to4.
Release the sunroof switch when the
tilt / sliding sunroof has reached the
desired position.
In a vehicle rollover, occupants not wearing
their seat belts or not wearing them properly
may be thrown out of the opening. Such an
opening also presents a potential for injury
for occupants wearing their seat belts prop-
erly as entire body parts or portions of them
may protrude from the passenger compart-
ment.
When leaving the vehicle, always remove the
key from steering lock and lock your vehicle.
Do not leave children unattended in the ve-
hicle, or with access to an unlocked vehicle.
Unsupervised use of vehicle equipment can
cause an accident and / or serious personal
injury.
!To avoid damaging the seals, do not
transport any objects with sharp edges
which can stick out of the tilt / sliding
sunroof.
Do not open the tilt / sliding sunroof if
there is snow or ice on the roof, as this
could result in malfunctions.
The tilt / sliding sunroof can be opened
or closed manually should an electrical
malfunction occur (
�page 271).
iIf the movement of the tilt / sliding sun-
roof is blocked during the closing pro-
cedure, the tilt / sliding sunroof will
stop and reopen slightly.
Page 154 of 356

152 Controls in detailPower tilt / sliding sunroof*Fully opening (Express-open) the power
tilt / sliding sunroof�
To open the tilt / sliding sunroof, move
the sunroof switch past the resistance
point in the direction of arrow2 and
release.
The tilt / sliding sunroof almost opens
completely.
�
Move the sunroof switch again briefly
in the direction of arrow2.
The tilt / sliding sunroof almost opens
completely.
Stopping the power tilt / sliding sunroof
during Express-open
�
Move the sunroof switch in any direc-
tion.
The movement of the tilt / sliding sun-
roof stops.Synchronizing the power tilt / sliding
sunroof
The tilt / sliding sunroof must be
synchronized�
after the battery has been
disconnected or discharged
�
after the tilt / sliding sunroof has been
closed manually (
�page 271)
�
after a malfunction
�
the tilt / sliding sunroof does not open
smoothly
�
Remove the respective fuse from the
fuse box (
�page 297).
�
Reinsert the fuse in the fuse box.
�
Switch on ignition.
�
Move and hold the sunroof switch in
the direction of arrow1 or4 until
the tilt / sliding sunroof is fully raised at
the rear or completely closed.
Keep holding the sunroof switch in the
direction of arrow1 or4 for approx-
imately one second.
The tilt / sliding sunroof is synchro-
nized.
Page 158 of 356

156 Controls in detailDriving systemsParktronic* system (Parking assist)
The Parktronic system is an electronic and
designed to assist the driver during park-
ing maneuvers. It visually and audibly indi-
cates the relative distance between the
vehicle and an obstacle.
The Parktronic system is automatically
activated when you switch on the ignition.
The Parktronic system deactivates at
speeds over approximately 10 mph
(15 km / h). At lower speeds the Parktronic
system turns on again.The Parktronic system monitors the sur-
roundings of your vehicle with six sensors
in the front bumper and four sensors in the
rear bumper.
1Sensors located in front bumperWarning!
G
The Parktronic is a supplemental system. It
is not intended to, nor does it replace, the
need for extreme care. The responsibility
during parking and other critical maneuvers
always rests with the driver.
Special attention must be paid to objects
with smooth surfaces or low silhouettes
(e.g. trailer couplings, painted posts, or road
curbs). Such objects may not be detected by
the system and can damage the vehicle.
The operational function of the Parktronic
system can be affected by dirty sensors, es-
pecially at times of snow and ice. See
“Cleaning the Parktronic system sensors”
(�page 243).
Interference caused by other ultrasonic sig-
nals (e.g. working jackhammers, car wash,
or the air brakes of trucks) can cause the
system to send erratic indications, and
should be taken into consideration.
Warning!
G
Make sure that no persons or animals are in
the area in which you are maneuvering. You
could otherwise injure them.
Page 160 of 356

158 Controls in detailDriving systemsWarning indicators
The warning indicators show the distance
between the sensor and the obstacle. The
warning indicators for the front area are lo-
cated above the center air vents in the
dashboard. The warning indicator for the
rear area is located in the rear passenger
compartment lamp.Front area warning indicator1Segments, left side of vehicle
2Segments, right side of vehicle
Each warning indicator has six yellow and
two red segments.The gear selector lever position deter-
mines which warning indicator is activat-
ed.
As soon as the sensors detect an obstacle,
one or more segments light up, depending
on the distance. An intermittent acoustic
warning will also sound as the seventh seg-
ment comes on and a constant acoustic
warning lasting a maximum of
three seconds will sound for the eighth
segment.
Selector lever
position
Warning indicator
D, R, N, P
Front area activated
R
Rear area activated
!If all red segments light up in the warn-
ing indicators, a dirty sensor or a ultra-
sonic signal could be the reason.�
Clean the sensors (
�page 243).
After cleaning the sensors, switch
the ignition on.
Page 161 of 356
159 Controls in detail
Driving systems
Switching Parktronic system on / off
The Parktronic system can switched on or
off manually.
The Parktronic switch is located on the
lower part of the center console.
1Parktronic off
2Indicator lamp
3Parktronic onSwitching off the Parktronic system
�
Press Parktronic switch on upper
part1.
Indicator lamp2 comes on.
Switching on the Parktronic system
�
Press Parktronic switch on lower
part3.
The indicator lamp2 goes out.!If the Parktronic system is malfunction-
ing, all red segments of the warning in-
dicators light up and an additional
warning sounds.
Contact your Mercedes-Benz Light
Truck Center as soon as possible.
iIf you switch the ignition on, the Park-
tronic system will be automatically
switched on.
The rear Parktronic sensors will not au-
tomatically disengage when towing a
trailer. Therefore switch the Parktronic
system off.