Page 8 of 356

ContentsAt the gas station............................... 219
Refueling ...................................... 219
Check regularly and
before a long trip .......................... 221
Engine compartment.......................... 222
Hood ............................................ 222
Engine oil...................................... 223
Transmission fluid level ................ 227
Coolant level ................................ 227
Battery ......................................... 228
Windshield / rear
window washer system and
headlamp cleaning system*......... 230
Tires and wheels ................................ 231
Important guidelines .................... 231
Life of tire ..................................... 232
Direction of rotation ..................... 232
Checking tire inflation pressure ... 232
Rotating wheels............................ 233
Winter driving..................................... 235
Winter tires................................... 235
Block heater (Canada only) .......... 236
Snow chains ................................. 236Maintenance ...................................... 237
Clearing the
maintenance service indicator ..... 237
Maintenance service
term exceeded ............................. 238
Calling up the
maintenance service indicator ..... 238
Resetting the
maintenance service indicator ..... 238
Vehicle care ....................................... 240
Cleaning and care of the vehicle .. 240
Practical hints.................................. 247
What to do if … .................................. 248
Lamps in instrument cluster ........ 248
Additional indicators
in the speedometer display .......... 263
Where will I find ...? ........................... 264
First aid kit ................................... 264
Vehicle tool kit ............................. 264
Spare wheel (space-saver tire) ..... 266Unlocking / locking in
an emergency .................................... 268
Unlocking the vehicle................... 268
Locking the vehicle ...................... 269
Fuel filler flap ............................... 269
Manually unlocking the
transmission gear selector lever .. 270
Opening / closing in
an emergency .................................... 271
Power tilt / sliding sunroof* ......... 271
Replacing key batteries ..................... 272
Remote control ............................ 273
Replacing bulbs ................................. 274
Bulbs ............................................ 274
Replacing bulbs for front lamps ... 276
Replacing bulbs for rear lamps .... 279
Adjusting headlamp aim .............. 282
Replacing wiper blades ...................... 283
Removing ..................................... 283
Installing ...................................... 283
Flat tire .............................................. 284
Mounting the spare wheel ........... 284
Page 223 of 356
.
1Engine oil level
2Coolant level
3Brake fluid
4Windshield washer system and
headlamp cleaning syst")
221 Operation
At the gas station
Check regularly and before a long trip�
Open the hood (
�page 222).
1Engine oil level
2Coolant level
3Brake fluid
4Windshield washer system and
headlamp cleaning system*
Engine oil level
For more information on engine oil, see
“Engine oil” (
�page 223).Coolant
For normal replenishing, use water (pota-
ble water quality). For more information,
see “Coolant level” (
�page 227) and see
“Fuels, coolants, lubricants, etc.”
(
�page 312).
Brake fluidWindshield / rear window washer
system and headlamp cleaning
system*
For more information on refilling the reser-
voir, see “Windshield / rear window washer
system and headlamp cleaning system*”
(
�page 230).
Vehicle lighting
Check function and cleanliness. For infor-
mation on replacing light bulbs, see “Re-
placing bulbs” (
�page 274).
For more information, see “Combination
switch” (
�page 107).
Tire inflation pressure
For more information, see “Checking tire
inflation pressure” (
�page 232).
!If you find that the brake fluid in the
brake fluid reservoir has fallen to the
minimum mark or below, have the
brake system checked for brake pad
thickness and leaks immediately. Noti-
fy an authorized Mercedes-Benz Light
Truck Center immediately. Do not add
brake fluid as this will not solve the
problem. For more information, see
“Practical Hints” (
�page 251).
Page 249 of 356
247 Practical hints
What to do if …
Where will I find ...?
Unlocking / locking in an emergency
Opening / closing in an emergency
Replacing key batteries
Replacing bulbs
Replacing wiper blades
Flat tire
Battery
Jump starting
Towing the vehicle
Fuses
Page 250 of 356

248 Practical hintsWhat to do if …Lamps in instrument clusterGeneral information:
If a bulb in the instrument cluster fails to
come on during the bulb self-check when switching on ignition, have it checked and
replaced if necessary.Problem
Possible cause
Suggested solution
-
The yellow ABS malfunction
indicator lamp comes on while
driving.
ABS has detected a malfunction and has
switched off. The BAS, ESP, and 4-ETS are
also switched off.
The brake system is still functioning normally
but without ABS available.
�
Continue driving with added caution.
Wheels may lock during hard braking
reducing steering capability.
�
Have the system checked at an autho-
rized Mercedes-Benz Light Truck Cen-
ter as soon as possible.
Failure to follow these instructions in-
creases the risk of an accident.
The charging voltage has fallen below
10 volts. The ABS has switched off.
When the voltage is above this value
again, the ABS is operational again.�
If necessary, have the generator
(alternator) and the battery checked.
Page 276 of 356

274 Practical hintsReplacing bulbsBulbs
Safe vehicle operation depends on proper
exterior lighting and signaling. It is there-
fore essential that all bulbs and lamp as-
semblies are in good working order at all
times.
Correct headlamp adjustment is extremely
important. Have headlamps checked and
readjusted at regular intervals and when a
bulb has been replaced. See an authorized
Mercedes-Benz Light Truck Center for
headlamp adjustment.Front lamps
iBackup bulbs will be brought into use
when the following lamps malfunction:�
Turn signal lamps
�
Parking lamps
�
Tail lamps
iIf the headlamps or front fog lamps are
fogged up on the inside as a result of
high humidity, driving the vehicle a dis-
tance with the lights on should clear up
the fogging.
Lamp
Type
1
Front Fog lamp
H8 (35 W)
2
High beam
H7 (55 W)
Parking, standing lamp
5W5
3
Low beam
1
1Vehicles with Xenon* headlamps: Do not replace
the Xenon bulbs yourself. See your authorized
Mercedes-Benz Light Truck Center.
H7 (55 W)
Xenon*:
D2S-35 W
4
Turn signal and side
marker lamp
1157 NA
(32 / 3 cp
bulb)
5
Additional turn signal
lamp
LED
Page 277 of 356

275 Practical hints
Replacing bulbs
Rear lamps Notes on bulb replacement
�
Only use 12 volt bulbs of the same type
and with the specified watt rating.
�
Switch lights off before changing a bulb
to prevent short circuits.
�
Always use a clean lint-free cloth when
handling bulbs.
�
Your hands should be dry and free of oil
and grease.
�
If the newly installed bulb does not
come on, visit an authorized
Mercedes-Benz Light Truck Center.
Lamp
Type
6
Brake lamp
1073
(32 cp bulb)
7
Backup lamp
1073
(32 cp bulb)
8
Turn signal lamp
PY 21 W
9
Side marker lamp
W 5 W
a
Tail, parking, standing
lamp, rear fog lamp
(only driver’s side)
P 21 / 4 W
b
High mounted brake
lamp
1073
(32 cp bulb)
c
License plate lamps
C 5 W
Warning!
G
Bulbs and bulb sockets can be very hot.
Allow the lamp to cool down before chang-
ing a bulb.
Keep bulbs out of reach of children.
Halogen lamps contain pressurized gas.
A bulb can explode if you:�
touch or move it when hot
�
drop the bulb
�
scratch the bulb
Wear eye and hand protection.
Because of high voltage in Xenon lamps, it is
dangerous to replace the bulb or repair the
lamp and its components. We recommend
that you have such work done by a qualified
technician.
Page 278 of 356
276 Practical hintsReplacing bulbsHave the LEDs and bulbs for the following
lamps replaced by an authorized
Mercedes-Benz Light Truck Center:�
Additional turn signals in the exterior
rear view mirrors
�
Xenon*-lamps
�
Front fog lamps (vehicles with sport
package*)
�
High mounted brake lamp (only vehi-
cles with an exterior spare-wheel
rack*)
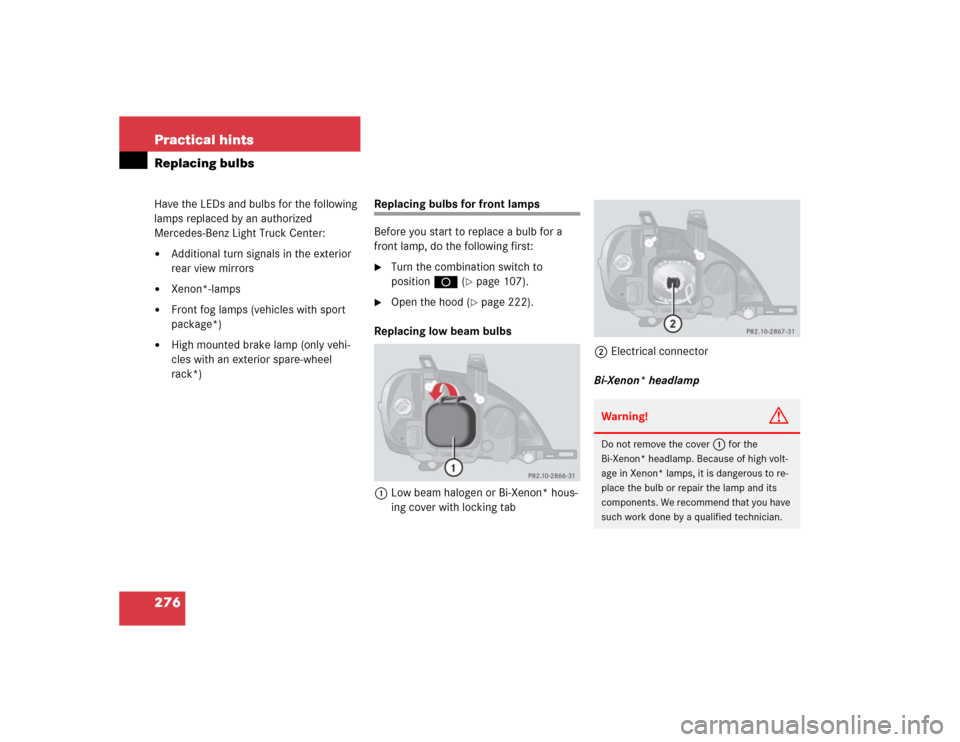
Replacing bulbs for front lamps
Before you start to replace a bulb for a
front lamp, do the following first:�
Turn the combination switch to
positionD (
�page 107).
�
Open the hood (
�page 222).
Replacing low beam bulbs
1Low beam halogen or Bi-Xenon* hous-
ing cover with locking tab2Electrical connector
Bi-Xenon* headlamp
Warning!
G
Do not remove the cover
1
for the
Bi-Xenon* headlamp. Because of high volt-
age in Xenon* lamps, it is dangerous to re-
place the bulb or repair the lamp and its
components. We recommend that you have
such work done by a qualified technician.
Page 279 of 356

277 Practical hints
Replacing bulbs
Low beam halogen headlamp�
Press down the tab on top end of hous-
ing cover1 and remove it in direction
of arrow.
�
Pull electrical connector2 off.
�
Unclip the retainer spring on the bulb
socket and take out of the bulb.
�
Insert the new bulb so that its socket
locates in the recess of the lamp hous-
ing.
�
Clip on the retainer spring.
�
Plug electrical connector2 onto the
bulb.
�
Align housing cover1 and press until
it engages.High beam halogen bulb (vehicles with
halogen bulbs: high beam and high
beam flasher; vehicles with Xenon*
headlamps: high beam flasher only),
parking and standing lamp
1Housing cover for high beam halogen
bulb (vehicles with halogen bulbs: high
beam and high beam flasher; vehicles
with Xenon* headlamps: high beam
flasher only), parking and standing
lamp2Electrical connector for high beam
halogen bulb (vehicles with halogen
bulbs: high beam and high beam flash-
er; vehicles with Xenon* headlamps:
high beam flasher only)
3Bulb socket for parking and standing
lamp bulb