Page 90 of 356

88 Controls in detailIn the “Controls in detail” section you will
find detailed information on how to oper-
ate the equipment installed in your vehicle.
If you are already familiar with the basic
functions of your vehicle, this section will
be of particular interest to you.
To quickly familiarize yourself with the ba-
sic functions of the vehicle, refer to the
“Getting started” section of this manual.
The corresponding page numbers are
given at the beginning of each segment.Locking and unlocking
For more information on locking and un-
locking, see “Getting started” (
�page 31)
and (
�page 55).
Remote control with folding key
Your vehicle comes supplied with two
remote controls with folding key.
The remote control provides an extended
operating range. To prevent theft,
however, it is advisable to only unlock the
vehicle when you are in close proximity to
it.
The key centrally locks and unlocks:�
the doors
�
the liftgate
�
the fuel filler flap
Remote control with folding key1ÂPanic button (
�page 75)
2ŒUnlock button
3‹Lock button
4Release button for key
5ŠUnlock button for liftgate
Page 92 of 356

90 Controls in detailLocking and unlocking
Loss of remote control with folding key
If you lose a remote control or the folding
key, you should do the following:�
Have the remote control deactivated
by an authorized Mercedes-Benz Light
Truck Center.
�
Report the loss of the remote control or
the folding key immediately to your car
insurance company.
�
If necessary have the mechanical lock
replaced.
Your authorized Mercedes-Benz Light
Truck Center will be glad to supply you
with a replacement.
Opening the doors from the inside
You can open a locked door from the in-
side. Open door only when conditions are
safe to do so.
1Locking knob
2Inside door handle
Front doors�
Pull on door handle2 on the respec-
tive front door to open door.
If door was locked, locking knob1 will
move up.
!If you can no longer lock or unlock the
vehicle with the remote control, then
the batteries in the remote control are
discharged, the remote control is mal-
functioning or the vehicle battery is
drained.�
Check the batteries in the remote
control and replace them if neces-
sary (
�page 273).
�
Use the folding key to unlock or
lock the driver’s door as required
(�page 268).
�
Lock the liftgate if necessary from
inside (
�page 91).
�
Check the vehicle battery
(�page 272).
�
Synchronize the remote control
(�page 273).
If the remote control is malfunctioning,
contact an authorized Mercedes-Benz
Light Truck Center.
Page 93 of 356

91 Controls in detail
Locking and unlocking
Rear doors�
Pull up locking knob1 on the respec-
tive rear door.
�
Pull on door handle2 on the respec-
tive rear door to open door.
Opening the liftgate
Opening the liftgate from outside
A minimum height clearance of 7 ft
(2.15 m) is required to open the liftgate.
The handle is located above the rear
license plate recess.
1Grip molding
2Handle
The vehicle must be unlocked.�
Pull on handle2.
�
Swing the liftgate upward by using the
grip molding1.Opening the liftgate from inside
A minimum height clearance of 7 ft
(2.15 m) is required to open the liftgate.
The release lever is located on the inside of
the liftgate.
1Release lever
2Catch
�
To unlock the liftgate, move the
catch2 to the right.
iIf the vehicle has previously been
locked from the outside using the
remote control, opening a door from
the inside will trigger the alarm.
To cancel the alarm, do one of the
following:�
Switch on the ignition by turning
the key in the steering lock to
position2.
�
Press the‹ or Œbutton on
the remote control.
!Always make sure that there is suffi-
cient overhead clearance.
��
Page 94 of 356

92 Controls in detailLocking and unlocking�
Pull release lever1 down and swing
liftgate upward.
Closing the liftgate
1Recessed grip
2Grip molding
�
Pull down on recessed grip1.
�
Close liftgate by using grip molding2.
!Always make sure that there is suffi-
cient overhead clearance.iTo lock the liftgate, move the catch2
to the left.
Warning!
G
To prevent possible personal injury, always
keep hands and fingers away from the lift-
gate opening when closing the liftgate. Be
especially careful when small children are
around.
Do not close the liftgate from the inside by
pulling on the handle.
When leaving the vehicle, always remove the
key from the steering lock and lock the vehi-
cle. Do not leave children unattended in the
vehicle. Children could open the liftgate
from inside, which could result in an acci-
dent and / or serious personal injury.
Warning!
G
Only drive with the liftgate closed as exhaust
fumes may enter the vehicle interior.iDo not place the key in the cargo com-
partment. You may lock yourself out.iIf the vehicle was previously centrally
locked, the liftgate lid will lock auto-
matically when closed. The turn signals
will flash three times to confirm lock-
ing.
��
Page 110 of 356

108 Controls in detailLightingManual headlamp mode
The low beam headlamps and the parking
lamps can be switched on and off with the
combination switch.
Automatic headlamp mode
The following lamps switch on and off au-
tomatically depending on the brightness of
the ambient light.�
Low beam headlamps
�
Tail and parking lamps
�
License plate lamps
�
Side marker lamps
�
Turn the combination switch to
positionU.
With the key in steering lock position1
only the parking lamps will switch on
and off automatically.
With the engine is running, the low
beam headlamps, the tail and parking
lamps, the license plate lamps, and the
side marker lamps will switch on and
off automatically.
They will be switched on constantly,
when you switch on the front fog
lamps.
iWith the key removed from the steering
lock and the driver’s door open, a warn-
ing sounds if the parking lamps or low
beam headlamps are switched on
(�page 107).
Warning!
G
If the combination switch is set toU�
the headlamps may switch off unexpect-
edly when the system senses bright am-
bient light, for example light from
oncoming traffic.
�
the headlamps will not be automatically
switched on under foggy conditions.
To minimize risk to you and to others, acti-
vate headlamps by turning combination
switch toõ when driving or when traffic
and / or ambient lighting conditions require
you to do so.
In low ambient lighting conditions, only
switch from positionU toõ with the
vehicle at a standstill. Switching
fromUtoõ will briefly switch off the
headlamps. Doing so while driving in low
ambient lighting conditions may result in an
accident.
The automatic headlamp feature is only an
aid to the driver. The driver is responsible for
the operation of the vehicle’s lights at all
times.
Page 111 of 356

109 Controls in detail
Lighting
Daytime running lamp mode
Canada only:�
Turn combination switch to
positionD orU.
When the engine is running, the low
beam headlamps are switched on.
In low ambient light conditions, the fol-
lowing lamps will switch on additional-
ly:�
Tail and parking lamps
�
License plate lamps
�
Side marker lamp
For nighttime driving you should turn the
combination switch to positionõ to
permit activation of the high beam head-
lamps.
When the engine is running, and you shift
from a driving position to positionN orP,
the low beam headlamps will switch off
with a three minutes delay.When the engine is running, and you
�
turn the combination switch to
positionC, the parking lamps
switch on additionally.
�
turn the combination switch to
positionõ, the manual headlamp
mode has priority over the daytime run-
ning lamp mode.
The corresponding exterior lamps
switch on (
�page 107).Night security illumination
Use this function to set wether and how
long you would like the exterior lamps to il-
luminate during darkness after exiting the
vehicle and all doors closed.
When a time is set for the night security il-
lumination and the combination switch is
set to positionUbefore turning off the
engine, the following lamps will come on
after you have removed the key from the
steering lock:
�
Tail and parking lamps
�
License plate lamps
�
Side marker lamps
�
Front fog lamps
iWith the daytime running lamp mode
and the combination switch in
positionD, the high beam head-
lamps cannot be switched on.
The high beam flasher is always avail-
able.
iYou can reactivate this function within
ten minutes by opening a door.
If you do not open a door or do not
close an opened door after turning off
the engine, the lamps will automatically
switch off after 60 seconds.
Page 117 of 356
115 Controls in detail
Lighting
Manual control
Front interior lighting�
Press front interior lamp lens1 or2.
The corresponding front interior lamp
switches on.
�
Press respective front interior lamp
lens1 or2 again.
The corresponding front interior lamp
switches off.
Rear interior lighting
�
Press upper part5 of the interior
lighting switch to switch the rear interi-
or lighting on or off.Operating rear interior lighting with
lamp lens
Rear interior lighting�
Press gently on lamp lens in direction
of arrow to switch the rear interior
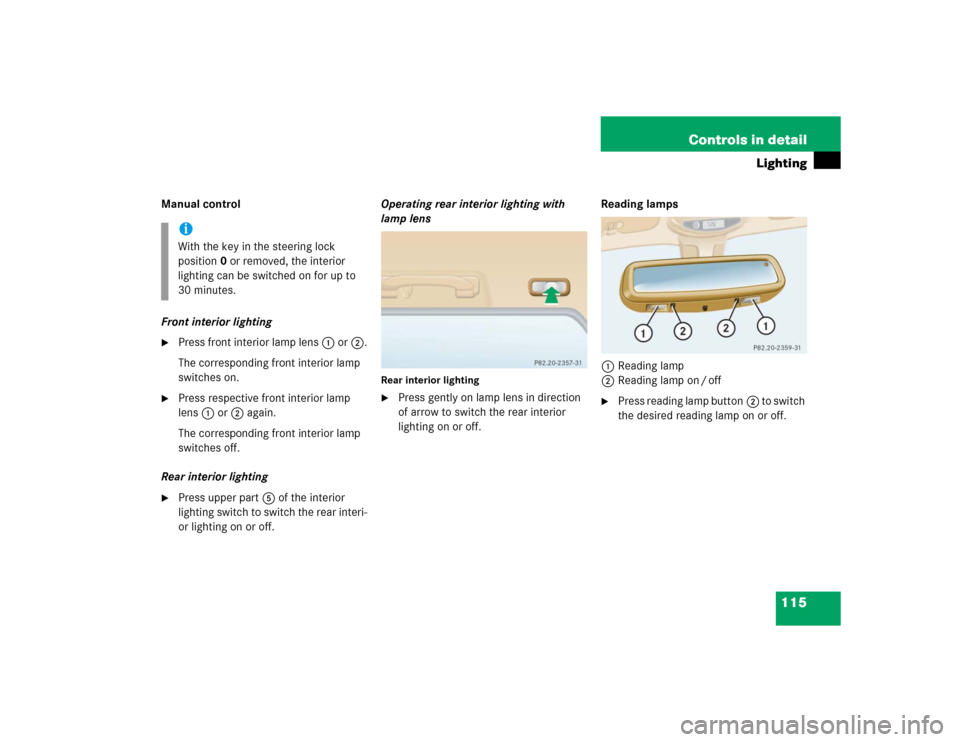
lighting on or off.Reading lamps
1Reading lamp
2Reading lamp on / off
�
Press reading lamp button2 to switch
the desired reading lamp on or off.
iWith the key in the steering lock
position0 or removed, the interior
lighting can be switched on for up to
30 minutes.
Page 121 of 356
 re-
peatedly until you see the trip odome-
ter display.
�
Press and hold the left knob1 until
the")
119 Controls in detail
Instrument cluster
Resetting trip odometer�
Press the left knob1 (
�page 117) re-
peatedly until you see the trip odome-
ter display.
�
Press and hold the left knob1 until
the trip odometer is reset.
Tachometer
To help protect the engine, the fuel supply
is interrupted if the engine is operated
above its specified limit.
Outside temperature indicator
The outside temperature is displayed in
the instrument cluster (
�page 24).
When moving the vehicle into colder ambi-
ent temperatures (e.g. when leaving your
garage), you will notice a delay before the
lower temperature is displayed.
A delay also occurs when ambient temper-
atures rise. This prevents inaccurate tem-
perature indications caused by heat
radiated from the engine during idling or
slow driving.
Setting the clock
Hour�
Pull out the right knob2 in the instru-
ment cluster (
�page 117) and turn it
counterclockwise.
Minutes
�
Pull out the right knob2 in the instru-
ment cluster (
�page 117) and turn it
clockwise.
Warning!
G
The outside temperature indicator is not de-
s i g n e d t o s e r v e a s a n i c e - w a r n i n g d e v i c e a n d
is therefore unsuitable for that purpose.
Indicated temperatures just above the freez-
ing point do not guarantee that the road sur-
face is free of ice. The road may still be icy,
especially in wooded areas or on bridges.
iTo set the clock by a single hour or a
few minutes, turn knob2 just a few
degrees in the direction indicated for
hours or minutes.