Page 276 of 356

274 Practical hintsReplacing bulbsBulbs
Safe vehicle operation depends on proper
exterior lighting and signaling. It is there-
fore essential that all bulbs and lamp as-
semblies are in good working order at all
times.
Correct headlamp adjustment is extremely
important. Have headlamps checked and
readjusted at regular intervals and when a
bulb has been replaced. See an authorized
Mercedes-Benz Light Truck Center for
headlamp adjustment.Front lamps
iBackup bulbs will be brought into use
when the following lamps malfunction:�
Turn signal lamps
�
Parking lamps
�
Tail lamps
iIf the headlamps or front fog lamps are
fogged up on the inside as a result of
high humidity, driving the vehicle a dis-
tance with the lights on should clear up
the fogging.
Lamp
Type
1
Front Fog lamp
H8 (35 W)
2
High beam
H7 (55 W)
Parking, standing lamp
5W5
3
Low beam
1
1Vehicles with Xenon* headlamps: Do not replace
the Xenon bulbs yourself. See your authorized
Mercedes-Benz Light Truck Center.
H7 (55 W)
Xenon*:
D2S-35 W
4
Turn signal and side
marker lamp
1157 NA
(32 / 3 cp
bulb)
5
Additional turn signal
lamp
LED
Page 277 of 356

275 Practical hints
Replacing bulbs
Rear lamps Notes on bulb replacement
�
Only use 12 volt bulbs of the same type
and with the specified watt rating.
�
Switch lights off before changing a bulb
to prevent short circuits.
�
Always use a clean lint-free cloth when
handling bulbs.
�
Your hands should be dry and free of oil
and grease.
�
If the newly installed bulb does not
come on, visit an authorized
Mercedes-Benz Light Truck Center.
Lamp
Type
6
Brake lamp
1073
(32 cp bulb)
7
Backup lamp
1073
(32 cp bulb)
8
Turn signal lamp
PY 21 W
9
Side marker lamp
W 5 W
a
Tail, parking, standing
lamp, rear fog lamp
(only driver’s side)
P 21 / 4 W
b
High mounted brake
lamp
1073
(32 cp bulb)
c
License plate lamps
C 5 W
Warning!
G
Bulbs and bulb sockets can be very hot.
Allow the lamp to cool down before chang-
ing a bulb.
Keep bulbs out of reach of children.
Halogen lamps contain pressurized gas.
A bulb can explode if you:�
touch or move it when hot
�
drop the bulb
�
scratch the bulb
Wear eye and hand protection.
Because of high voltage in Xenon lamps, it is
dangerous to replace the bulb or repair the
lamp and its components. We recommend
that you have such work done by a qualified
technician.
Page 278 of 356
276 Practical hintsReplacing bulbsHave the LEDs and bulbs for the following
lamps replaced by an authorized
Mercedes-Benz Light Truck Center:�
Additional turn signals in the exterior
rear view mirrors
�
Xenon*-lamps
�
Front fog lamps (vehicles with sport
package*)
�
High mounted brake lamp (only vehi-
cles with an exterior spare-wheel
rack*)
Replacing bulbs for front lamps
Before you start to replace a bulb for a
front lamp, do the following first:�
Turn the combination switch to
positionD (
�page 107).
�
Open the hood (
�page 222).
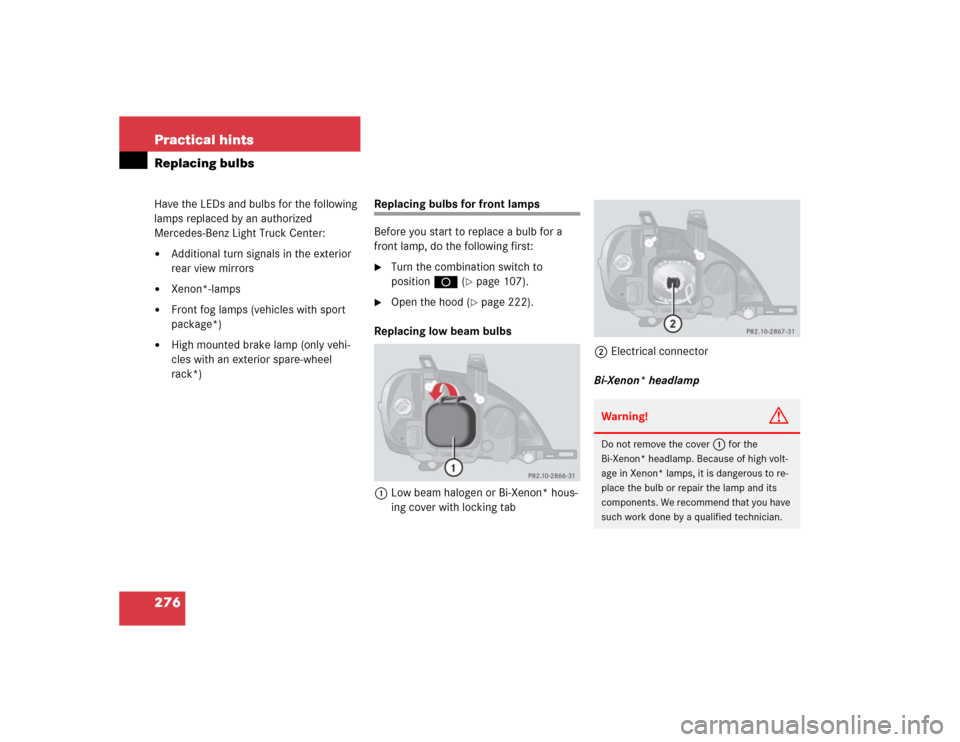
Replacing low beam bulbs
1Low beam halogen or Bi-Xenon* hous-
ing cover with locking tab2Electrical connector
Bi-Xenon* headlamp
Warning!
G
Do not remove the cover
1
for the
Bi-Xenon* headlamp. Because of high volt-
age in Xenon* lamps, it is dangerous to re-
place the bulb or repair the lamp and its
components. We recommend that you have
such work done by a qualified technician.
Page 280 of 356
�
Turn housing cover1")
278 Practical hintsReplacing bulbsHigh beam halogen bulb (vehicles with
halogen bulbs: high beam and high
beam flasher; vehicles with Xenon*
headlamps: high beam flasher only)�
Turn housing cover1 counterclock-
wise and remove it.
�
Pull electrical connector2 off.
�
Unclip the retainer spring on the bulb
socket and take out the bulb.
�
Insert the new bulb so that its socket
locates in the recess of the lamp hous-
ing.
�
Clip on the retainer spring.
�
Plug electrical connector2 onto the
bulb.
�
Align housing cover1 and turn it
clockwise.Parking / standing lamp bulb
�
Turn housing cover1 counterclock-
wise and remove it.
�
Pull out bulb socket3 with the bulb.
�
Press gently onto the bulb and turn
counterclockwise out of bulb
socket3.
�
Press the new bulb gently into bulb
socket3 and turn clockwise until it
engages.
�
Press bulb socket3 back into the
lamp.
�
Align housing cover1 and turn it
clockwise.Turn signal bulb / side marker bulb
1Bulb socket
�
Twist bulb socket1 counterclockwise
and pull out.
�
Push bulb into socket, turn counter-
clockwise and remove.
�
Insert new bulb in socket, push in and
twist clockwise.
�
Reinstall the bulb socket1.
Page 281 of 356
279 Practical hints
Replacing bulbs
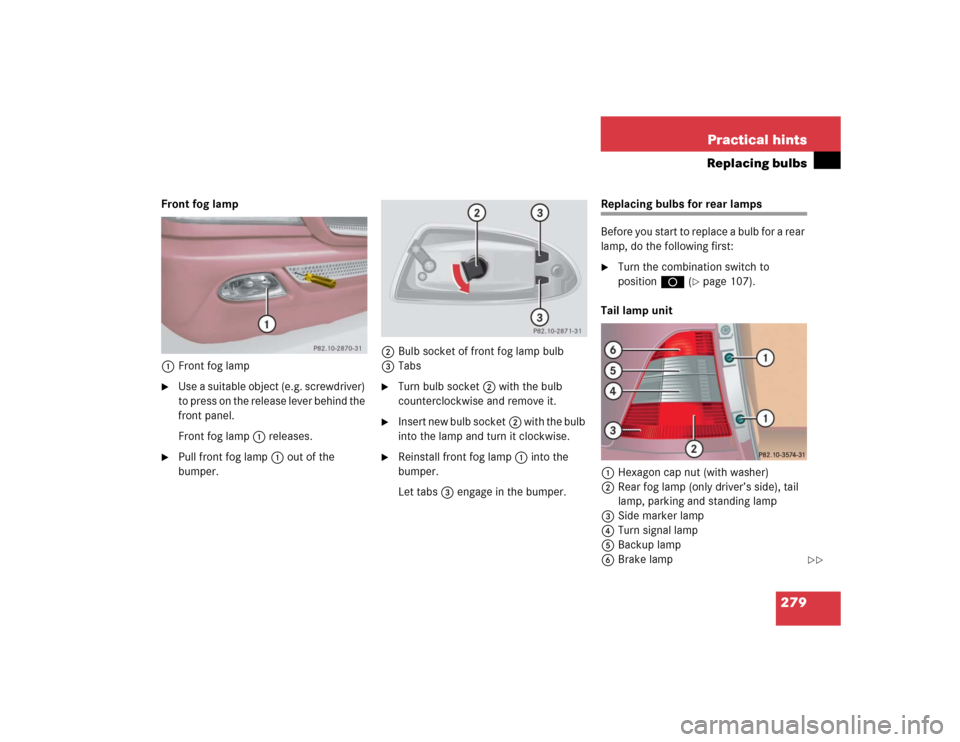
Front fog lamp
1Front fog lamp�
Use a suitable object (e.g. screwdriver)
to press on the release lever behind the
front panel.
Front fog lamp1 releases.
�
Pull front fog lamp1 out of the
bumper.2Bulb socket of front fog lamp bulb
3Tabs
�
Turn bulb socket2 with the bulb
counterclockwise and remove it.
�
Insert new bulb socket2 with the bulb
into the lamp and turn it clockwise.
�
Reinstall front fog lamp1 into the
bumper.
Let tabs3 engage in the bumper.
Replacing bulbs for rear lamps
Before you start to replace a bulb for a rear
lamp, do the following first:�
Turn the combination switch to
positionD (
�page 107).
Tail lamp unit
1Hexagon cap nut (with washer)
2Rear fog lamp (only driver’s side), tail
lamp, parking and standing lamp
3Side marker lamp
4Turn signal lamp
5Backup lamp
6Brake lamp
��
Page 333 of 356

331 Index
Automatic headlamp mode 108
Automatic interior lighting control
Activating 114
Deactivating 114
Automatic locking when driving 93
Automatic transmission
Accelerator position 124
Emergency operation
(Limp Home Mode) 126
Gear ranges 122
Gear selector lever position 123
Gear shifting malfunctions 126
Kickdown 124
Manual shifting 121
One-touch gearshifting 121
Selector lever position 120
Towing a trailer 125
Transmission fluid 227
B
BabySmart
TM
Airbag deactivation system 70
Compatible child seats 70, 323
Self-test 70
BabySmart
TM airbag
deactivation system 323Backrest tilt 36
Backup lamps 275, 279
Bulbs 275
BAS 78, 323
Malfunction indicator lamp 251, 252,
253
Warning lamp 251
Batteries, remote control
Replacing 273
Battery discharged
Jump starting 291
Battery indicator lamp
Indicator lamp 261
Battery, vehicle 228, 272
Charging 289
Disconnecting 289
Reconnecting 289
Reinstalling 289
Removing 289
Bi-Xenon headlamps* 323
Block heater (Canada only) 236
Blocking
Rear door window operation 74
Brake assist system (BAS) 323
Brake fluid 314
Brake lamp bulbs 275Brake pad wear
Indicator lamp 261
Brakes 198
Warning lamp 250
Break-in period 196
Bulbs, replacing 274
Additional turn signals 274
Backup lamps 275
Brake lamps 275
Fog lamps 274
Front fog lamp 279
Front lamps 274
High beam 274
High mounted brake lamp 281
License plate lamps 275, 281
Low beam 274
Parking, standing lamp 274
Rear fog lamps 279
Rear side marker lamp bulbs 279
Side marker lamps 274, 275
Standing lamps 274
Tail lamp assemblies 279
Turn signal lamps 274, 275
Turn signal, side marker lamp 274
Page 338 of 356

336 IndexEngine oil 223, 314
Adding 226
Additives 314
Checking level 223
Consumption 223
Messages in display 224
Oil dipstick 226
Viscosity 324
Enlarged cargo compartment 100
Error
Display messages 263
ESP 25, 80, 324
Indicator lamp 251
LOW RANGE mode 81
Malfunction indicator lamp 251, 252,
253
Switching off 81
Switching on 82
Synchronizing 252
Warning lamp 258
ETD 324
Safety guidelines 62
ETD (Emergency tensioning device) 67Exterior mirrors
Folding 130
Exterior rear view mirrors
Adjusting 41
Folding electrically 130
F
Fastening the seat belts 43
Fine adjustment
Cruise control 155
First aid kit 264
Flat tire 284
Lowering the vehicle 287
Preparing the vehicle 284
Spare wheel 266
Flexible Service System (FSS) 237, 324
Fluid level
Automatic transmission 227
Fog lamps 111
Replacing bulbs 274
Fog lamps, front
Replacing bulbs 276
Switching on 112
Folding
Exterior mirrors 130Folding electrically
Exterior rear view mirrors 130
4-ETS 25, 79
Indicator lamp 259
LOW RANGE mode 80
Malfunction indicator lamp 259
Warning lamp 258
Front airbags 63
Front fog lamps
Indicator lamp 260
Front lamps
Replacing bulbs 274, 276
Front towing eye 295
Front turn signal bulbs
Replacing 278
FSS (Flexible Service System) 237, 324
Fuel 220
Additives 315
Fuel reserve warning lamp 259
Gasoline additives 315
Premium unleaded gasoline 220,
315
Requirements 315
Reserve warning 25
Page 341 of 356

339 Index
Intermittent wiping 132
J
Jack 265
Jump starting 291
K
Key
Global locking 89
Global unlocking 89
Loss of 90
Positions in steering lock 33
Remote control with folding key 88
Unlocking liftgate 89
Unlocking the driver’s door,
fuel filler flap 89
Key, Mechanical 268
Key, Remote control
Unlocking with 32
Kickdown 124, 325
L
Labels, identification 304
Lamp bulbs, exterior 274
Lamps, exterior
Front 274
Rear 275Lamps, indicator and warning
4-ETS 258, 259
ABS 248
Adjustable steering column 260
AIRBAG OFF 63, 249
BAS 78, 251, 252
Battery indicator lamp 261
Brake pad wear 261
Brakes 250
CHECK ENGINE 254, 255
CHECK Engine malfunction indicator
lamp 255
Coolant 256
EBP 251
Engine diagnostics 254, 255
ESP 251, 252, 258
Front fog lamps 260
Fuel reserve 259
Low engine oil level 260
LOW RANGE 259
Low washer system fluid level 260
Seat belts 260
Service indicator 237
SRS 262
Turn signals 25LATCH child seat anchors 73
LATCH child seat mounts 73
Layout of poly-V-belt drive 305
Leather upholstery
Cleaning 245
Lever
For cruise control 153
License plate lamps
Replacing bulbs 275, 281
Liftgate
Closing 92
Opening 89, 91
Opening from inside 91
Opening from outside 91
Light alloy wheels
Cleaning 244
Lighter see cigarette lighter