Page 88 of 356
86 Safety and SecurityAnti-theft systemsVehicles without trip computer*
The buttons are located in the overhead
control panel.
1Switching off tow-away alarm and glass
breakage sensor
�
Turn key in steering lock to position2
(�page 33).
�
Return key to position0 and remove it
from the steering lock.
�
Within 30 seconds press button1 on
the right or left side.
�
Exit vehicle and lock vehicle with
remote control (
�page 32).
The tow-away alarm and glass breakage
sensor remain switched off until the key is
inserted in steering lock and turned to
position1.Canceling the alarm
To cancel the alarm:
�
Switch on ignition (
�page 33).
or
�
Press theŒ or ‹button on the
remote control.
The alarm is canceled.
Page 91 of 356

89 Controls in detail
Locking and unlocking
Unlocking
Global unlocking�
Press buttonΠtwice.
All turn signal lamps flash once. The
locking knobs in the doors move up.
The anti-theft alarm system is switched
off.
The vehicle will lock again automatically
and reactivate the anti-theft alarm system
within approximately 40 seconds of
unlocking if:
�
neither door nor liftgate is opened
�
the key is not inserted in the starter
switch
�
the central locking switch is not
activatedUnlocking the driver’s door and fuel
filler flap
�
Press buttonΠonce.
All turn signal lamps flash once. The
locking knob in the driver’s door moves
up. The anti-theft alarm system is
switched off.
Unlocking the liftgate
�
Press buttonŠ.
Only the liftgate unlocks.
Locking
�
Press button‹ once.
All turn signal lamps flash three times
to indicate that all doors, the liftgate
and the fuel filler flap are locked. The
anti-theft alarm system is activated.
Warning!
G
When leaving the vehicle, always remove the
key from the steering lock, and lock your ve-
hicle. Do not leave children unattended in
the vehicle, or with access to an unlocked
vehicle. Unsupervised use of vehicle equip-
ment may cause an accident and / or seri-
ous personal injury.!To prevent possible malfunction, avoid
exposing the remote control to high
levels of electromagnetic radiation.iIf the key is inserted in the steering
lock, the vehicle cannot be locked or
unlocked with the remote control.
Page 93 of 356

91 Controls in detail
Locking and unlocking
Rear doors�
Pull up locking knob1 on the respec-
tive rear door.
�
Pull on door handle2 on the respec-
tive rear door to open door.
Opening the liftgate
Opening the liftgate from outside
A minimum height clearance of 7 ft
(2.15 m) is required to open the liftgate.
The handle is located above the rear
license plate recess.
1Grip molding
2Handle
The vehicle must be unlocked.�
Pull on handle2.
�
Swing the liftgate upward by using the
grip molding1.Opening the liftgate from inside
A minimum height clearance of 7 ft
(2.15 m) is required to open the liftgate.
The release lever is located on the inside of
the liftgate.
1Release lever
2Catch
�
To unlock the liftgate, move the
catch2 to the right.
iIf the vehicle has previously been
locked from the outside using the
remote control, opening a door from
the inside will trigger the alarm.
To cancel the alarm, do one of the
following:�
Switch on the ignition by turning
the key in the steering lock to
position2.
�
Press the‹ or Œbutton on
the remote control.
!Always make sure that there is suffi-
cient overhead clearance.
��
Page 94 of 356

92 Controls in detailLocking and unlocking�
Pull release lever1 down and swing
liftgate upward.
Closing the liftgate
1Recessed grip
2Grip molding
�
Pull down on recessed grip1.
�
Close liftgate by using grip molding2.
!Always make sure that there is suffi-
cient overhead clearance.iTo lock the liftgate, move the catch2
to the left.
Warning!
G
To prevent possible personal injury, always
keep hands and fingers away from the lift-
gate opening when closing the liftgate. Be
especially careful when small children are
around.
Do not close the liftgate from the inside by
pulling on the handle.
When leaving the vehicle, always remove the
key from the steering lock and lock the vehi-
cle. Do not leave children unattended in the
vehicle. Children could open the liftgate
from inside, which could result in an acci-
dent and / or serious personal injury.
Warning!
G
Only drive with the liftgate closed as exhaust
fumes may enter the vehicle interior.iDo not place the key in the cargo com-
partment. You may lock yourself out.iIf the vehicle was previously centrally
locked, the liftgate lid will lock auto-
matically when closed. The turn signals
will flash three times to confirm lock-
ing.
��
Page 96 of 356

94 Controls in detailLocking and unlockingActivating�
Press and hold upper part1 of the
central locking switch for approximate-
ly six seconds.
The automatic central locking is
activated.
Deactivating
�
Press and hold lower part2 of the
central locking switch for approximate-
ly six seconds.
The automatic central locking is deacti-
vated.
Locking and unlocking from the inside
You can lock or unlock the doors and the
liftgate from inside using the central lock-
ing switch. This can be useful, for example,
if you want to lock the vehicle before start-
ing to drive.
The fuel filler flap cannot be locked or un-
locked with the central locking switch.
The switch is located on the lower center
console (
�page 93).
Locking
�
Press upper part1 of central locking
switch.
If all the doors are closed, the vehicle
locks.
Unlocking
�
Press lower part2 of central locking
switch.
The vehicle unlocks.
Warning!
G
When leaving the vehicle, always remove the
key from the steering lock and lock the vehi-
cle. Do not leave children unattended in the
vehicle, or with access to an unlocked vehi-
cle. Unsupervised use of vehicle equipment
may cause an accident and / or serious per-
sonal injury.
iYou can open a locked door from the
inside. Open door only when conditions
are safe to do so.
If the vehicle was previously centrally
locked using the remote control, it will
not unlock using the central locking
switch.
Page 107 of 356

105 Controls in detail
Memory function*
�Memory function*
With the memory button you can store up
to three different settings for the driver-
and passenger seat.
Together with the driver’s seat you can
store the exterior rear view mirrors.
For the front passenger seat you can store
the seat position.
1Position button
2Memory button
�
Switch on ignition (
�page 33).
!Prior to operating the vehicle, the driv-
er should check and adjust the seat
height, seat position fore and aft, and
seat backrest angle if necessary, to
ensure adequate control, reach and
comfort. The head restraint should also
be adjusted for proper height. See also
the section on airbags (
�page 59) for
proper seat positioning.
In addition, adjust the steering wheel to
ensure adequate control, reach, opera-
tion and comfort. Both the interior and
exterior rear view mirrors should be ad-
justed for adequate rear vision.
Fasten seat belts. Infants and small
children should be seated in a properly
secured restraint system that complies
with U.S. Federal Motor Vehicle Safety
Standard 213 and 225 and Canadian
Motor Vehicle Safety Standards 213
and 210.2.
Warning!
G
Do not activate the memory function while
driving. Activating the memory function
while driving could cause the driver to lose
control of the vehicle.
Page 109 of 356
107 Controls in detail
Lighting
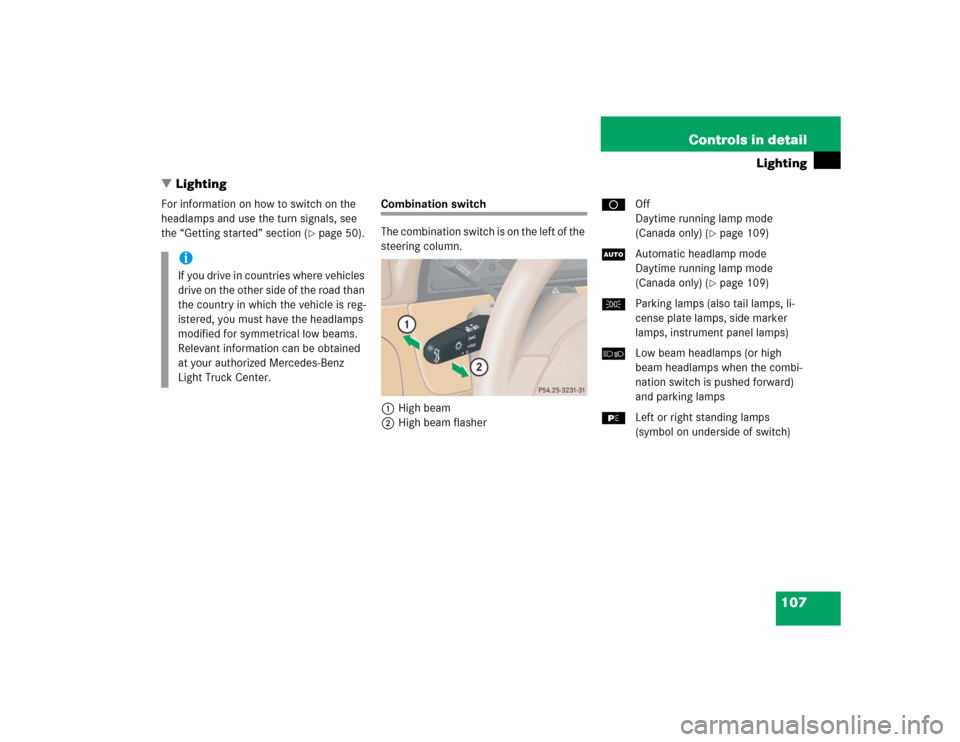
�Lighting
For information on how to switch on the
headlamps and use the turn signals, see
the “Getting started” section (
�page 50).
Combination switch
The combination switch is on the left of the
steering column.
1High beam
2High beam flasherDOff
Daytime running lamp mode
(Canada only) (
�page 109)
UAutomatic headlamp mode
Daytime running lamp mode
(Canada only) (�page 109)
CParking lamps (also tail lamps, li-
cense plate lamps, side marker
lamps, instrument panel lamps)
õLow beam headlamps (or high
beam headlamps when the combi-
nation switch is pushed forward)
and parking lamps
ƒLeft or right standing lamps
(symbol on underside of switch)
iIf you drive in countries where vehicles
drive on the other side of the road than
the country in which the vehicle is reg-
istered, you must have the headlamps
modified for symmetrical low beams.
Relevant information can be obtained
at your authorized Mercedes-Benz
Light Truck Center.
Page 110 of 356

108 Controls in detailLightingManual headlamp mode
The low beam headlamps and the parking
lamps can be switched on and off with the
combination switch.
Automatic headlamp mode
The following lamps switch on and off au-
tomatically depending on the brightness of
the ambient light.�
Low beam headlamps
�
Tail and parking lamps
�
License plate lamps
�
Side marker lamps
�
Turn the combination switch to
positionU.
With the key in steering lock position1
only the parking lamps will switch on
and off automatically.
With the engine is running, the low
beam headlamps, the tail and parking
lamps, the license plate lamps, and the
side marker lamps will switch on and
off automatically.
They will be switched on constantly,
when you switch on the front fog
lamps.
iWith the key removed from the steering
lock and the driver’s door open, a warn-
ing sounds if the parking lamps or low
beam headlamps are switched on
(�page 107).
Warning!
G
If the combination switch is set toU�
the headlamps may switch off unexpect-
edly when the system senses bright am-
bient light, for example light from
oncoming traffic.
�
the headlamps will not be automatically
switched on under foggy conditions.
To minimize risk to you and to others, acti-
vate headlamps by turning combination
switch toõ when driving or when traffic
and / or ambient lighting conditions require
you to do so.
In low ambient lighting conditions, only
switch from positionU toõ with the
vehicle at a standstill. Switching
fromUtoõ will briefly switch off the
headlamps. Doing so while driving in low
ambient lighting conditions may result in an
accident.
The automatic headlamp feature is only an
aid to the driver. The driver is responsible for
the operation of the vehicle’s lights at all
times.