Page 246 of 356
244 OperationVehicle careLight alloy wheels
Mercedes-Benz approved Wheel Care
should be used for regular cleaning of the
light alloy wheels.
If possible, clean wheels once a week with
Mercedes-Benz approved Wheel Care, us-
ing a soft bristle brush and a strong spray
of water.
Follow instructions on container.Instrument cluster
Use a gentle dishwashing detergent or
mild detergent for delicate fabrics as a
washing solution. Wipe with a cloth moist-
ened in lukewarm solution. Do not use
scouring agents.
Steering wheel and gear selector lever
Wipe with a damp cloth and dry thoroughly
or clean with Mercedes-Benz approved
Leather Care.
Cup holder
Use a gentle dishwashing detergent or
mild detergent for delicate fabrics as a
washing solution. Wipe with a cloth moist-
ened in lukewarm solution. Do not use
scouring agents.Hard plastic trim items
Pour Mercedes-Benz approved Interior
Care onto soft lint-free cloth and apply
with light pressure.
Headliner and rear window shelf
Clean with soft bristle brush, or use a
dry-shampoo cleaner in case of excessive
dirt.
Seat belts
The webbing must not be treated with
chemical cleaning agents. Only use clear,
lukewarm water and soap. Do not dry the
webbing at temperatures above 176°F
(80°C) or in direct sunlight.
!Fold the windshield wiper arms back
onto the windshield before turning the
key in the steering lock.
Hold on to the wiper when folding the
wiper arm back. If released, the force
of the impact from the tensioning
spring could crack the windshield.iOnly use acid-free cleaning materials.
Acid may cause corrosion or damage
the clear coat.
Warning!
G
Do not bleach or dye seat belts as this may
severely weaken them. In a crash they may
not be able to provide adequate protection.
Page 250 of 356
248 Practical hintsWhat to do if …Lamps in instrument clusterGeneral information:
If a bulb in the instrument cluster fails to
come on during the bulb self-check when switching on ignition, have it checked and
replaced if necessary.Problem
Possible cause
Suggested solution
-
The yellow ABS malfunction
indicator lamp comes on while
driving.
ABS has detected a malfunction and has
switched off. The BAS, ESP, and 4-ETS are
also switched off.
The brake system is still functioning normally
but without ABS available.
�
Continue driving with added caution.
Wheels may lock during hard braking
reducing steering capability.
�
Have the system checked at an autho-
rized Mercedes-Benz Light Truck Cen-
ter as soon as possible.
Failure to follow these instructions in-
creases the risk of an accident.
The charging voltage has fallen below
10 volts. The ABS has switched off.
When the voltage is above this value
again, the ABS is operational again.�
If necessary, have the generator
(alternator) and the battery checked.
Page 254 of 356
252 Practical hintsWhat to do if …Problem
Possible cause
Suggested solution
¿
The yellow BAS / ESP malfunc-
tion indicator lamp comes on
while driving.
The ESP is no longer synchronized following
a voltage supply interruption (e.g. battery dis-
connected or discharged).
Synchronize the ESP:�
With vehicle stationary and the engine
running, turn the steering wheel
completely to the left and then to the
right.
If the BAS / ESP indicator lamp does not
go out:
�
Continue driving with added caution.
�
Visit an authorized Mercedes-Benz
Light Truck Center as soon as possi-
ble.
Failure to follow these instructions
increases the risk of an accident.
!When synchronizing the ESP, make
sure you can turn the steering wheel in
both directions as far as it will go with-
out the wheels hitting any objects, e.g.
a road curb.
Page 286 of 356
284 Practical hintsFlat tireMounting the spare wheel Preparing the vehicle
�
Park the vehicle as far as possible from
moving traffic on a hard surface.
�
Turn on the hazard warning flashers.
�
Engage the steering wheel lock in the
straight ahead position.
�
Set the parking brake.
�
Move the gear selector lever toP.
�
Have any passenger exit the vehicle at
a safe distance from the roadway.
�
Take the spare wheel out of its carrier
(�page 266).Lifting the vehicle
�
Prevent the vehicle from rolling away
by blocking wheels with wheel chocks
(not included) or other sizable objects.
When changing wheel on a level surface:
�
Place one chock in front of and one be-
hind the wheel that is diagonally oppo-
site to the wheel being changed.
When changing wheel on a hill:
�
Place chocks on the downhill side
blocking both wheels of the other axle.
�
Take the two-piece wheel wrench and
the jack out of the rear cargo compart-
ment (
�page 264). Assemble wheel
wrench.
Warning!
G
The dimensions of the spare wheel are dif-
ferent from those of the road wheels. As a
result, the vehicle handling characteristics
change when driving with a mounted spare
wheel. Adapt your driving style accordingly.
The spare wheel is for temporary use only.
When driving with spare wheel mounted,
make sure proper tire pressure and do not
exceed vehicle speed of 50 mph (80 km / h).
Drive to the nearest Mercedes-Benz Light
Truck Center as soon as possible to have the
spare wheel replaced with a regular road
wheel.
Never operate the vehicle with more than
one spare wheel mounted.
iOpen door only when conditions are
safe to do so.
Page 295 of 356
293 Practical hints
Towing the vehicle
�Towing the vehicle
Mercedes-Benz recommends that the
vehicle be transported with all wheels off
the ground using flatbed or appropriate
wheel lift / dolly equipment. This method is
preferable to other types of towing.When circumstances do not permit the
recommended towing methods, the
vehicle may be towed with all wheels on
the ground only so far as necessary to have
the vehicle moved to a safe location where
the recommended towing methods can be
employed.
!Use flatbed or wheel lift / dolly equip-
ment, with key in steering lock turned
to position0.
Do not tow with sling-type equipment.
Towing with sling-type equipment over
bumpy roads will damage radiator and
supports.
To prevent damage during transport,
do not tie down vehicle by its chassis or
suspension parts. Use the towing eyes.
Switch off the ESP (
�page 81),
tow-away alarm (
�page 85) and the
automatic central locking (
�page 93).
!When towing the vehicle with all wheels
on the ground, the gear selector lever
must be in positionN and the key must
be in steering lock position2.
When towing the vehicle with all wheels
on the ground, the vehicle may be
towed only for distances up to 30 miles
(50 km) and at a speed not to exceed
30 mph (50 km / h).
If the vehicle is towed with the front
axle raised (observe instructions re-
garding flexible drive shaft), the engine
must be shut off (key in steering lock
position1). Otherwise, the 4-ETS may
become engaged which may cause loss
of towing control.
!To be certain to avoid additional dam-
age to the vehicle powertrain, however
you should observe the following:�
With damage to the front axle�
raise front axle
�
remove flexible drive shaft be-
tween rear axle and transfer
case
�
With damage to the rear axle�
raise rear axle
�
tow vehicle with wheel lift or
dolly placed under front wheels
�
With damage to the transfer case�
remove flexible drive shaft to
the drive axles
Always install new self-locking nuts
when reinstalling flexible drive shaft.
Page 296 of 356

294 Practical hintsTowing the vehicleWarning!
G
If circumstances require towing the vehicle
with all wheels on the ground, always tow
with a tow bar if:�
the engine will not run
�
there is a malfunction in the power sup-
ply or in the vehicle’s electrical system
Prior to towing the vehicle with all wheels on
the ground, make sure the key is in steering
lock position2.
If the key is left in steering lock position0
for an extended period of time, it can no
longer be turned in the switch. In this case,
the steering is locked. To unlock, remove
key from steering lock and reinsert.
Warning!
G
With the engine not running, there is no
power assistance for the brake and steering
systems. In this case, it is important to keep
in mind that a considerably higher degree of
effort is necessary to brake and steer the
vehicle. Adapt your driving accordingly.iTo signal turns while being towed with
hazard warning flasher in use, turn key
in steering lock to position2 and acti-
vate combination switch for left or right
turn signal in usual manner – only the
selected turn signal will operate.
Upon canceling the turn signal, the
hazard warning flasher will operate
again.
iThe vehicle cannot be started via
tow-start.iIf the battery is disconnected or dis-
charged, the gear selector lever will re-
main locked in positionP and the key
will not turn in the steering lock. For
more information, see “Battery”
(�page 272) and “Jump starting”
(�page 291).
For information on manual unlocking
transmission gear selector lever, see
(�page 270).
Page 297 of 356
295 Practical hints
Towing the vehicle
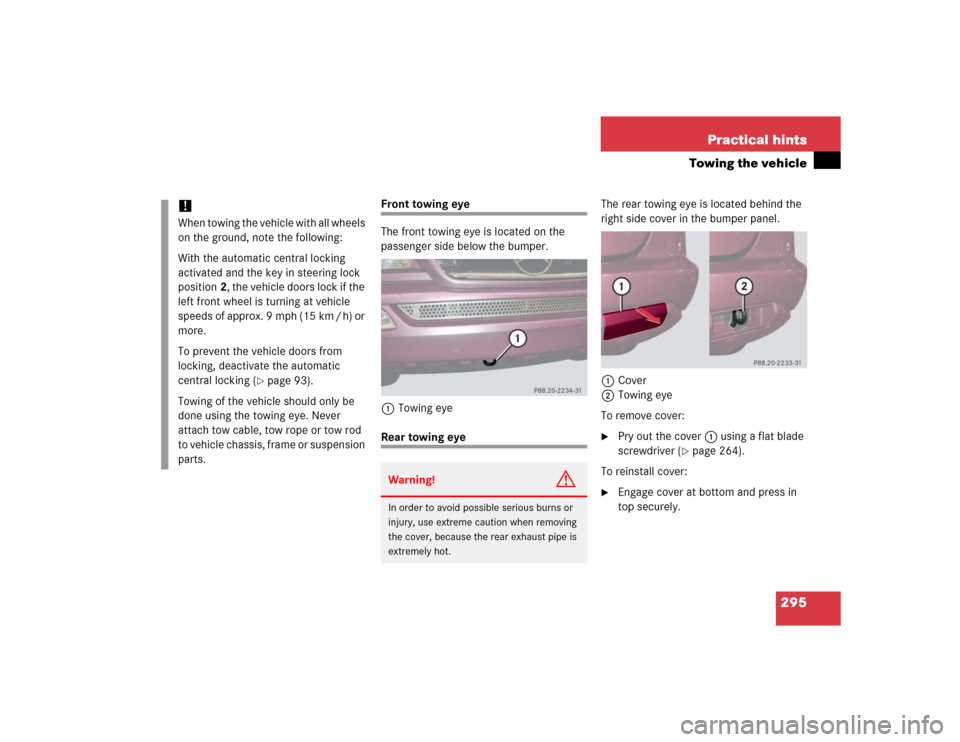
Front towing eye
The front towing eye is located on the
passenger side below the bumper.
1Towing eyeRear towing eyeThe rear towing eye is located behind the
right side cover in the bumper panel.
1Cover
2Towing eye
To remove cover:
�
Pry out the cover1 using a flat blade
screwdriver (
�page 264).
To reinstall cover:
�
Engage cover at bottom and press in
top securely.
!When towing the vehicle with all wheels
on the ground, note the following:
With the automatic central locking
activated and the key in steering lock
position2, the vehicle doors lock if the
left front wheel is turning at vehicle
speeds of approx. 9 mph (15 km / h) or
more.
To prevent the vehicle doors from
locking, deactivate the automatic
central locking (
�page 93).
Towing of the vehicle should only be
done using the towing eye. Never
attach tow cable, tow rope or tow rod
to vehicle chassis, frame or suspension
parts.
Warning!
G
In order to avoid possible serious burns or
injury, use extreme caution when removing
the cover, because the rear exhaust pipe is
extremely hot.
Page 314 of 356
312 Technical dataFuels, coolants, lubricants, etc.Capacities
Vehicle components and their respective
lubricants must match.Therefore only use products tested and
approved by Mercedes-Benz.Please refer to the Factory Approved
Service Products pamphlet, or inquire at
your Mercedes-Benz Light Truck Center.
Model
Capacity
Fuels, coolants, lubricants, etc.
Engine with oil filter
ML 350, ML 500
8.5 US qt (8.0 l)
Approved engine oils
Automatic transmis-
sion
9.0 US qt (8.5 l)
MB Automatic Transmission Oil
Transfer case
1.6 US qt (1.5 l)
(Dexron 3 or Dexron 2E)
Rear axle
1.3 US qt (1.25 l)
(Hypoid gear oil SAE 90, 85 W 90)
Front axle
1.2 US qt (1.1 l)
(Hypoid gear oil SAE 90)
Power steering
approx. 0.65 US qt (0.6 l)
MB Power Steering Fluid
Front wheel hubs
approx. 1.5oz (43g) each
High temperature roller bearing grease