Page 162 of 356

160 Controls in detailLoadingLoading instructions
The gross vehicle weight which is the
weight of the vehicle including fuel, tools,
spare wheel, installed accessories, pas-
sengers and luggage / cargo must never
exceed the Gross Vehicle Weight Rating
(GVWR) for your vehicle. In addition, the
load must be distributed in such a way so
that the weight on each axle never exceeds
the Gross Axle Weight Rating (GAWR) for
the front and rear axle. The GVWR and
GAWR for your vehicle are indicated on the
certification label which can be found on
the left door pillar.The handling characteristics of a fully load-
ed vehicle depend greatly on the load dis-
tribution. It is therefore recommended to
load the vehicle according to the illustra-
tions shown, with the heaviest items being
placed towards the front of the vehicle.
Please pay attention to and comply with
the following instructions when loading the
vehicle and transporting cargo:
�
Always place items being carried
against front or rear seat backrests,
and fasten them as securely as possi-
ble.
�
The heaviest portion of the cargo
should always be kept as low as possi-
ble against front or rear seat backrests.
Warning!
G
Always fasten items being carried as secure-
ly as possible using cargo tie-down rings and
fastening materials appropriate for the
weight and size of the load.
In an accident, during hard braking or sud-
den maneuvers, loose items will be thrown
around inside the vehicle, and can cause in-
jury to vehicle occupants unless the items
are securely fastened in the vehicle.
To help avoid personal injury during a colli-
sion or sudden maneuver, always use parti-
tion net when transporting cargo.
Never drive vehicle with the liftgate open.
Deadly carbon monoxide (CO) gases may
enter vehicle interior resulting in uncon-
sciousness and death.
Page 163 of 356
161 Controls in detail
Loading
For additional safety when transporting
cargo while the rear seats are unoccupied,
fasten the outer seat belts crosswise into
the opposite side buckles.Cargo tie-down rings
The cargo compartment is provided with
four tie-down rings. Additional two rings
are located at the rear of front seats.
Cargo tie-down ring
Carefully secure cargo by applying even
load on all rings with rope of sufficient
strength to hold down the cargo.
iThe cargo compartment is the pre-
ferred place to carry objects. The en-
larged cargo compartment should only
be used for items which do not fit in the
cargo compartment alone.
iWhile the partition net* (
�page 162)
will help protect you from smaller ob-
jects, it cannot prevent the movement
of large, heavier objects into the pas-
senger compartment in an accident.
Such items must be properly secured
using the cargo tie-down rings in the
cargo compartment floor.
Page 164 of 356

162 Controls in detailLoadingHooks
Four hooks located on the rear compart-
ment trim panels, two on each side.HooksUse the hooks to secure light weight items.
The maximum permissible weight per hook
is 9 lbs (4 kg).
Partition net*Use of the partition net is a particularly im-
portant safety factor when the vehicle is
loaded higher than the top of the seat
backrests with smaller objects.
The partition net can be installed behind
the backrests of the front or rear seats.
Engaging partition net
1Holder
2Mounting hookWarning!
G
Always lock backrest in its upright position
when rear seat bench is occupied by pas-
sengers, or cargo is being carried behind the
seat bench.
To help avoid personal injury from smaller
objects flying in the occupant compartment
during a collision or sudden maneuver, al-
ways use partition net when transporting
cargo.
The partition net cannot prevent the move-
ment of large, heavier objects into the pas-
senger compartment in an accident. Such
items must be properly secured using the
cargo tie-down rings in the cargo compart-
ment floor (
�page 161).
Passenger use of seats behind installed par-
tition net is restricted because of the foot-
well being taken up by the net.
Page 165 of 356
163 Controls in detail
Loading
�
One after the other, press the two
mounting hooks2 inward against the
spring pressure and turn them.
The mounting hooks are locked in this
position and you can move the net into
position more easily.
�
Turn one of the mounting hooks2 in
the opposite direction.
The spring pressure will push it out.
�
Engage mounting hook2 in
holder1.
�
Turn the other mounting hook and en-
gage it in the opposite holder.
�
Push both mounting hooks2 forward
into holder1.Tightening partition net
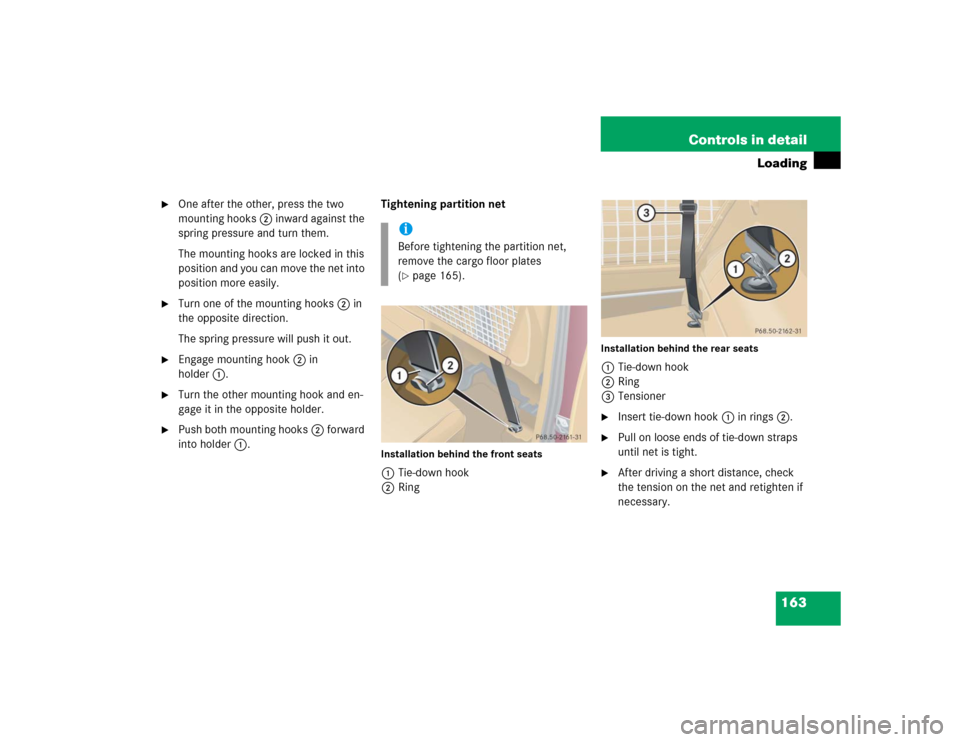
Installation behind the front seats1Tie-down hook
2Ring
Installation behind the rear seats1Tie-down hook
2Ring
3Tensioner�
Insert tie-down hook1 in rings2.
�
Pull on loose ends of tie-down straps
until net is tight.
�
After driving a short distance, check
the tension on the net and retighten if
necessary.
iBefore tightening the partition net,
remove the cargo floor plates
(�page 165).
Page 166 of 356
164 Controls in detailLoadingRemoving partition net�
Lift tensioner3 upward to a horizon-
tal position to release tensioning of the
strap.
�
Disengage tie-down hooks1 from
rings2.
�
Remove mounting hooks2
(�page 162) from holder1
(�page 162).
�
Roll up and close the partition net.
�
Store partition net behind rear seat
bench.
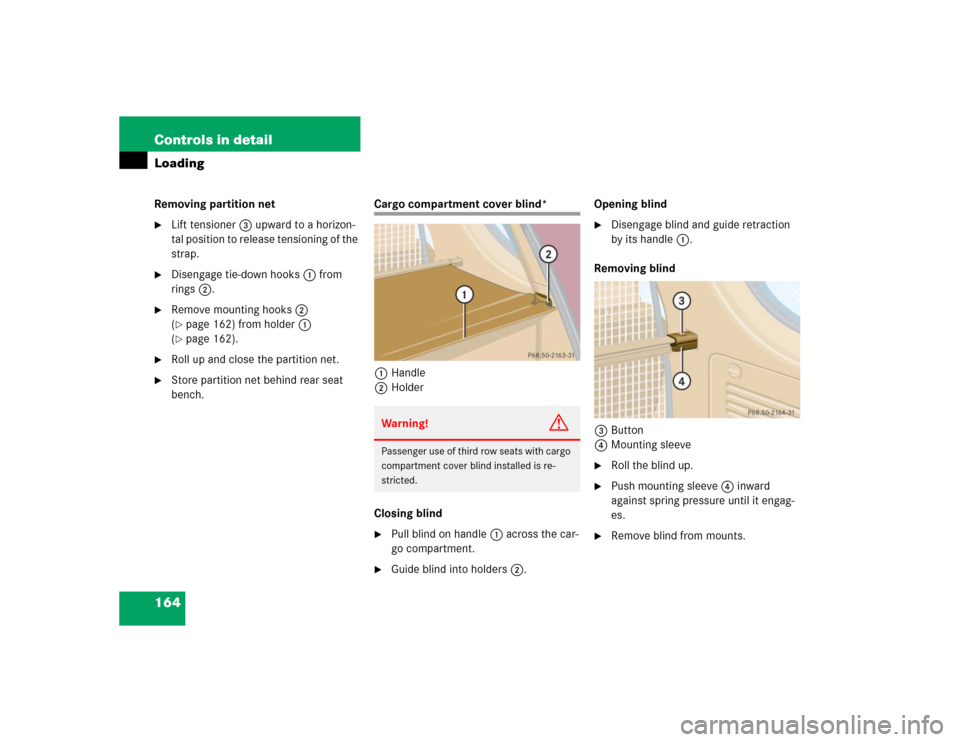
Cargo compartment cover blind*
1Handle
2Holder
Closing blind�
Pull blind on handle1 across the car-
go compartment.
�
Guide blind into holders2.Opening blind
�
Disengage blind and guide retraction
by its handle1.
Removing blind
3Button
4Mounting sleeve
�
Roll the blind up.
�
Push mounting sleeve4 inward
against spring pressure until it engag-
es.
�
Remove blind from mounts.
Warning!
G
Passenger use of third row seats with cargo
compartment cover blind installed is re-
stricted.
Page 167 of 356
165 Controls in detail
Loading
Installing blind�
Place left side of blind in left mount.
�
Position right side of blind over right
mount.
�
Push button3, releasing mounting
sleeve to slide into mount.
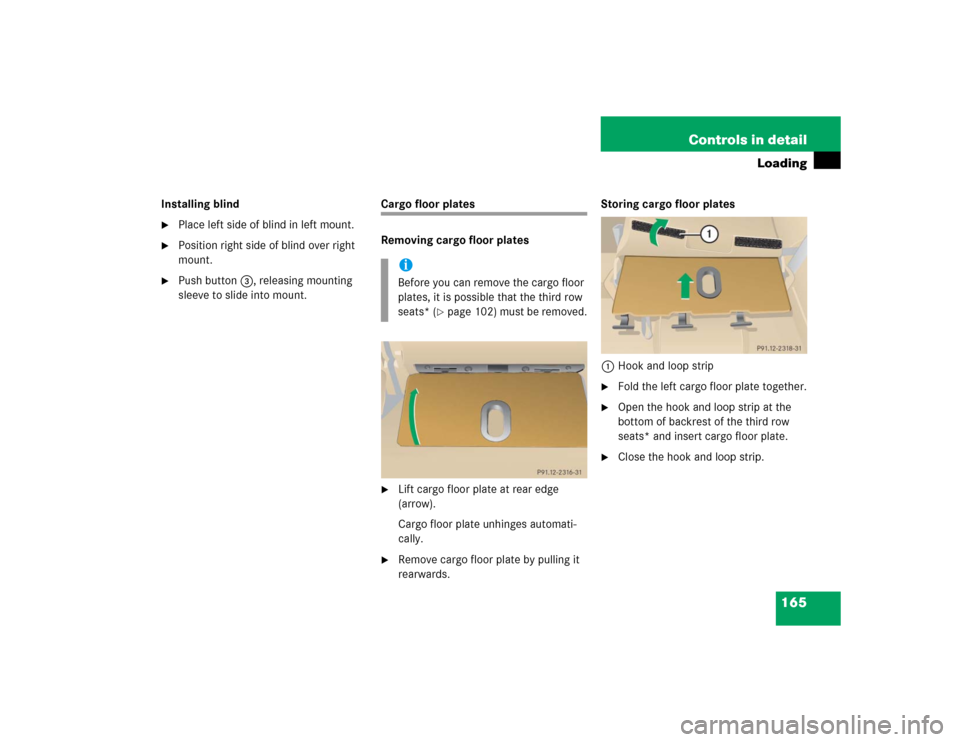
Cargo floor plates
Removing cargo floor plates�
Lift cargo floor plate at rear edge
(arrow).
Cargo floor plate unhinges automati-
cally.
�
Remove cargo floor plate by pulling it
rearwards.Storing cargo floor plates
1Hook and loop strip
�
Fold the left cargo floor plate together.
�
Open the hook and loop strip at the
bottom of backrest of the third row
seats* and insert cargo floor plate.
�
Close the hook and loop strip.
iBefore you can remove the cargo floor
plates, it is possible that the third row
seats* (
�page 102) must be removed.
Page 198 of 356

The more cautiously you treat you")
196 OperationIn the “Operation” section you will find
detailed information on operating, main-
taining and caring for your vehicle.The first 1000 miles (1500 km)
The more cautiously you treat your vehicle
during the break-in period, the more satis-
fied you will be with its performance later
on.�
Drive your vehicle during the first
1000 miles (1500 km) at varying but
moderate vehicle and engine speeds.
�
During this period, avoid heavy loads
(full throttle driving) and excessive en-
gine speeds (no more than
2/3 of max-
imum rpm in each gear).
�
Avoid accelerating by kick-down.
�
Do not attempt to slow the vehicle
down by shifting to a lower gear using
the gear selector lever.
�
Select positions3, 2 or1 only when
driving at moderate speeds (for hill
driving).After 1000 miles (1500 km) you may grad-
ually increase vehicle and engine speeds
to the permissible maximum.
All of the above instructions, as may apply
to your vehicle type, also apply when the
first 1000 miles (1500 km) after the en-
gine, the transfer case, the front differen-
tial or the rear differential has been
replaced.
iAlways obey applicable speed limits.
Page 211 of 356
.
�
Cross obstacles (e.g")
209 Operation
Driving instructions
Crossing obstacles
�
Check the vehicle clearance before
crossing obstacles.
�
Select gear range1 on the automatic
transmission (
�page 122).
�
Cross obstacles (e.g. tree stumps or
big rocks) very slowly by aiming one of
the front wheels at the center of the ob-
stacle, and repeat same with the rear
wheel.
!Obstacles can damage the vehicle
undercarriage or suspension compo-
nents. If possible use the assistance of
a second person outside the vehicle to
scout the path you intend to take and
check for adequate ground clearance
when you cross obstacles with your ve-
hicle. The person assisting you outside
the vehicle should always be a safe dis-
tance away from the vehicle and posi-
tioned so that he or she cannot get hurt
in case of any unexpected vehicle
movement.
After off-road driving or crossing obsta-
cles, inspect vehicle for any damage,
especially vehicle undercarriage and
suspension components. Failure to do
so can adversely affect the vehicle's fu-
ture performance, including increased
chance of an accident.
!Special attention is needed when you
cross obstacles on a steep incline.
The vehicle could slide sideways as a
result of its possible slanted position
which in turn may result in the vehicle
tipping or rolling over.