Page 103 of 356
101 Controls in detailSeats
The red backrest lock indicator at lock
button1 is not visible in the locked
position.
�
Install head restraint (
�page 96).
�
Slide seat rearward to desired position
(�page 100).
�
Adjust front seats to desired position.
Manual seats (
�page 36) or power
seats (
�page 38).
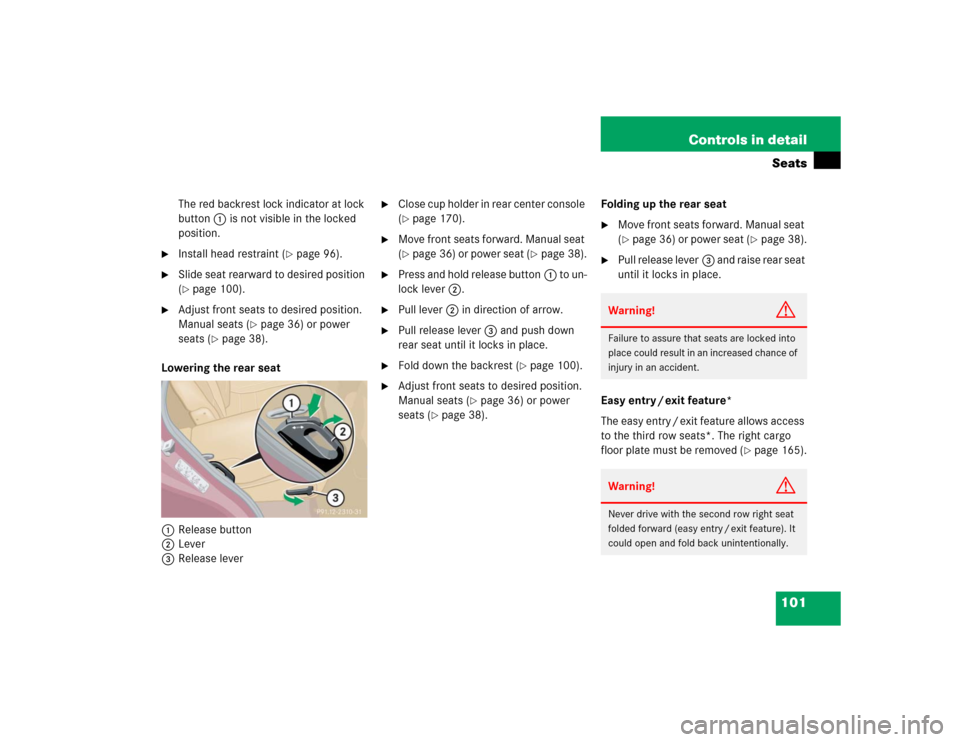
Lowering the rear seat
1Release button
2Lever
3Release lever
�
Close cup holder in rear center console
(�page 170).
�
Move front seats forward. Manual seat
(�page 36) or power seat (
�page 38).
�
Press and hold release button1 to un-
lock lever2.
�
Pull lever2 in direction of arrow.
�
Pull release lever3 and push down
rear seat until it locks in place.
�
Fold down the backrest (
�page 100).
�
Adjust front seats to desired position.
Manual seats (
�page 36) or power
seats (
�page 38).Folding up the rear seat
�
Move front seats forward. Manual seat
(�page 36) or power seat (
�page 38).
�
Pull release lever3 and raise rear seat
until it locks in place.
Easy entry / exit feature*
The easy entry / exit feature allows access
to the third row seats*. The right cargo
floor plate must be removed (
�page 165).
Warning!
G
Failure to assure that seats are locked into
place could result in an increased chance of
injury in an accident.Warning!
G
Never drive with the second row right seat
folded forward (easy entry / exit feature). It
could open and fold back unintentionally.
Page 116 of 356
114 Controls in detailLightingInterior lighting
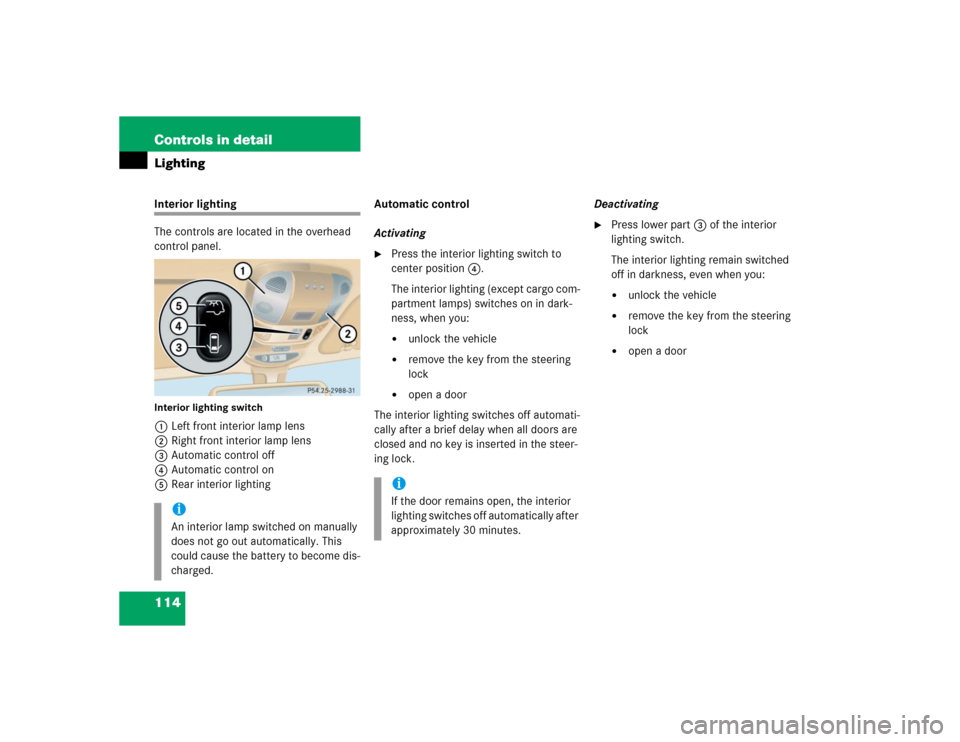
The controls are located in the overhead
control panel.Interior lighting switch1Left front interior lamp lens
2Right front interior lamp lens
3Automatic control off
4Automatic control on
5Rear interior lightingAutomatic control
Activating
�
Press the interior lighting switch to
center position4.
The interior lighting (except cargo com-
partment lamps) switches on in dark-
ness, when you:�
unlock the vehicle
�
remove the key from the steering
lock
�
open a door
The interior lighting switches off automati-
cally after a brief delay when all doors are
closed and no key is inserted in the steer-
ing lock.Deactivating
�
Press lower part3 of the interior
lighting switch.
The interior lighting remain switched
off in darkness, even when you:�
unlock the vehicle
�
remove the key from the steering
lock
�
open a door
iAn interior lamp switched on manually
does not go out automatically. This
could cause the battery to become dis-
charged.
iIf the door remains open, the interior
lighting switches off automatically after
approximately 30 minutes.
Page 130 of 356

128 Controls in detailGood visibilityFor more information, see “Windshield
wipers” (
�page 51) and “Mirrors”
(
�page 41).
Rear view mirrors
Interior rear view mirror, antiglare
position
1Lever
�
Tilt the mirror to the antiglare night po-
sition by moving lever1 towards the
windshield.
The interior rear view mirror is dimmed.
Automatic antiglare rear view mirrors*
The reflection brightness of the exterior
rear view mirror on the driver’s side and
the interior rear view mirror will respond
automatically to glare when:
�
the automatic antiglare function is acti-
vated (
�page 129)
�
the ignition is switched on
�
incoming light from headlamps falls on
the sensor in the interior rear view
mirror
The rear view mirror will not react if
�
reverse gear is engaged
�
the interior light is turned on
Warning!
G
The automatic antiglare function does not
react if incoming light is not aimed directly
at sensors in the interior rear view mirror.
The interior rear view mirror and the exterior
rear view mirror on the driver’s side do not
react, for example, if the cargo compart-
ment is fully loaded.
Glare can endanger you and others.Warning!
G
In the case of an accident, liquid electrolyte
may escape from the mirror housing if the
mirror glass breaks.
Electrolyte has an irritating effect. Do not al-
low the liquid to come into contact with
eyes, skin, clothing, or respiratory system.
In case it does, immediately flush affected
area with water, and seek medical help if
necessary.
Page 131 of 356
129 Controls in detail
Good visibility
Activating
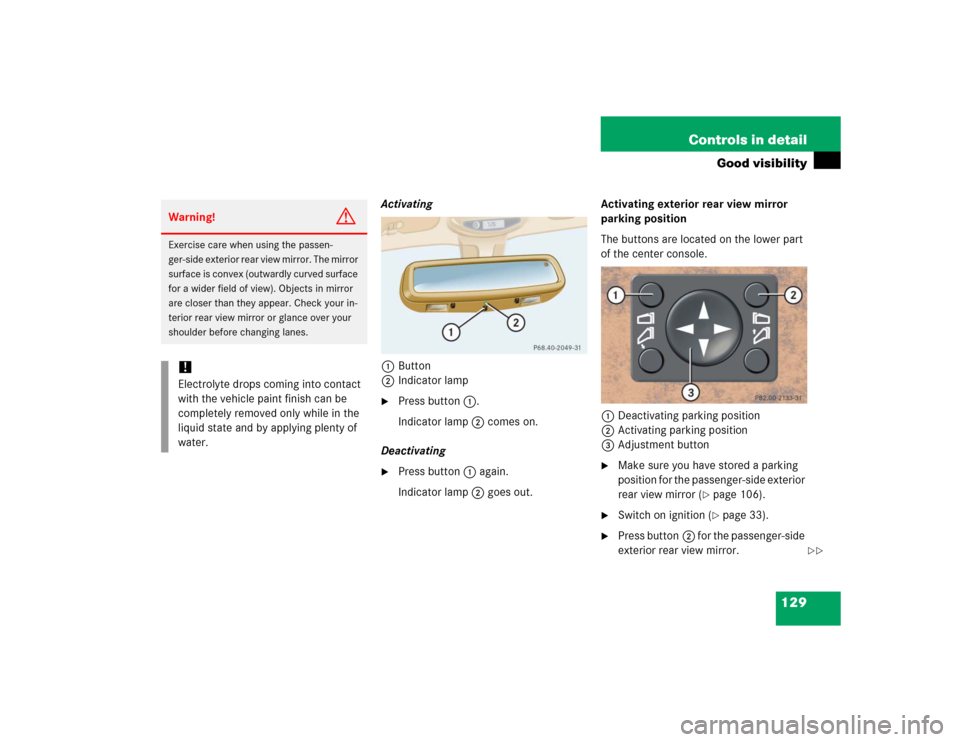
1Button
2Indicator lamp�
Press button1.
Indicator lamp2 comes on.
Deactivating
�
Press button1 again.
Indicator lamp2 goes out.Activating exterior rear view mirror
parking position
The buttons are located on the lower part
of the center console.
1Deactivating parking position
2Activating parking position
3Adjustment button
�
Make sure you have stored a parking
position for the passenger-side exterior
rear view mirror (
�page 106).
�
Switch on ignition (
�page 33).
�
Press button2 for the passenger-side
exterior rear view mirror.
Warning!
G
Exercise care when using the passen-
ger-side exterior rear view mirror. The mirror
surface is convex (outwardly curved surface
for a wider field of view). Objects in mirror
are closer than they appear. Check your in-
terior rear view mirror or glance over your
shoulder before changing lanes.!Electrolyte drops coming into contact
with the vehicle paint finish can be
completely removed only while in the
liquid state and by applying plenty of
water.
��
Page 132 of 356
130 Controls in detailGood visibility�
Place the gear selector lever in reverse
gearR.
The passenger-side exterior rear view
mirror will be turned downward to the
stored position.
The exterior rear view mirror returns to its
previously stored driving position:
�
ten seconds after you put the gear
selector lever in positionD
�
immediately once you exceed a vehicle
speed of approx. 6 mph (10 km / h)
�
immediately when you press the
button1 for driver’s side mirrorElectrically folding exterior rear view
mirrors
Folding exterior mirrors in and out
manually*
The exterior rear view mirrors can vibrate if
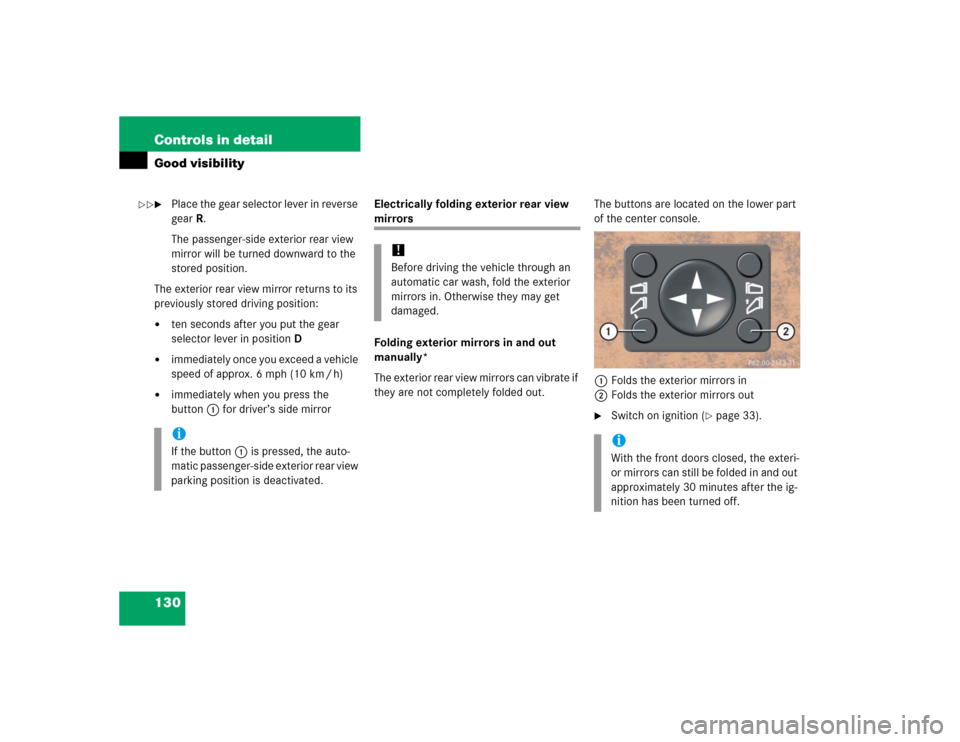
they are not completely folded out.The buttons are located on the lower part
of the center console.
1Folds the exterior mirrors in
2Folds the exterior mirrors out
�
Switch on ignition (
�page 33).
iIf the button1 is pressed, the auto-
matic passenger-side exterior rear view
parking position is deactivated.
!Before driving the vehicle through an
automatic car wash, fold the exterior
mirrors in. Otherwise they may get
damaged.
iWith the front doors closed, the exteri-
or mirrors can still be folded in and out
approximately 30 minutes after the ig-
nition has been turned off.
��
Page 133 of 356
131 Controls in detail
Good visibility
Folding in�
Briefly press button1 (
�page 130).
The mirrors fold in.Folding out
�
Briefly press button2.
The mirrors fold out.
Windshield wipers
For more information on the windshield
wipers, see the “Getting started” section
(�page 51).
!Before you drive the vehicle through an
automatic car wash, fold the exterior
mirrors in, otherwise they may get
damaged.iIf you are driving at more than approxi-
mately 9 mph (15 km / h), you will not
able to fold the exterior mirrors in.
!If an exterior rear view mirror housing
is forcibly pushed forward (hit from the
rear), reposition it manually by applying
firm pressure until it snaps back into
place.
If an exterior rear view mirror is forcibly
pushed rearward (hit from the front)
press button1 to fold mirrors in, then
press button2 to fold mirrors out. Do
not force mirrors by hand as this may
damage the adjustment mechanism.
The mirror housing is now properly po-
sitioned and you can adjust the mirror
normally.
!If leaves, snow, etc. block the wind-
shield wipers, the wiper motor turns
off.�
For safety reasons, withdraw key
from steering lock. Remove block-
age.
�
Turn the windshield wipers on
again.
If windshield wipers fail to function at
all in switch position1,
�
set the wiper switch to the next
highest wiper speed.
�
have the windshield wipers
checked at the nearest authorized
Mercedes-Benz Light Truck Center.
Page 158 of 356

156 Controls in detailDriving systemsParktronic* system (Parking assist)
The Parktronic system is an electronic and
designed to assist the driver during park-
ing maneuvers. It visually and audibly indi-
cates the relative distance between the
vehicle and an obstacle.
The Parktronic system is automatically
activated when you switch on the ignition.
The Parktronic system deactivates at
speeds over approximately 10 mph
(15 km / h). At lower speeds the Parktronic
system turns on again.The Parktronic system monitors the sur-
roundings of your vehicle with six sensors
in the front bumper and four sensors in the
rear bumper.
1Sensors located in front bumperWarning!
G
The Parktronic is a supplemental system. It
is not intended to, nor does it replace, the
need for extreme care. The responsibility
during parking and other critical maneuvers
always rests with the driver.
Special attention must be paid to objects
with smooth surfaces or low silhouettes
(e.g. trailer couplings, painted posts, or road
curbs). Such objects may not be detected by
the system and can damage the vehicle.
The operational function of the Parktronic
system can be affected by dirty sensors, es-
pecially at times of snow and ice. See
“Cleaning the Parktronic system sensors”
(�page 243).
Interference caused by other ultrasonic sig-
nals (e.g. working jackhammers, car wash,
or the air brakes of trucks) can cause the
system to send erratic indications, and
should be taken into consideration.
Warning!
G
Make sure that no persons or animals are in
the area in which you are maneuvering. You
could otherwise injure them.
Page 159 of 356

157 Controls in detail
Driving systems
Range of the sensors
To function properly, the sensors must be
free of dirt, ice, snow and slush. Clean the
sensors regularly, being careful not to
scratch or damaging the sensors.Front sensors
Rear sensorsMinimum distance
When an obstacle is located in this area, all
warning displays will light up and a warning
tone will sound. If the vehicle moves closer
than the minimum distance to an object,
the distance may no longer be displayed.
Center
approx. 39.4 in (100 cm)
Corners
approx. 23.6 in (60 cm)
Center
approx. 47.2 in (120 cm)
Corners
approx. 31.5 in (80 cm)
!During parking maneuvers, pay special
attention to objects located above or
below the height of the sensors (e.g.
planters or trailer hitches). The Park-
tronic system will not detect such ob-
jects at close range and damage to
your vehicle or the object may result.
Ultrasonic signals from outside sourc-
es (e.g. truck air brakes or jackham-
mers) may impair the operation of the
Parktronic system.
Center
approx. 8 in (20 cm)
Corners
approx. 6 in (15 cm)